
Part of our Start Here: A New Ham’s Guide to Getting On The Air guide.
Over the last few weeks I have built nine free tools into QSO Journey for the questions I hear over and over at Tech Sessions, VE sessions and club nets: which radio to buy, where you can transmit, how to program the thing, how long to cut the antenna, how far it will talk, how long the battery lasts, which HF band is open and how your family stays in touch when the phones go down. This is the one guide to all of them, with real worked examples, screenshots of each tool and a cheat-sheet infographic for every one.
They all run in your browser on a phone or a computer, with no account needed, and they all live under Tools at the top of every page. If you are new, take them roughly in the order below: pick a radio service, learn your privileges, program the radio, then build out antennas, power and a plan.
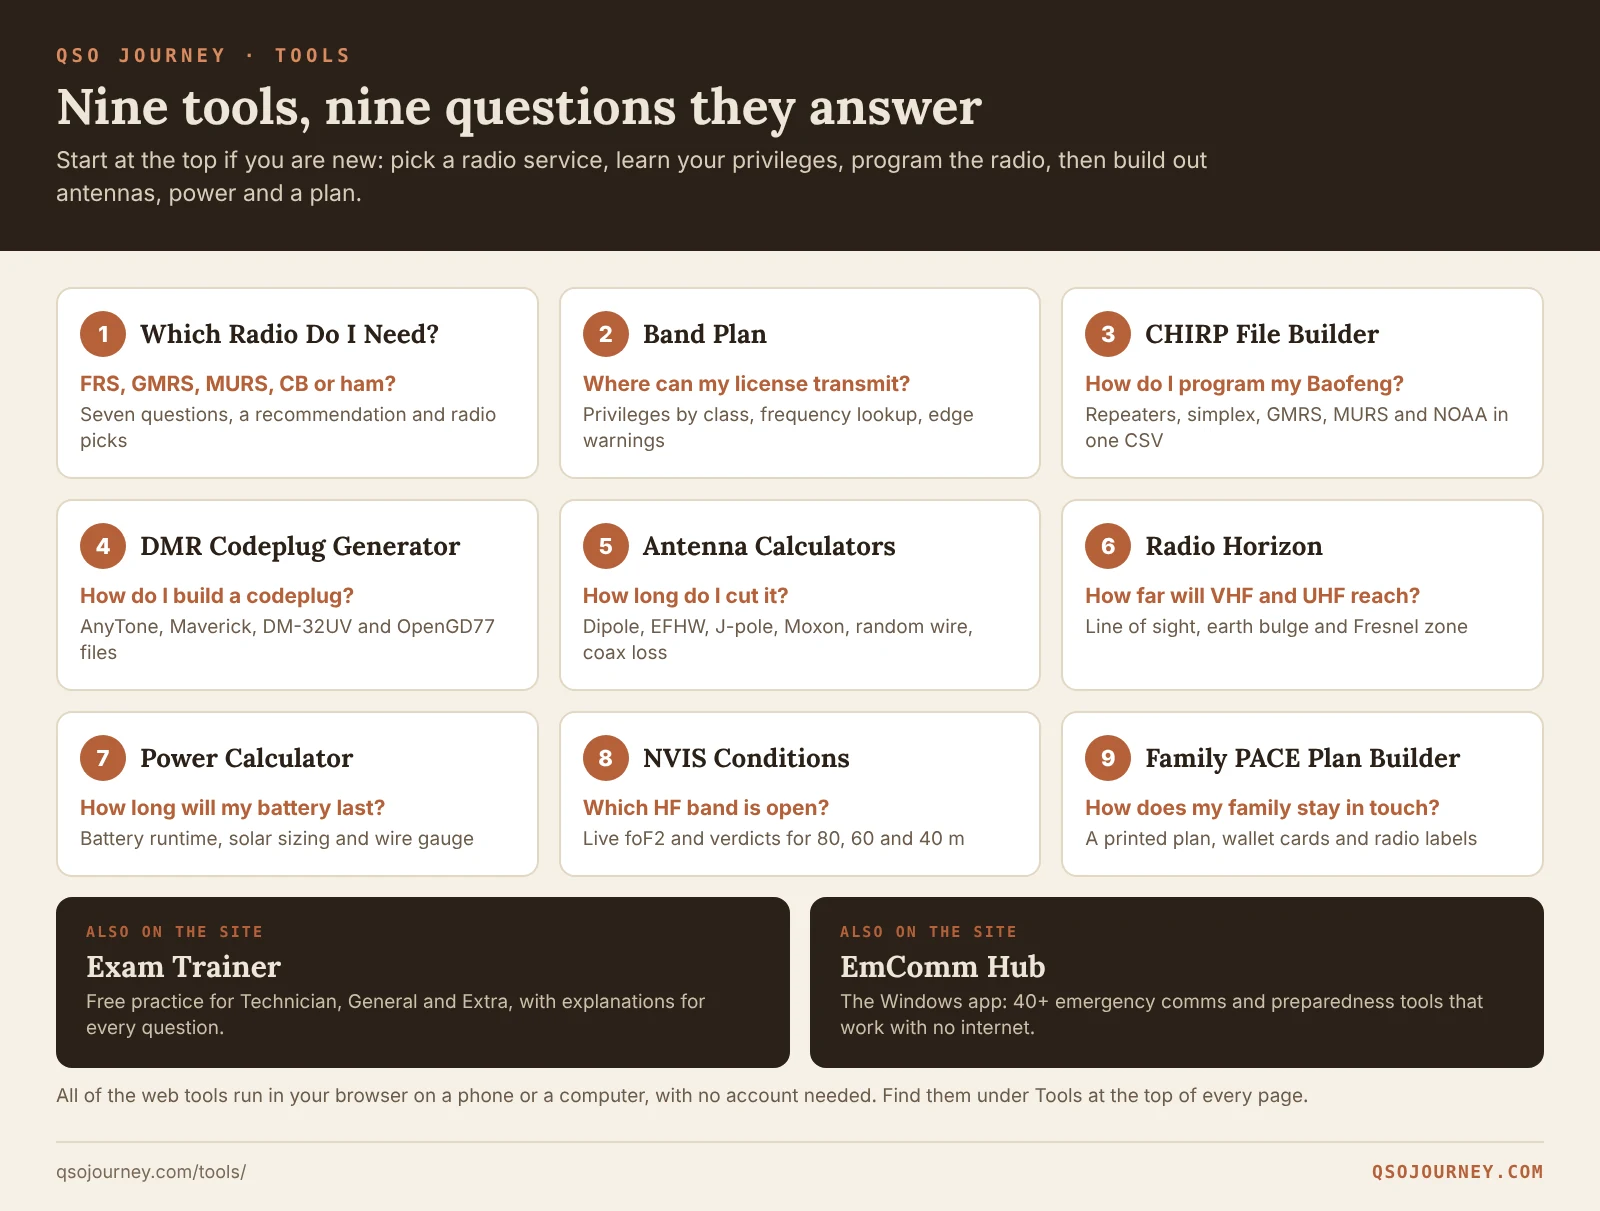
The tools in this guide
| # | Tool | The question it answers | Try it |
|---|---|---|---|
| 1 | Which Radio Do I Need? | FRS, GMRS, MURS, CB or ham radio? | Open the tool |
| 2 | Band Plan | Where can my license transmit? | Open the tool |
| 3 | CHIRP File Builder | How do I program my Baofeng? | Open the tool |
| 4 | DMR Codeplug Generator | How do I build a DMR codeplug? | Open the tool |
| 5 | Antenna Calculators | How long do I cut it? | Open the tool |
| 6 | Radio Horizon Calculator | How far will VHF and UHF reach? | Open the tool |
| 7 | Power Calculator | How long will my battery last? | Open the tool |
| 8 | NVIS Conditions | Which HF band is open for my net? | Open the tool |
| 9 | Family PACE Plan Builder | How does my family stay in touch? | Open the tool |
Which Radio Do I Need?
“What radio should I buy?” is really two questions: which radio service fits what you need, and then which radio. Most people skip the first one and end up with a handheld they cannot legally use for what they bought it for. Which Radio Do I Need? answers the first question in seven quick questions, then points you at radios worth a look. Here is how it works, with two real examples.
What Which Radio Do I Need? does
- The quiz: seven questions about who you need to reach, how far, whether you will take a test, who carries the radios, vehicles, budget and what matters most.
- A recommendation: the best fit and a runner-up, each with the license, cost, typical range, reasons it fits, cautions, radios to look at and next steps.
- Compare all services: FRS, GMRS, MURS, CB, ham Technician and ham General side by side.
- Radio picks: handheld and mobile radios for every service, by price tier, linked to QSO Journey reviews where there is one.
Your answers are saved in your browser, and the result can be printed. It is a starting point, not legal advice.
The six services it scores
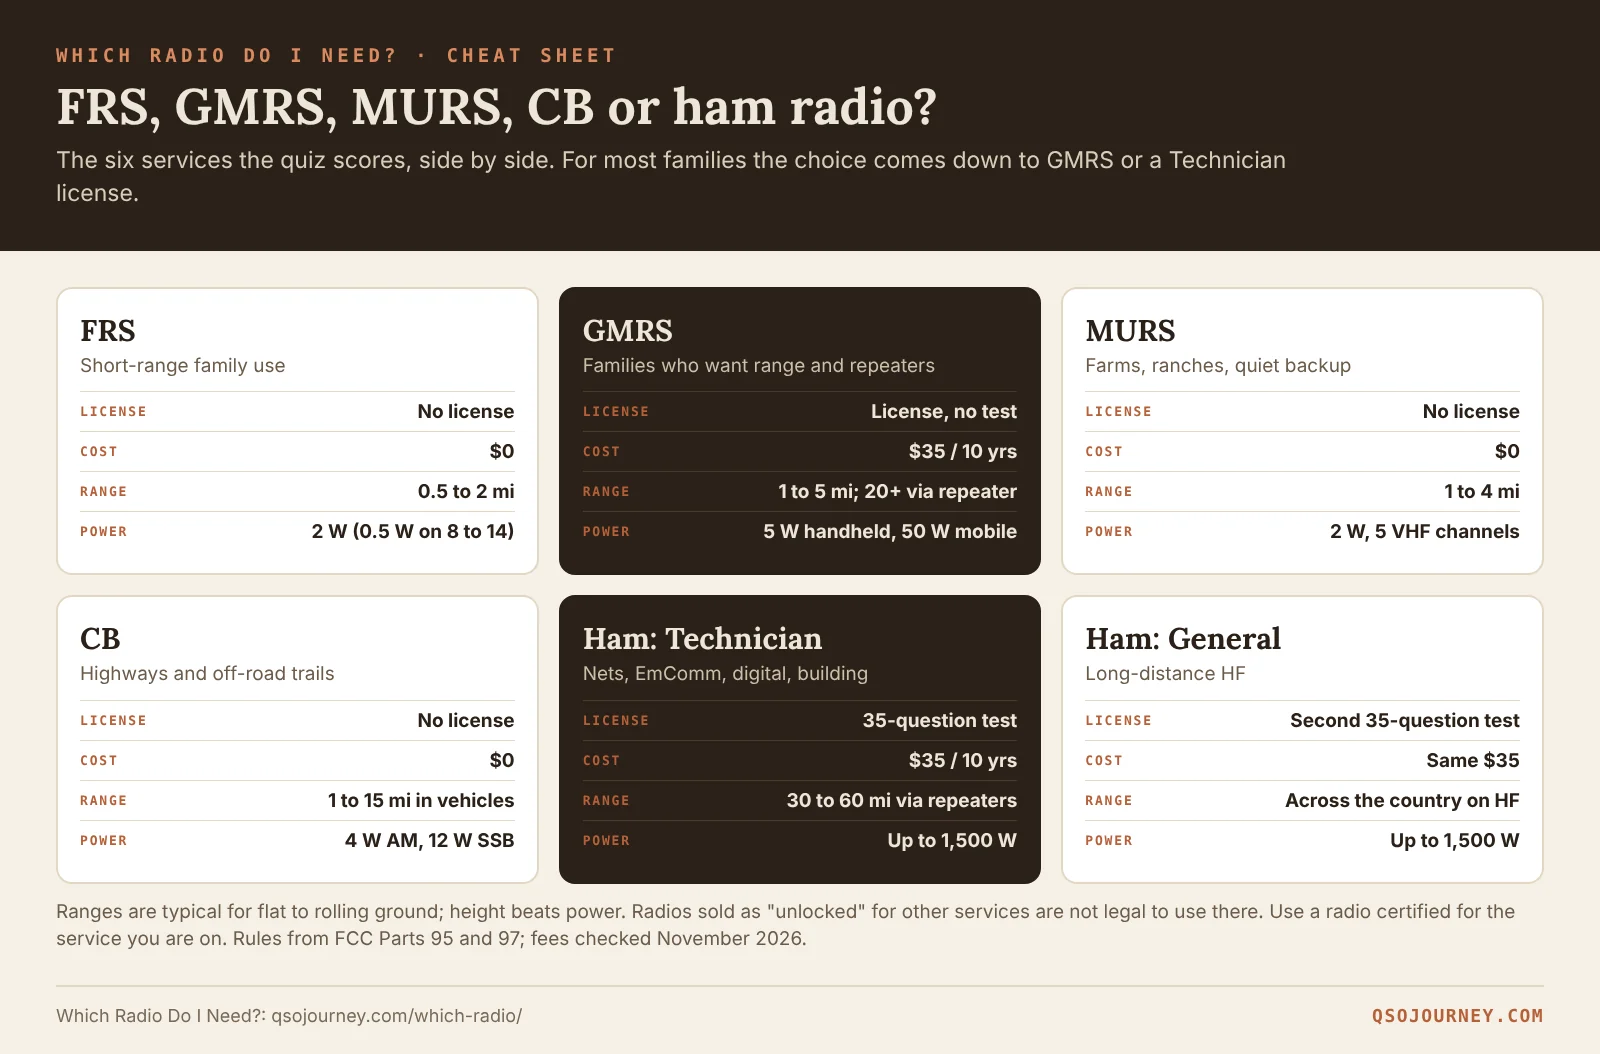
The short version: FRS, MURS and CB need no license at all. GMRS needs a license but no test ($35 for 10 years, covering your immediate family). Ham radio needs a 35-question test for each license class, and in return gives you the most power, the most bands, repeaters across the state and every digital mode there is.
The seven questions
| # | Question | Why it matters |
|---|---|---|
| 1 | Who do you need to talk to? | Family, a group, other hams and nets, or coworkers on a farm or ranch. This decides the service more than anything. |
| 2 | How far apart will you usually be? | Under a mile, across town, across the county, or across the state. |
| 3 | Would you take a 35-question multiple-choice test? | No, maybe, or yes. A firm no rules out ham radio. |
| 4 | Who will carry the radios? | Kids and non-radio people need something simple and legal for them to use. |
| 5 | Will you use radios in vehicles? | Mobile radios with roof antennas change range a lot. |
| 6 | What do you want to spend per radio? | Under $40, $40 to $150, or more. |
| 7 | What matters most? | Simplicity, working without cell service, range, or options like digital modes and APRS. |
Example 1: a family that wants to stay in touch when cell service is down
Answers: my family, across town (1 to 10 miles), no test, kids will carry radios, yes to vehicles, $40 to $150, and “it works when cell service and the internet are down.”
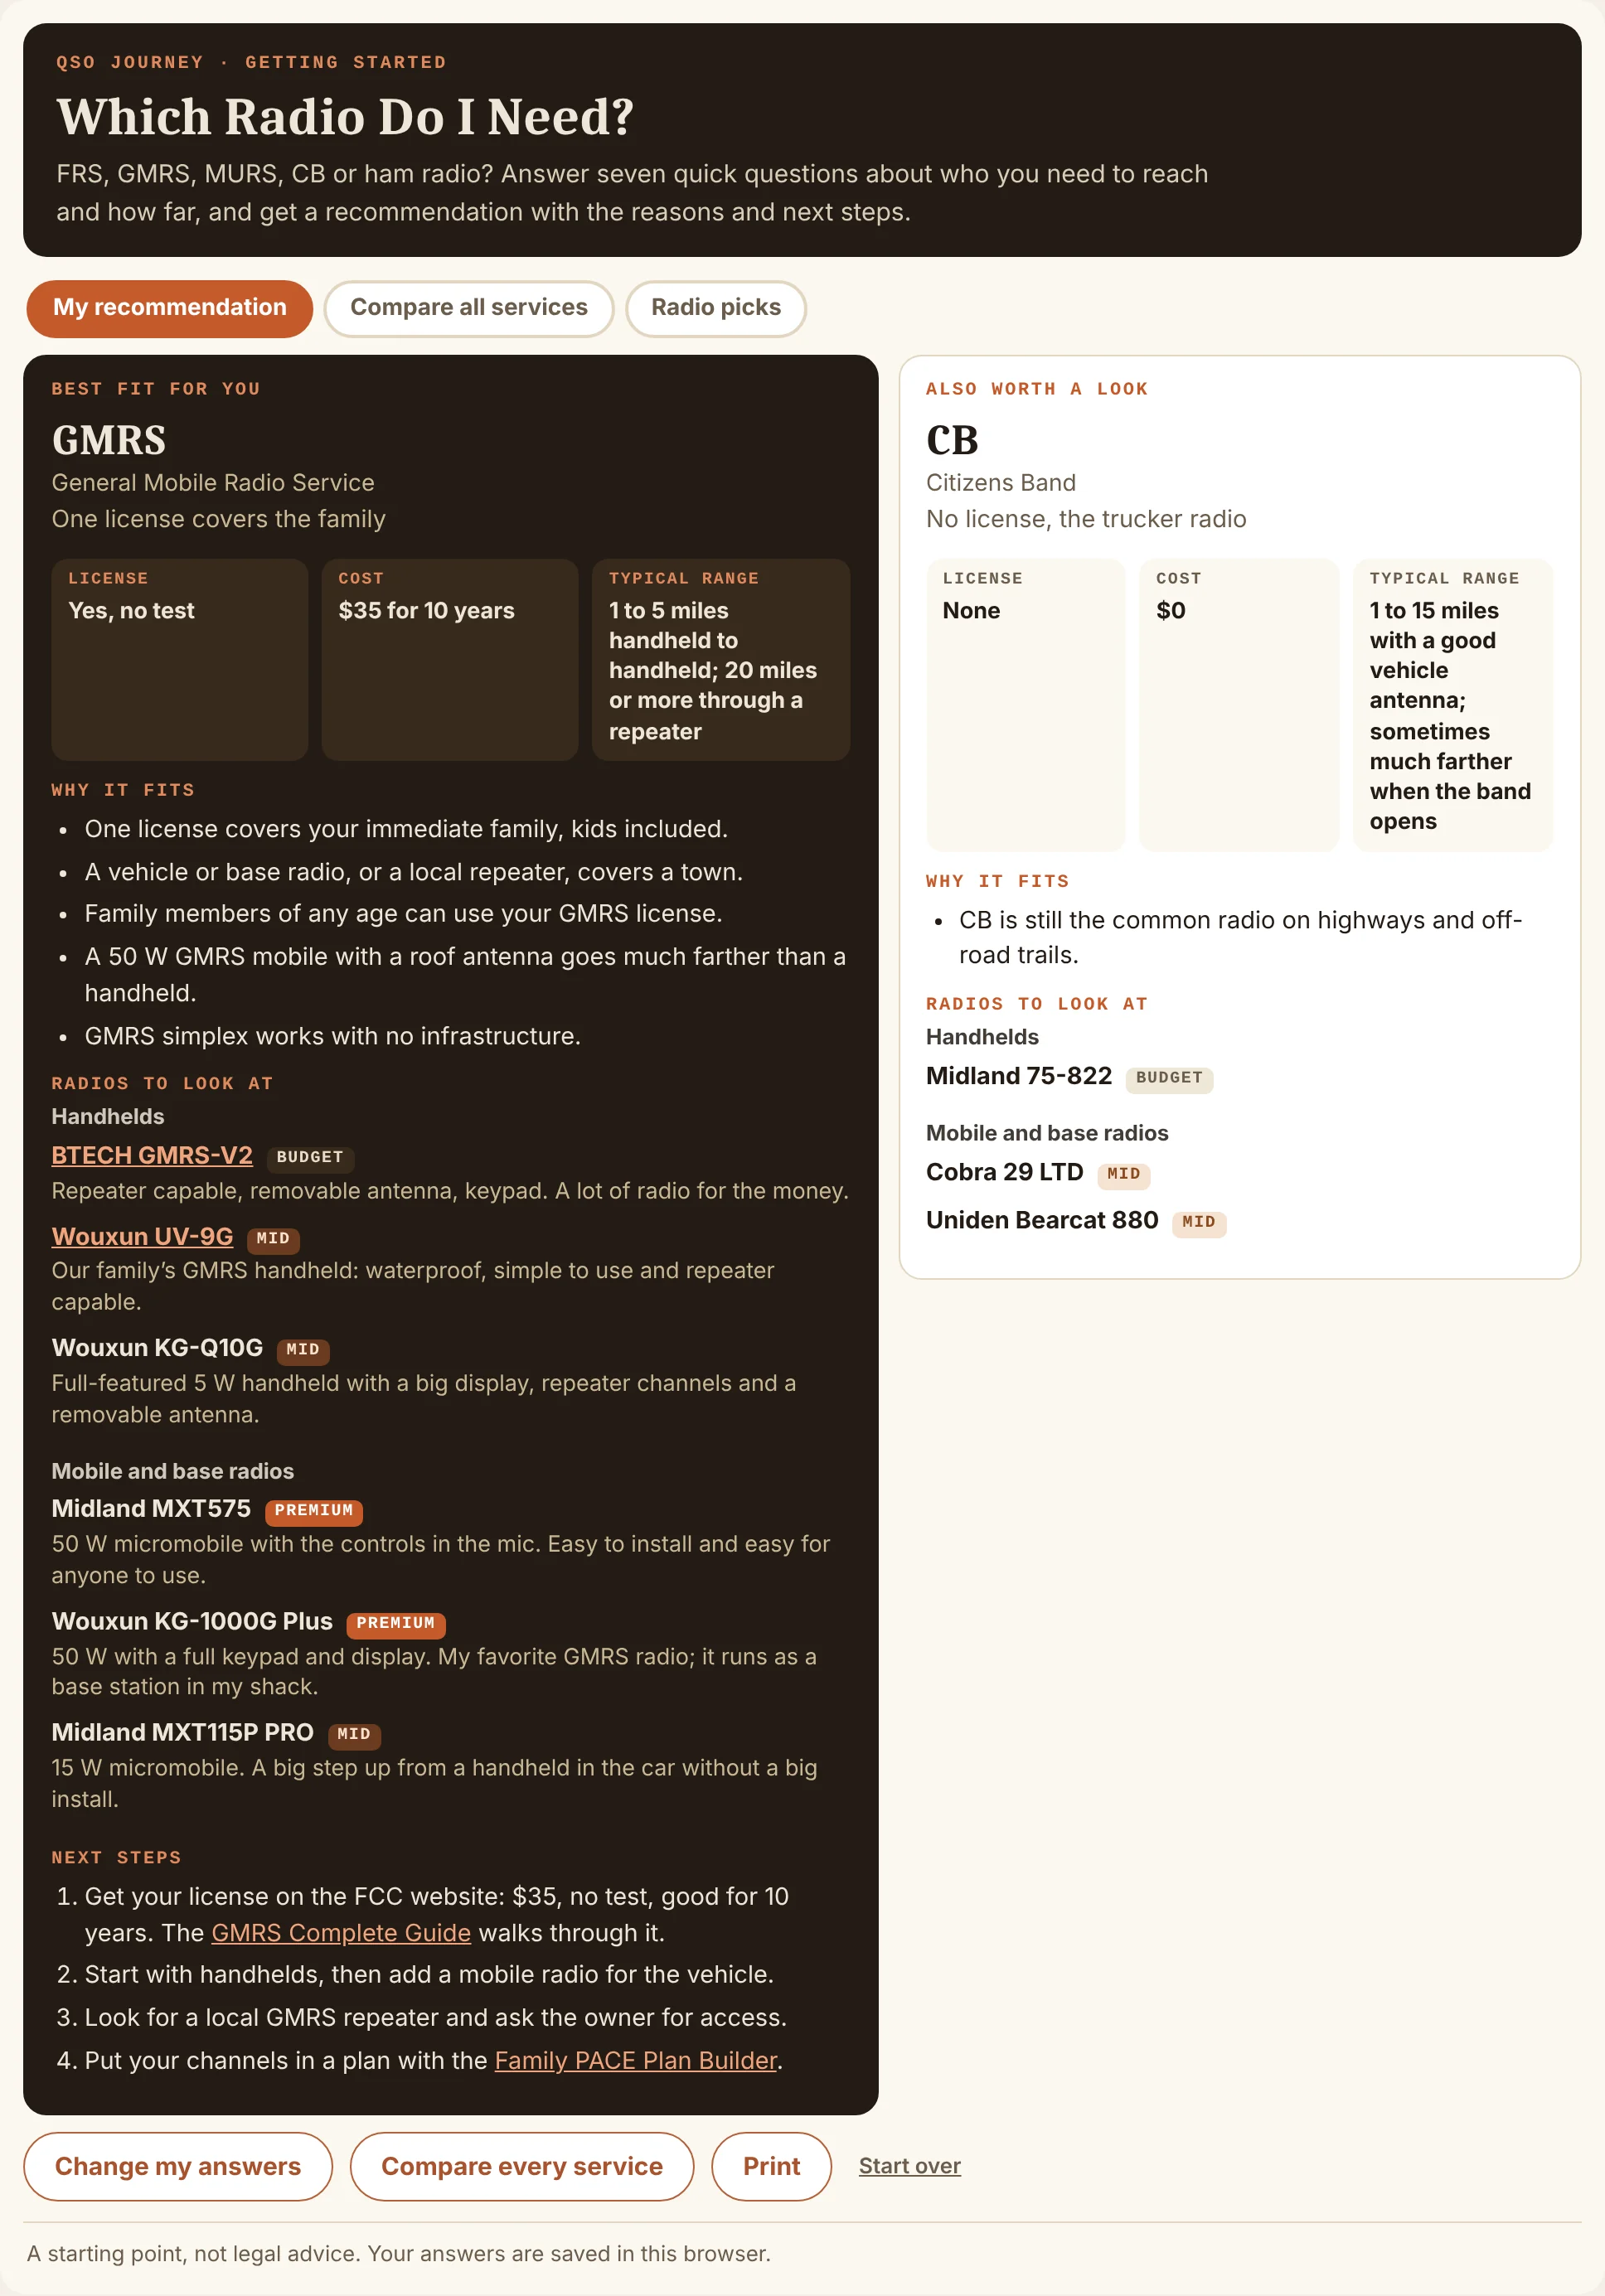
Best fit: GMRS. The reasons it lists match the answers: one license covers the immediate family, kids included; a vehicle radio or local repeater covers a town; a 50 W GMRS mobile with a roof antenna goes much farther than a handheld; and GMRS simplex needs no infrastructure. Typical range is 1 to 5 miles handheld to handheld and 20 miles or more through a repeater.
Runner-up: CB, because it is still the common radio on highways and off-road trails. The next steps are the right ones: get the license on the FCC website, start with handhelds, add a mobile for the vehicle, look for a local GMRS repeater, and put the channels in a plan with the Family PACE Plan Builder.
Example 2: someone who wants to join the local nets
Answers: other hams, nets and emergency groups; across the county (10 to 50 miles); yes to studying; mostly me; yes to vehicles; more if it does the job; and “options: digital modes, APRS, building antennas.”
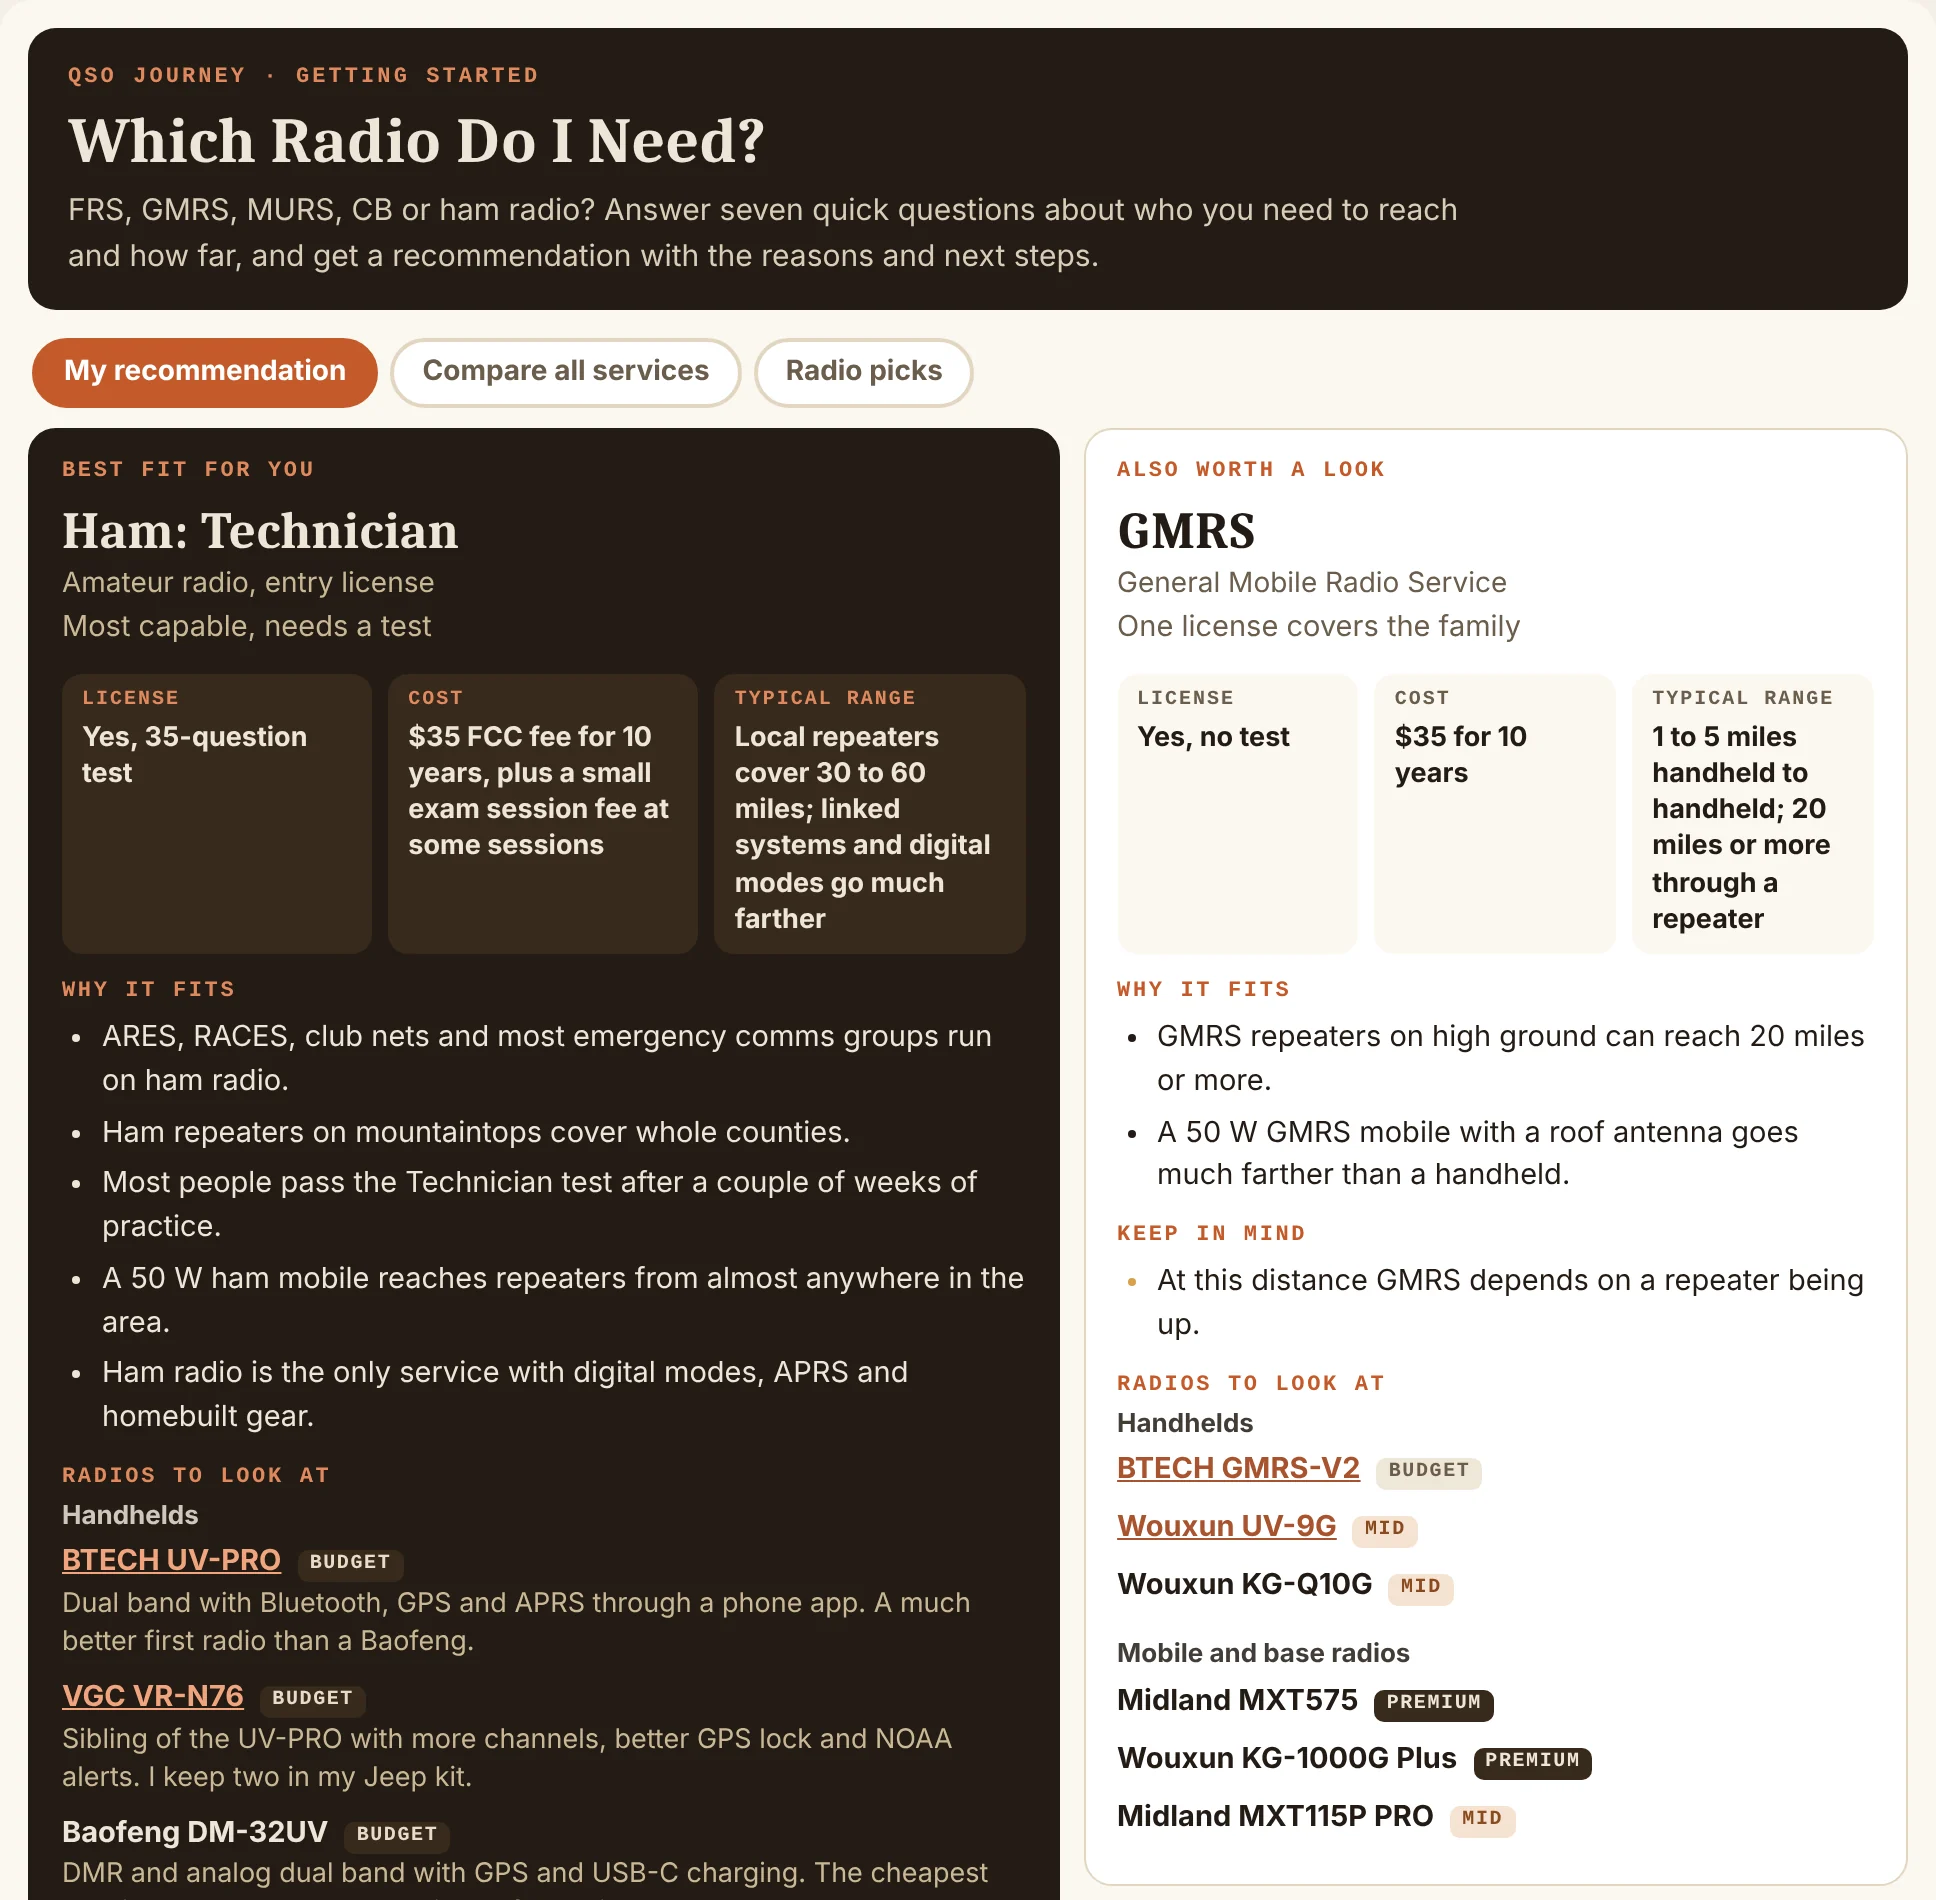
Best fit: ham radio, Technician. ARES, RACES, club nets and most emergency groups run on ham radio; mountaintop repeaters cover whole counties; most people pass the Technician test after a couple of weeks of practice; and ham radio is the only service with digital modes, APRS and homebuilt gear. The next steps point to the Getting Licensed guide, the Exam Trainer until you score 80 percent or better, and finding an exam session.
Compare all services
The Compare all services tab is the whole picture in one table: license, test, cost, who can use it, power, antennas, repeaters, typical range, radio cost and what each service is best for.
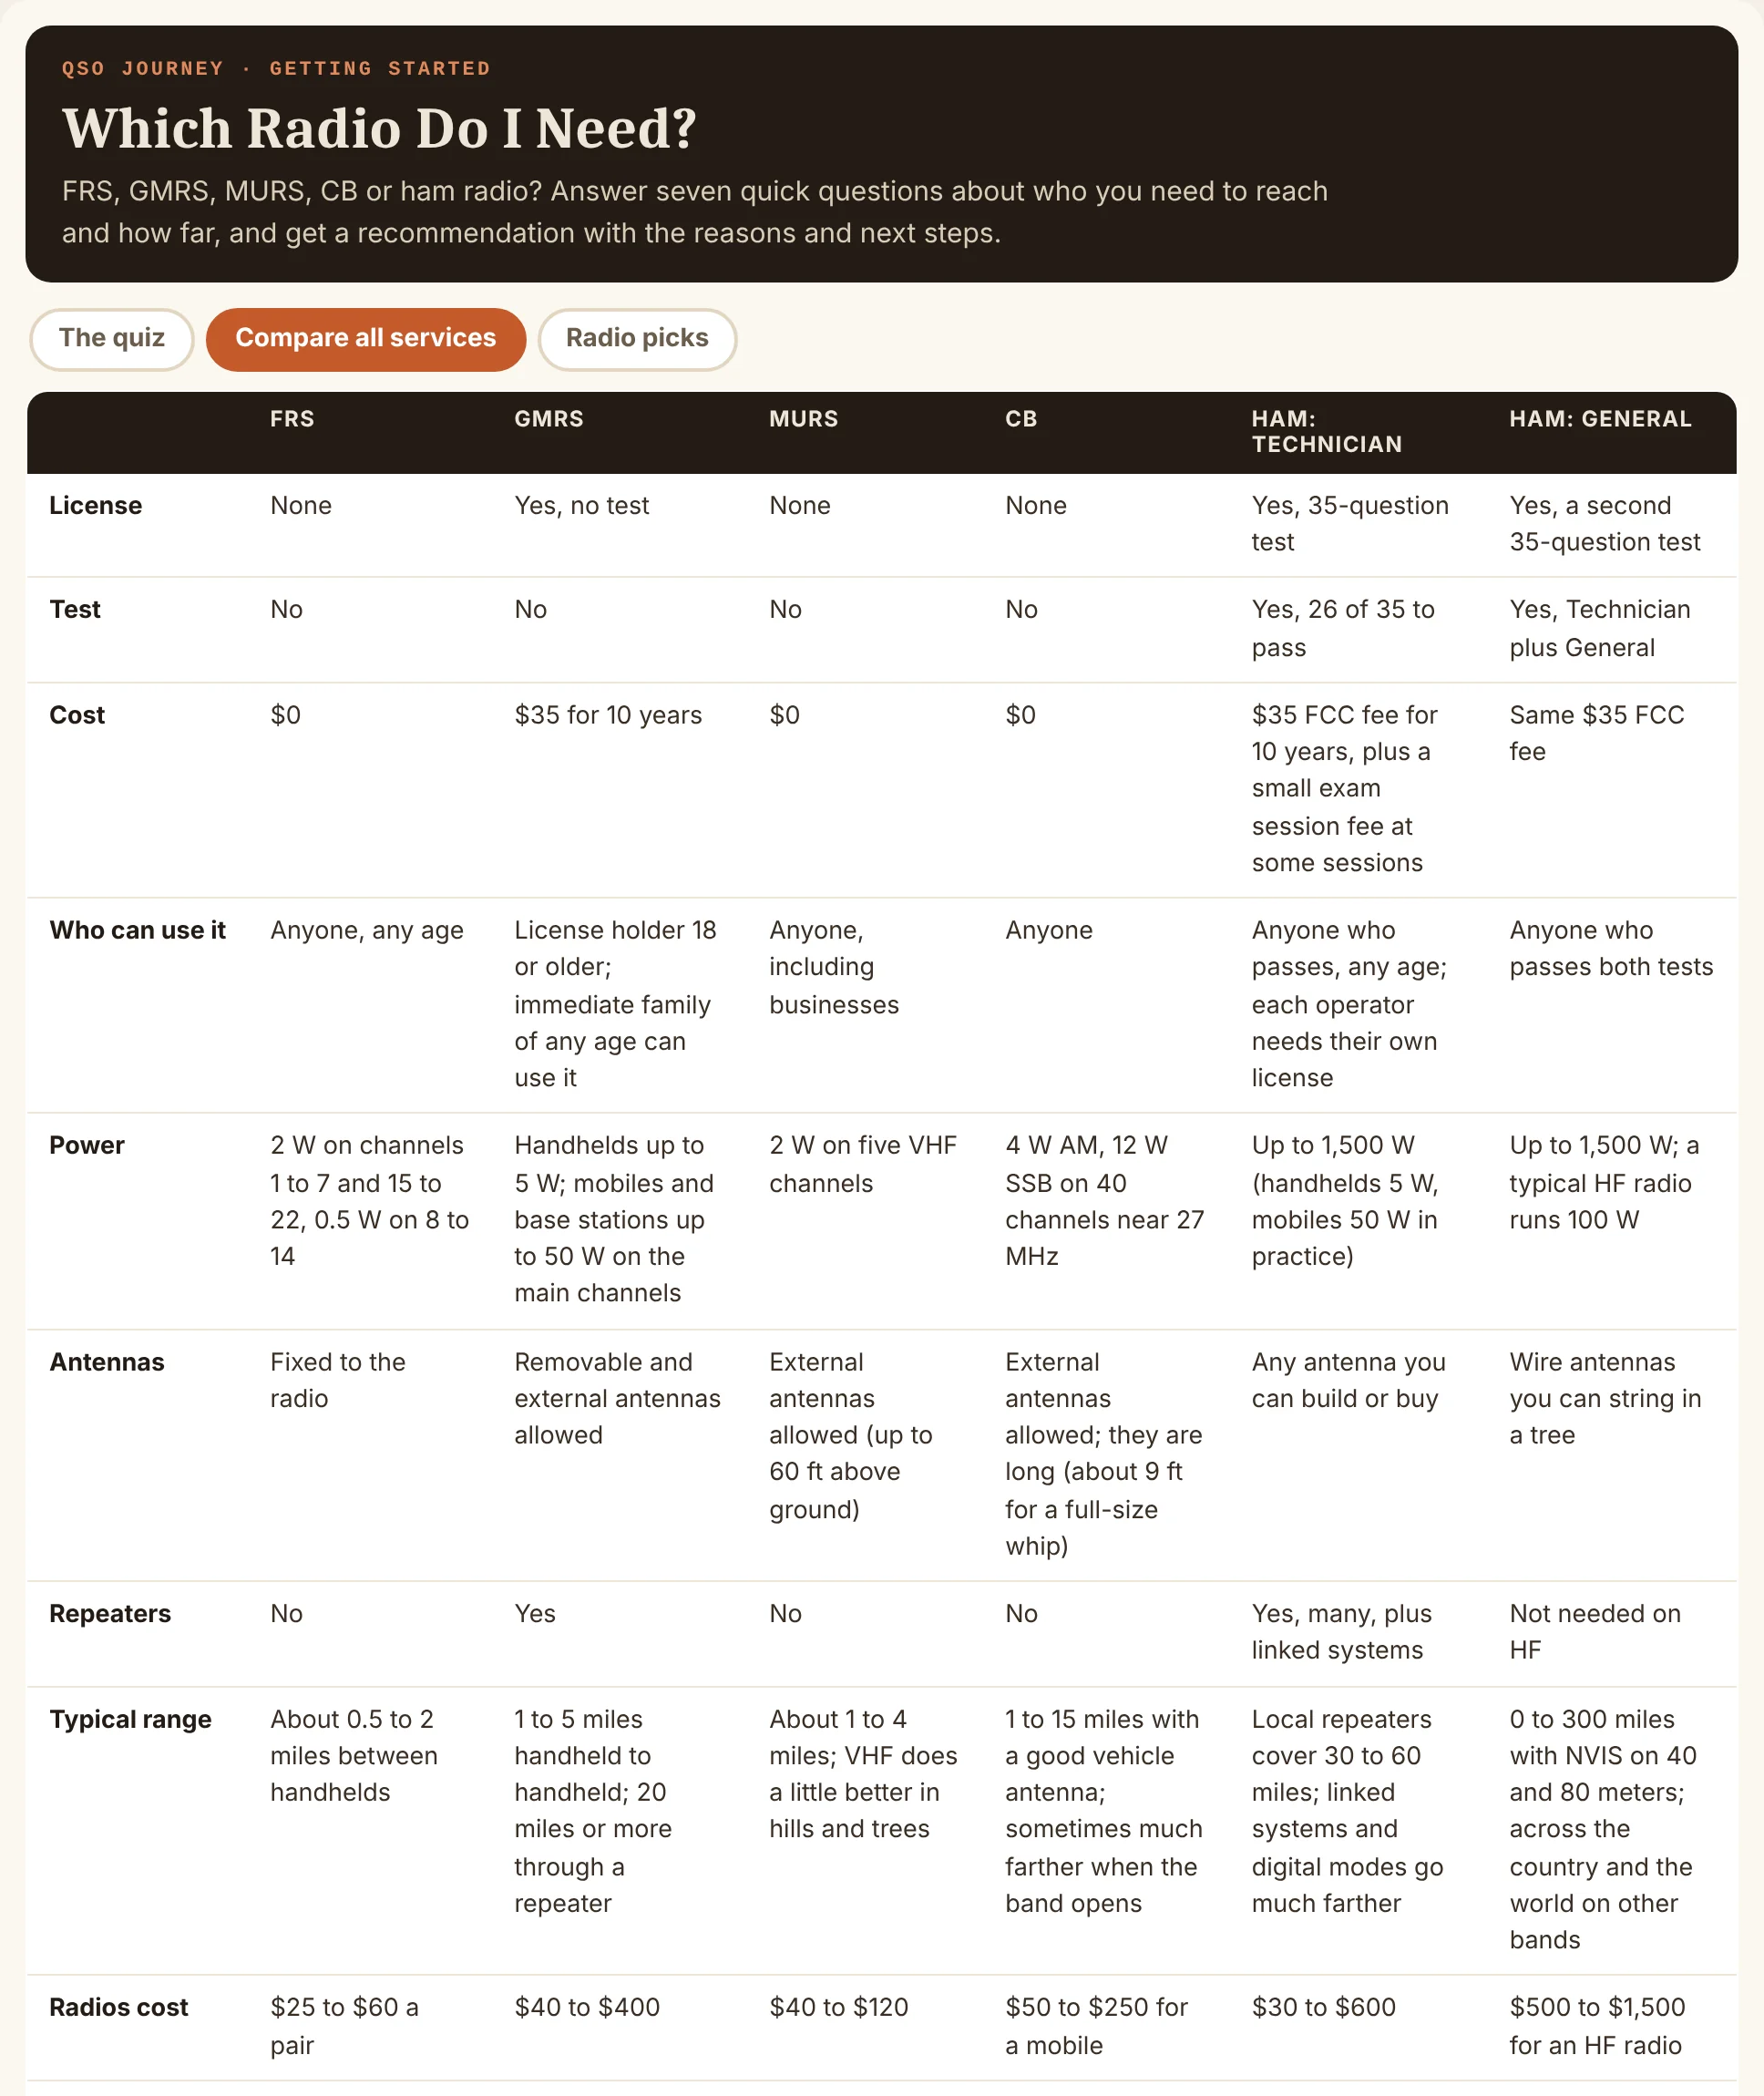
A few rows people find surprising:
- FRS antennas are fixed to the radio, and power is 2 W on most channels (0.5 W on 8 to 14). That is why FRS range is 0.5 to 2 miles.
- GMRS allows removable and external antennas, 5 W handhelds and 50 W mobiles on the main channels, plus repeaters.
- MURS allows external antennas up to 60 ft above the ground, on five VHF channels at 2 W.
- Each ham operator needs their own license, at any age. A GMRS license, by contrast, covers your immediate family.
The page also carries an important warning: radios sold as “unlocked” or able to transmit across services are not legal to use on a service they are not certified for. Use a radio certified for the service you are on.
Radio picks
Every result card lists handhelds and mobile or base radios for that service, by tier (Budget, Mid and Premium), with a one-line reason for each. The Radio picks tab shows the full list for every service in one place. Where QSO Journey has a review, the name links to it. GMRS and ham always show both handhelds and mobiles, because for both services a mobile radio with a good antenna is where the range really comes from.
After the quiz
- GMRS: GMRS Radio: The Complete Guide covers the license, radios and repeaters.
- Ham radio: Getting Your Ham Radio License, then the Exam Trainer.
- Not sure how far you need to reach? The Radio Horizon Calculator shows what antenna height buys you.
- Sharing with family? Send them the quiz link. It is written for people who are not radio people.
Band Plan
“Can I transmit here?” is the most important question a new ham asks, and the honest answer is buried in a dense table in Part 97 of the FCC rules. The Band Plan tool turns that table into something you can read on a phone: pick your license class and see every US band, where you can transmit, which modes and how much power. This section shows how to read it, with real lookups that trip people up.
What the Band Plan tool does
- Every band from 2200 m to 23 cm with the segments for your class, the modes allowed in each, and the power limit.
- Four classes: Technician, General, Advanced (no longer issued, but still renewed) and Amateur Extra.
- Two views: My privileges, or Compare classes to see all four side by side.
- Filters: All, HF only, or VHF and up.
- “Can I transmit on…” lookup that checks any frequency and warns you within 3 kHz of an edge.
- Common operating spots for FT8, JS8Call and the national calling frequencies.
- Print this chart for the shack wall.
The data comes straight from FCC Part 97 (97.301 and 97.305) and already includes the February 13, 2026 change to 60 meters.
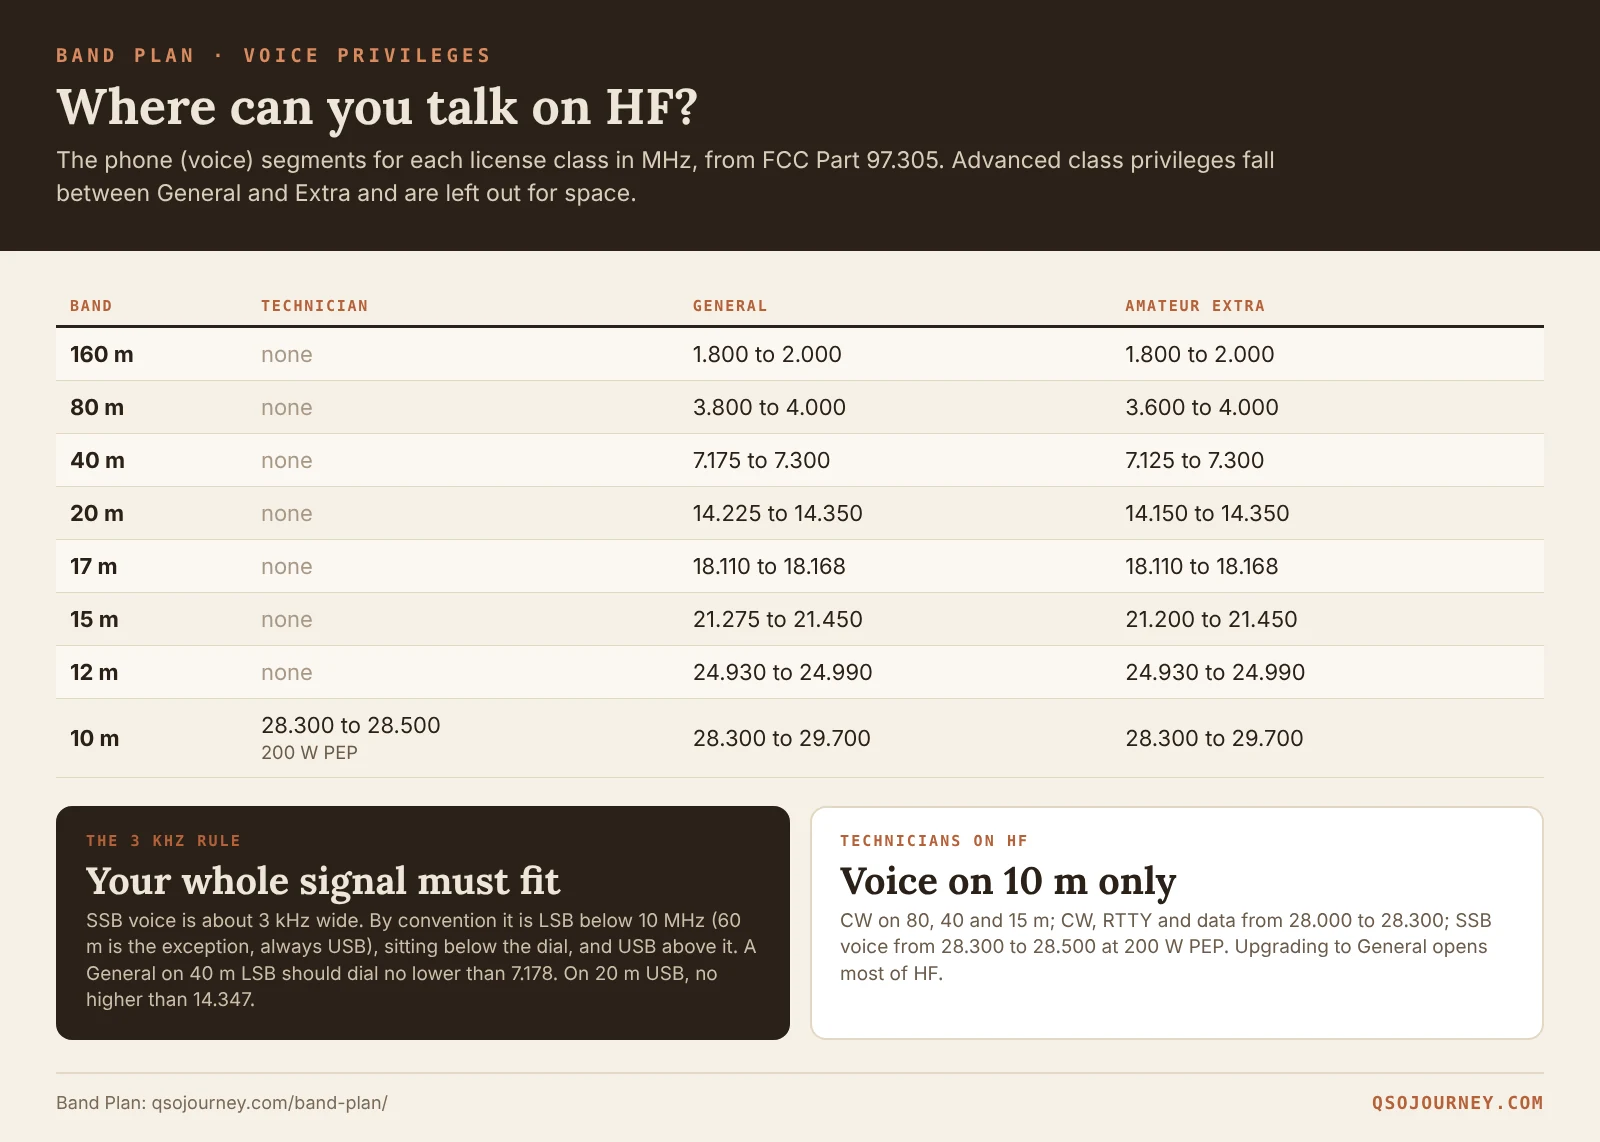
How to read a band card
Each band gets a card with a bar running from the bottom of the band to the top. Colors show what you can do in each piece of it:
| Color | Meaning |
|---|---|
| Dark rust | All modes |
| Orange | Phone (voice) and CW |
| Green | CW and data (FT8, RTTY and other digital modes) |
| Tan | CW only |
| Peach | 60 m channel rules |
| Pale | No privileges for your class |
Thin black lines mark the common FT8, JS8Call and calling spots. Under the bar, each segment is listed with its exact edges, modes and power limit, followed by any notes for the band.
Example 1: what a brand-new Technician can do
Leave the class on Technician. The summary across the top says it all: 4 of 12 bands below 30 MHz (80, 40, 15 and 10 m), voice on just one of them (10 m SSB), and 6 bands from VHF up with every mode.
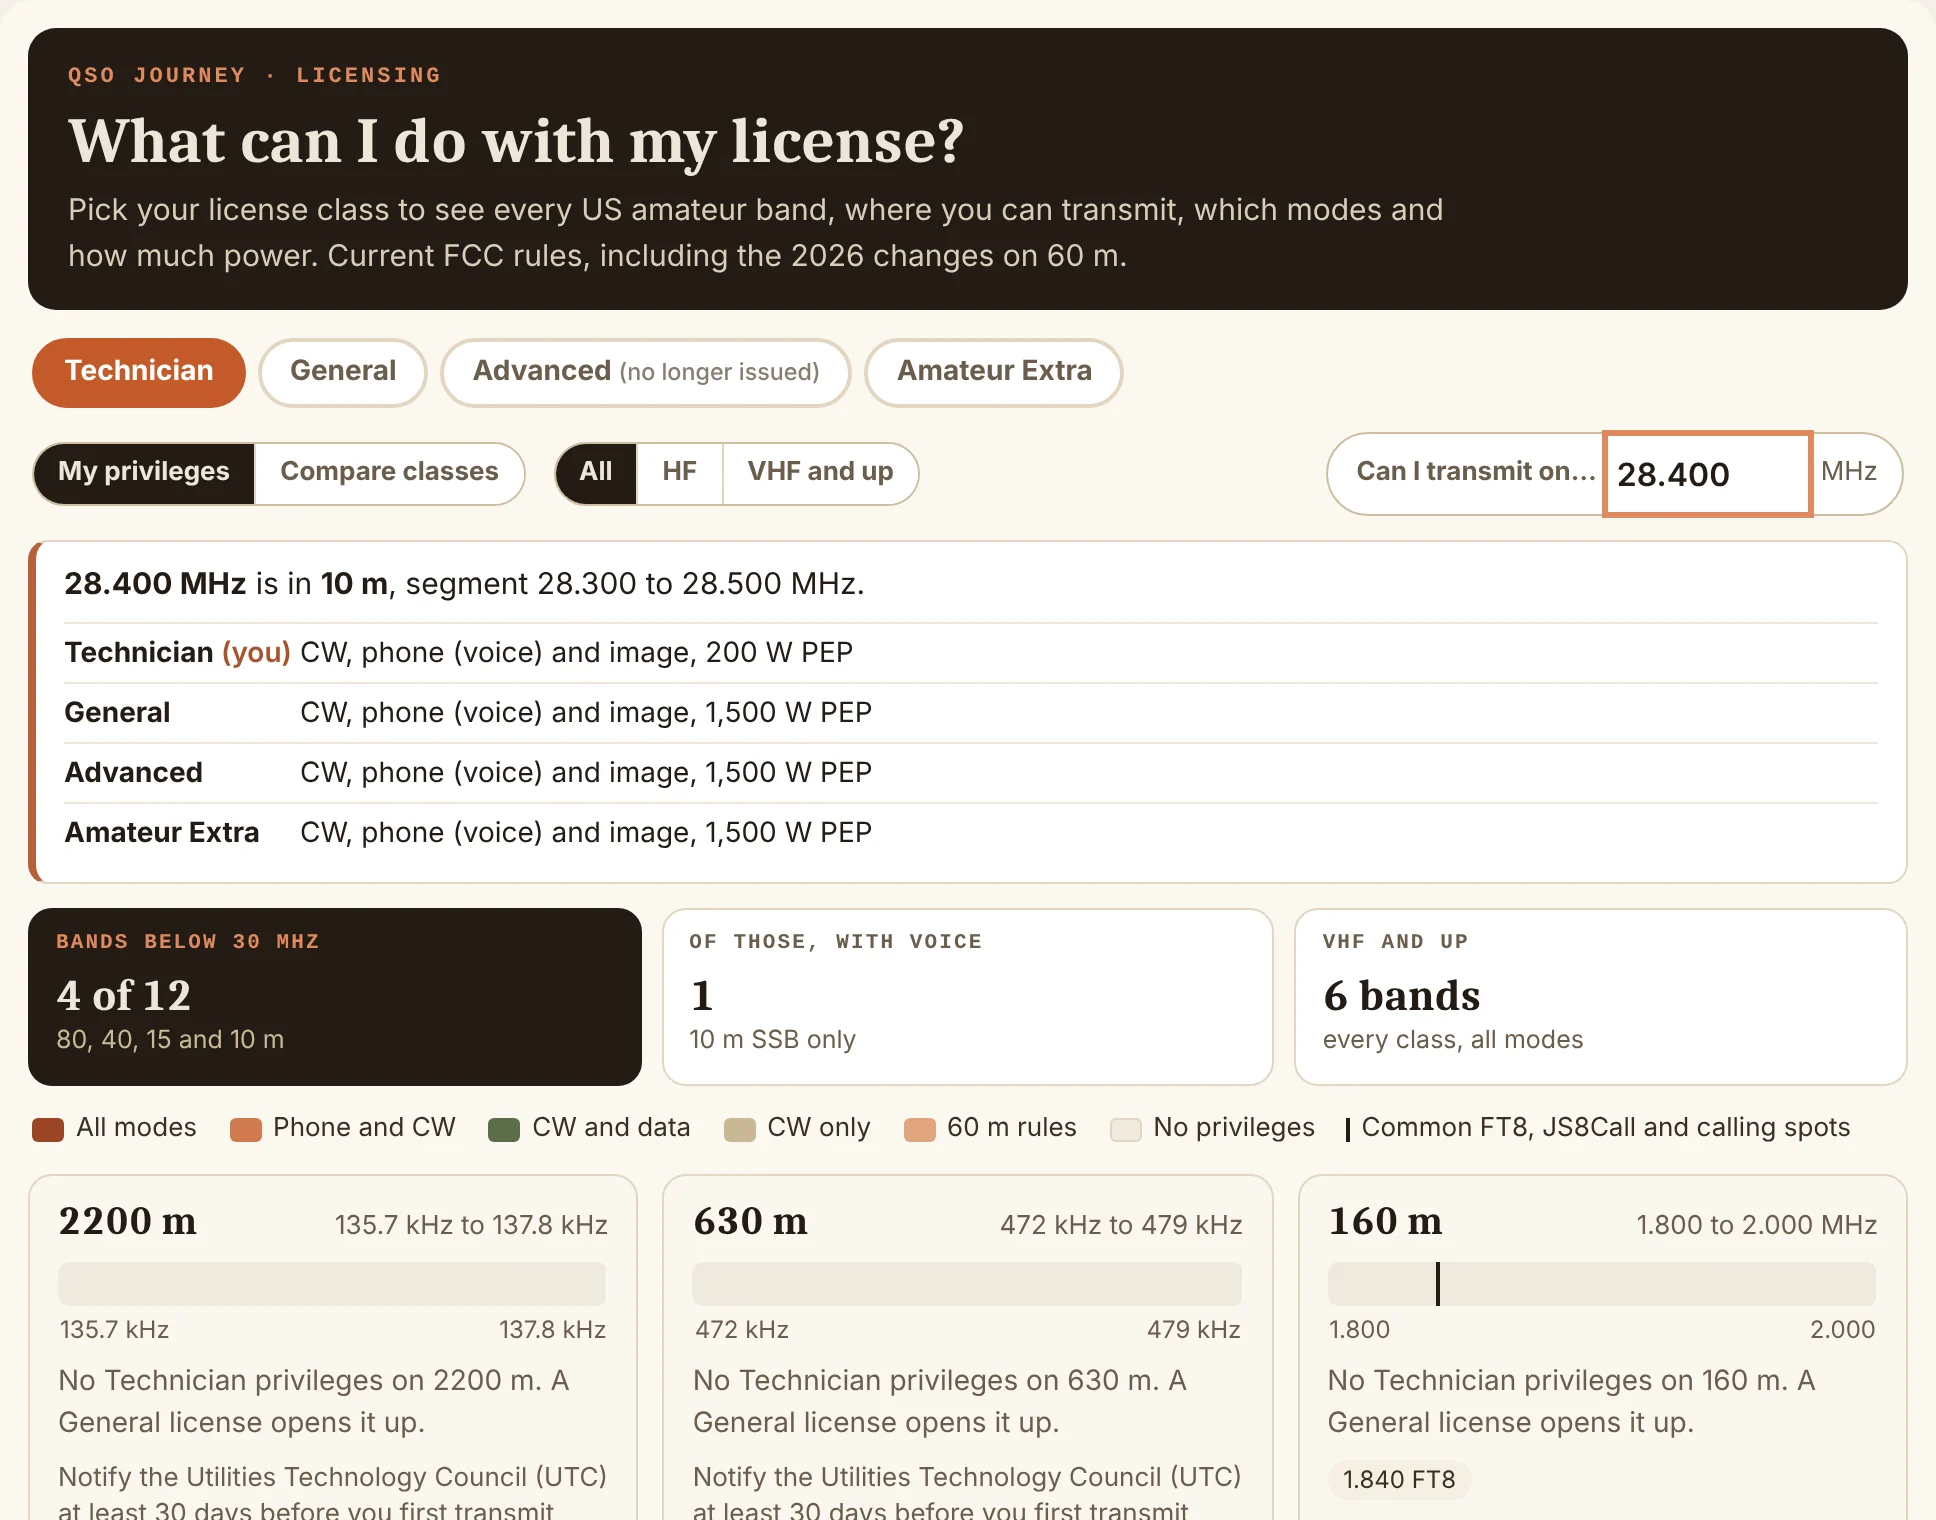
Type 28.400 into the lookup and it answers: 10 m, segment 28.300 to 28.500 MHz, and Technicians have CW, phone and image at 200 W PEP. Generals and up get the same segment at 1,500 W. That 10 m phone slice is a great reason to put an HF radio on the air as a Technician when the sun is active.
Example 2: the frequency lookup
The lookup shows every class at once, so it doubles as a “what would an upgrade get me” check. A few real ones:
| Frequency | Result |
|---|---|
| 146.520 MHz | 2 m, all classes: CW, phone, image, RTTY and data, 1,500 W PEP. The national FM simplex calling frequency. |
| 14.230 MHz | 20 m phone segment 14.225 to 14.350. General, Advanced and Extra: yes. Technician: no privileges. |
| 14.200 MHz | Segment 14.175 to 14.225. Advanced and Extra only. A General talking here is out of band. |
| 28.400 MHz | 10 m, 28.300 to 28.500. Every class, with Technicians limited to 200 W PEP. |
The 14.200 result is the classic General mistake. The bottom of the General 20 m phone band is 14.225, and plenty of nets and DX stations sit just below it.
Example 3: the band edge warning
This is the feature most worth knowing about. Set the class to General and look up 7.176.

7.176 is technically inside the General phone segment (7.175 to 7.300). But on 40 m you use lower sideband, and an SSB signal is about 3 kHz wide below the dial. A dial frequency of 7.176 puts your signal from about 7.173 to 7.176, and the bottom 2 kHz of it is outside your privileges. The tool warns you about it:
“Careful: this is 1.0 kHz from a segment edge. An SSB signal is about 3 kHz wide (below the dial on LSB, above it on USB), and all of it must stay inside your privileges.”
The practical rule: on LSB, stay at least 3 kHz above the bottom edge (7.178 for a General on 40 m). On USB, stay at least 3 kHz below the top edge (14.347 on 20 m). CW and FT8 signals are much narrower, but the same idea applies.
Example 4: compare classes before you upgrade
Click Compare classes and pick HF. Every band now shows four rows: T, G, A and E, with your own class highlighted.
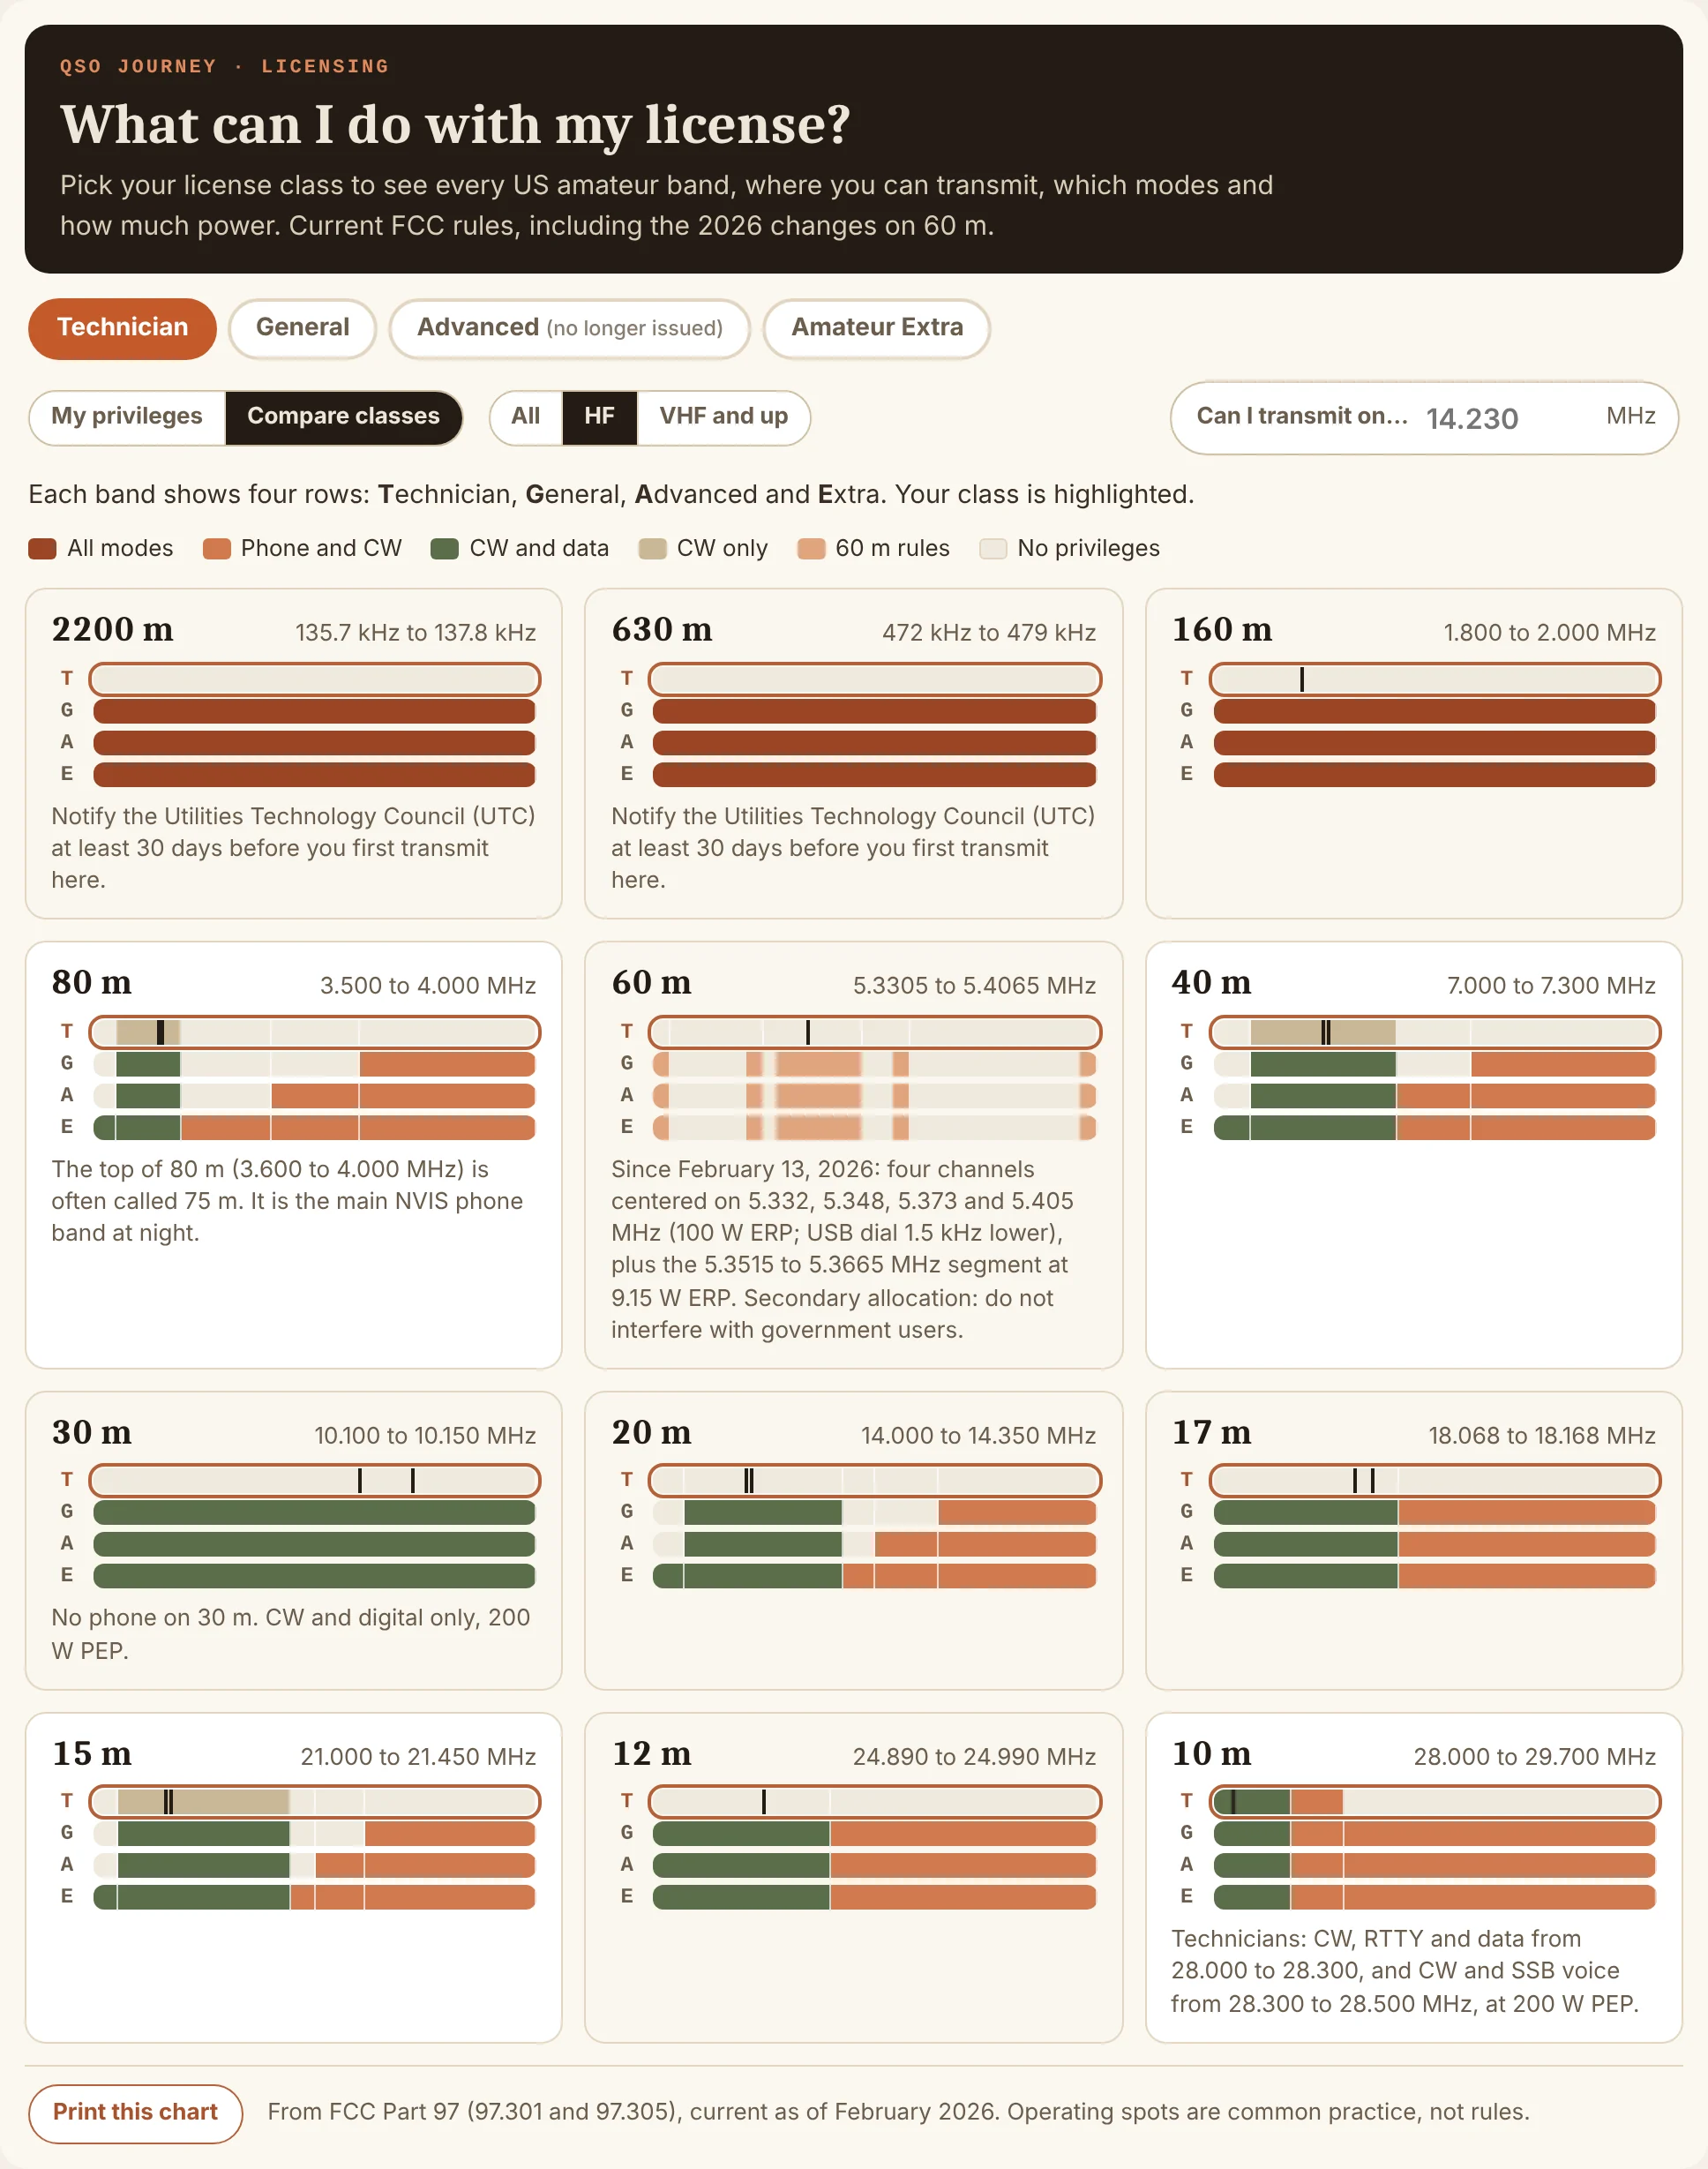
Look at the T row versus the G row and you can see why the General upgrade matters so much. Technicians have small CW slices on 80, 40 and 15 m and a bit of 10 m. Generals get phone on every HF band except 30 m (which is CW and data only for everyone), plus all of 160, 17 and 12 m. The jump from General to Extra is smaller: the bottom 25 kHz of several CW bands and wider phone segments. General Class Deep Dive and Extra Class Deep Dive go into the details, and the Exam Trainer gets you there.
60 meters after the 2026 change
60 m is unlike any other band, and the rules changed on February 13, 2026. General, Advanced and Extra operators now have:
- Four channels centered on 5.332, 5.348, 5.373 and 5.405 MHz, at 100 W ERP. On USB, set the dial 1.5 kHz below the center (5.3305 for 5.332, for example).
- A contiguous segment from 5.3515 to 5.3665 MHz at 9.15 W ERP.
- The old 5.3585 channel is gone.
ERP is measured relative to a dipole, so antenna gain counts. Amateurs are secondary on 60 m, which means we must not interfere with government users. The tool shows all of this on the 60 m card and marks FT8 at 5.357.
FT8, JS8Call and calling spots
Every band card lists the common spots as little tags: FT8 on 14.074, JS8Call on 7.078, FM simplex calling on 146.520 and 446.000, SSB calling on 50.125 and 144.200, and more. These are operating custom, not rules, but they are where you will find people. If you are new to FT8, WSJT-X Explained gets you set up.
A few things the chart cannot tell you
- Local band plans. Repeater pairs, simplex channels and satellite segments on 2 m and 70 cm are set by your regional frequency coordinator. The legal privileges are on the chart; the local custom is not.
- Special areas. Some places have extra limits on 70 cm (near the Canadian border and some military sites, for example). The 70 cm card reminds you.
- Other countries. These are US rules. Band Plans vs Frequency Allocations, and ITU Regions explains why other countries differ.
CHIRP File Builder
Typing 40 channels into the CHIRP grid by hand, one offset and tone at a time, is how most of us programmed our first Baofeng. It is also how most of us ended up with a typo on the one repeater we actually needed. The CHIRP File Builder builds the whole channel list for you and hands you one file to import. This section walks through it with a real example: a UV-5R for the Phoenix area.
What the CHIRP File Builder does
You pick the channel groups you want, and it writes a CSV in the same 14-column layout CHIRP uses (Location, Name, Frequency, Duplex, Offset, Tone, rToneFreq, cToneFreq, DtcsCode, DtcsPolarity, Mode, TStep, Skip, Comment). The groups are:
- Your repeaters, with offsets and tones, plus a Maricopa and Pinal County, Arizona starter list.
- Ham simplex and calling: 146.520, 446.000, 223.500, the common 2 m simplex channels and APRS on 144.390.
- GMRS and FRS 1 to 22, and GMRS repeater pairs 15R to 22R for certified radios.
- MURS 1 to 5.
- NOAA Weather Radio WX1 to WX7, receive only and skipped in scan.
It applies your radio’s channel limit and name length, and it protects you from transmitting where your radio is not certified. Nothing you type leaves your browser.
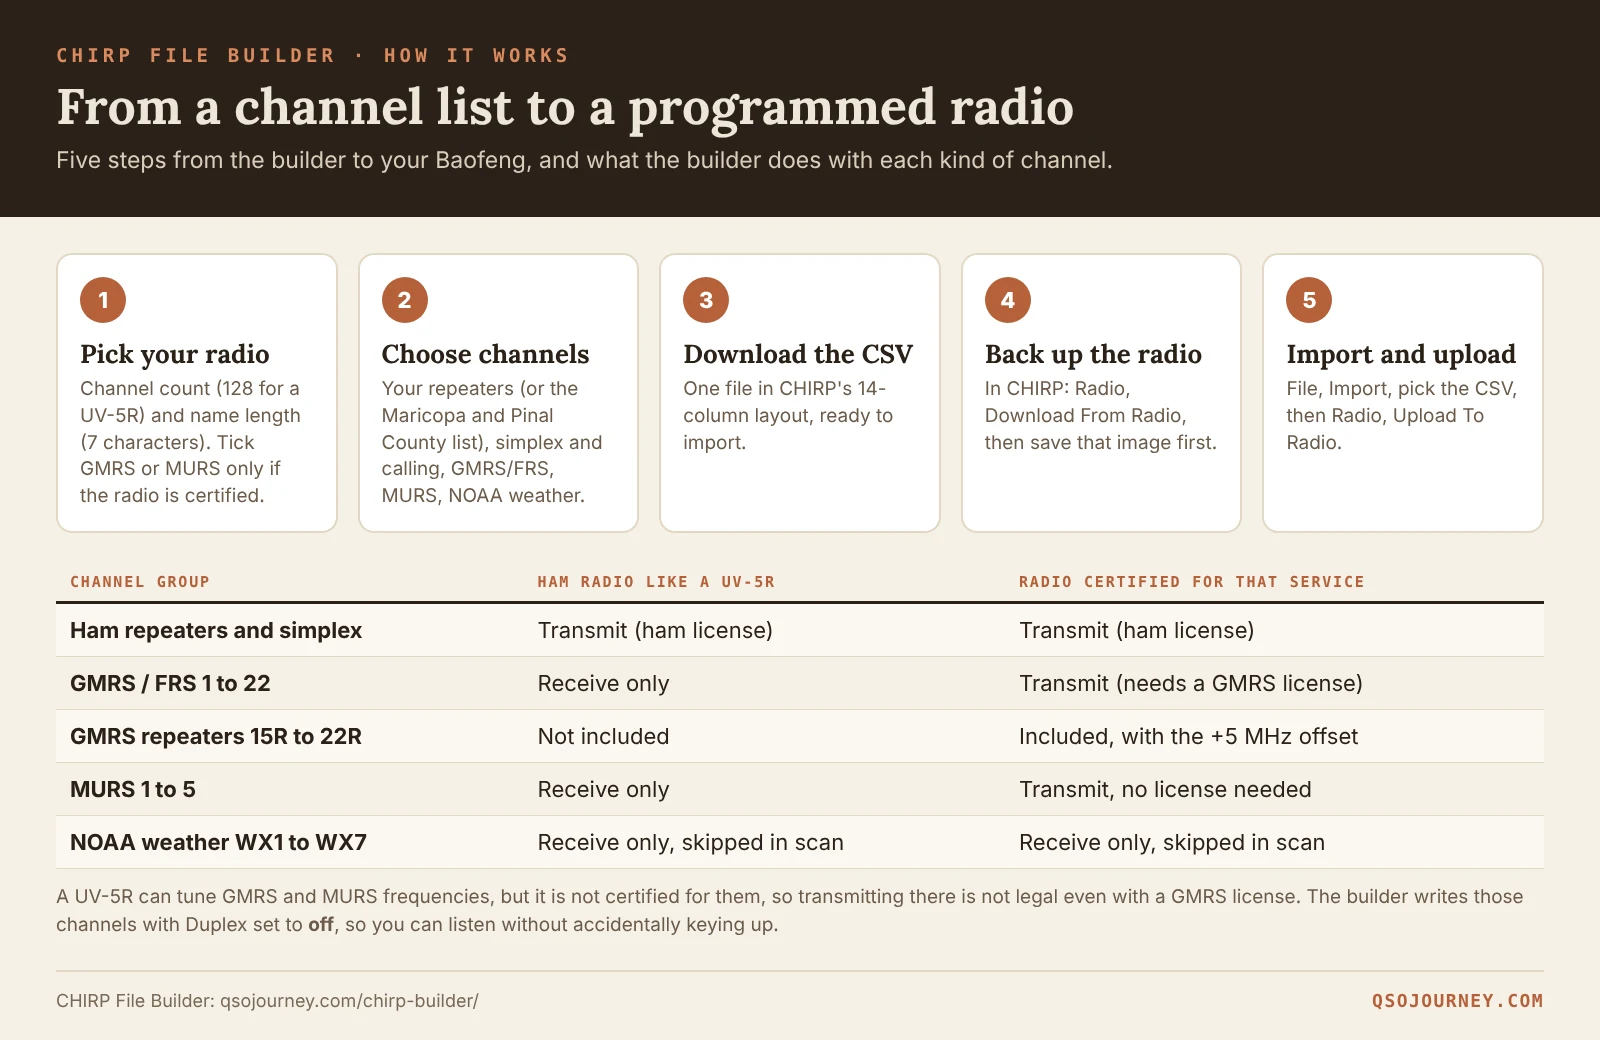
Step 1: tell it about your radio

- Channel memory: 128 for a UV-5R, UV-82 or BF-F8HP. Other choices cover radios with 199, 250 and 999 or more channels. The builder stops adding channels when you hit the limit.
- Longest channel name: 7 characters on a UV-5R. Names are cut to fit, so “Rim Mt Ord” becomes “Rim Mt”. Choose short names for your own repeaters.
- First memory number: CHIRP numbers UV-5R memories from 0. Starting at 1 keeps 0 free.
- Certified for GMRS / MURS: leave both unchecked for a ham radio like the UV-5R. More on why below.
Step 2: add your repeaters
Click + Add a repeater for each one, or Load Maricopa and Pinal County, AZ for the starter list. Typing an output frequency fills in the usual offset for that band (600 kHz on 2 m, 5 MHz on 70 cm), and you pick the tone mode and tone.

The Arizona list has 11 entries, including Sacaton Peak (N7ULY) on 447.725, the MARA/CFAR PACE simplex frequency 145.275, Pima/Pinal RACES on 147.300, the ARA Rimlink and Metrolink systems and White Tanks. If you are outside Arizona, clear the list and add your own from a current directory such as RepeaterBook. Always check each offset and tone against the directory, because repeaters do change.
Step 3: pick the other groups
Each group has a checkbox and a count. Untick a whole group, or untick single channels inside it. For a new Technician with a UV-5R I would keep:
- The four main calling and simplex channels (146.520, 146.550, 146.580 and 446.000)
- All 22 GMRS/FRS channels as receive only, so you can hear family radios
- All seven NOAA weather channels
- MURS as receive only, if you have room
That plus 11 repeaters comes to 49 channels, well under the 128 limit.
Step 4: preview and download
The bottom of the page shows every channel exactly as it will land in the radio: memory number, name, frequency, offset, tone and mode.
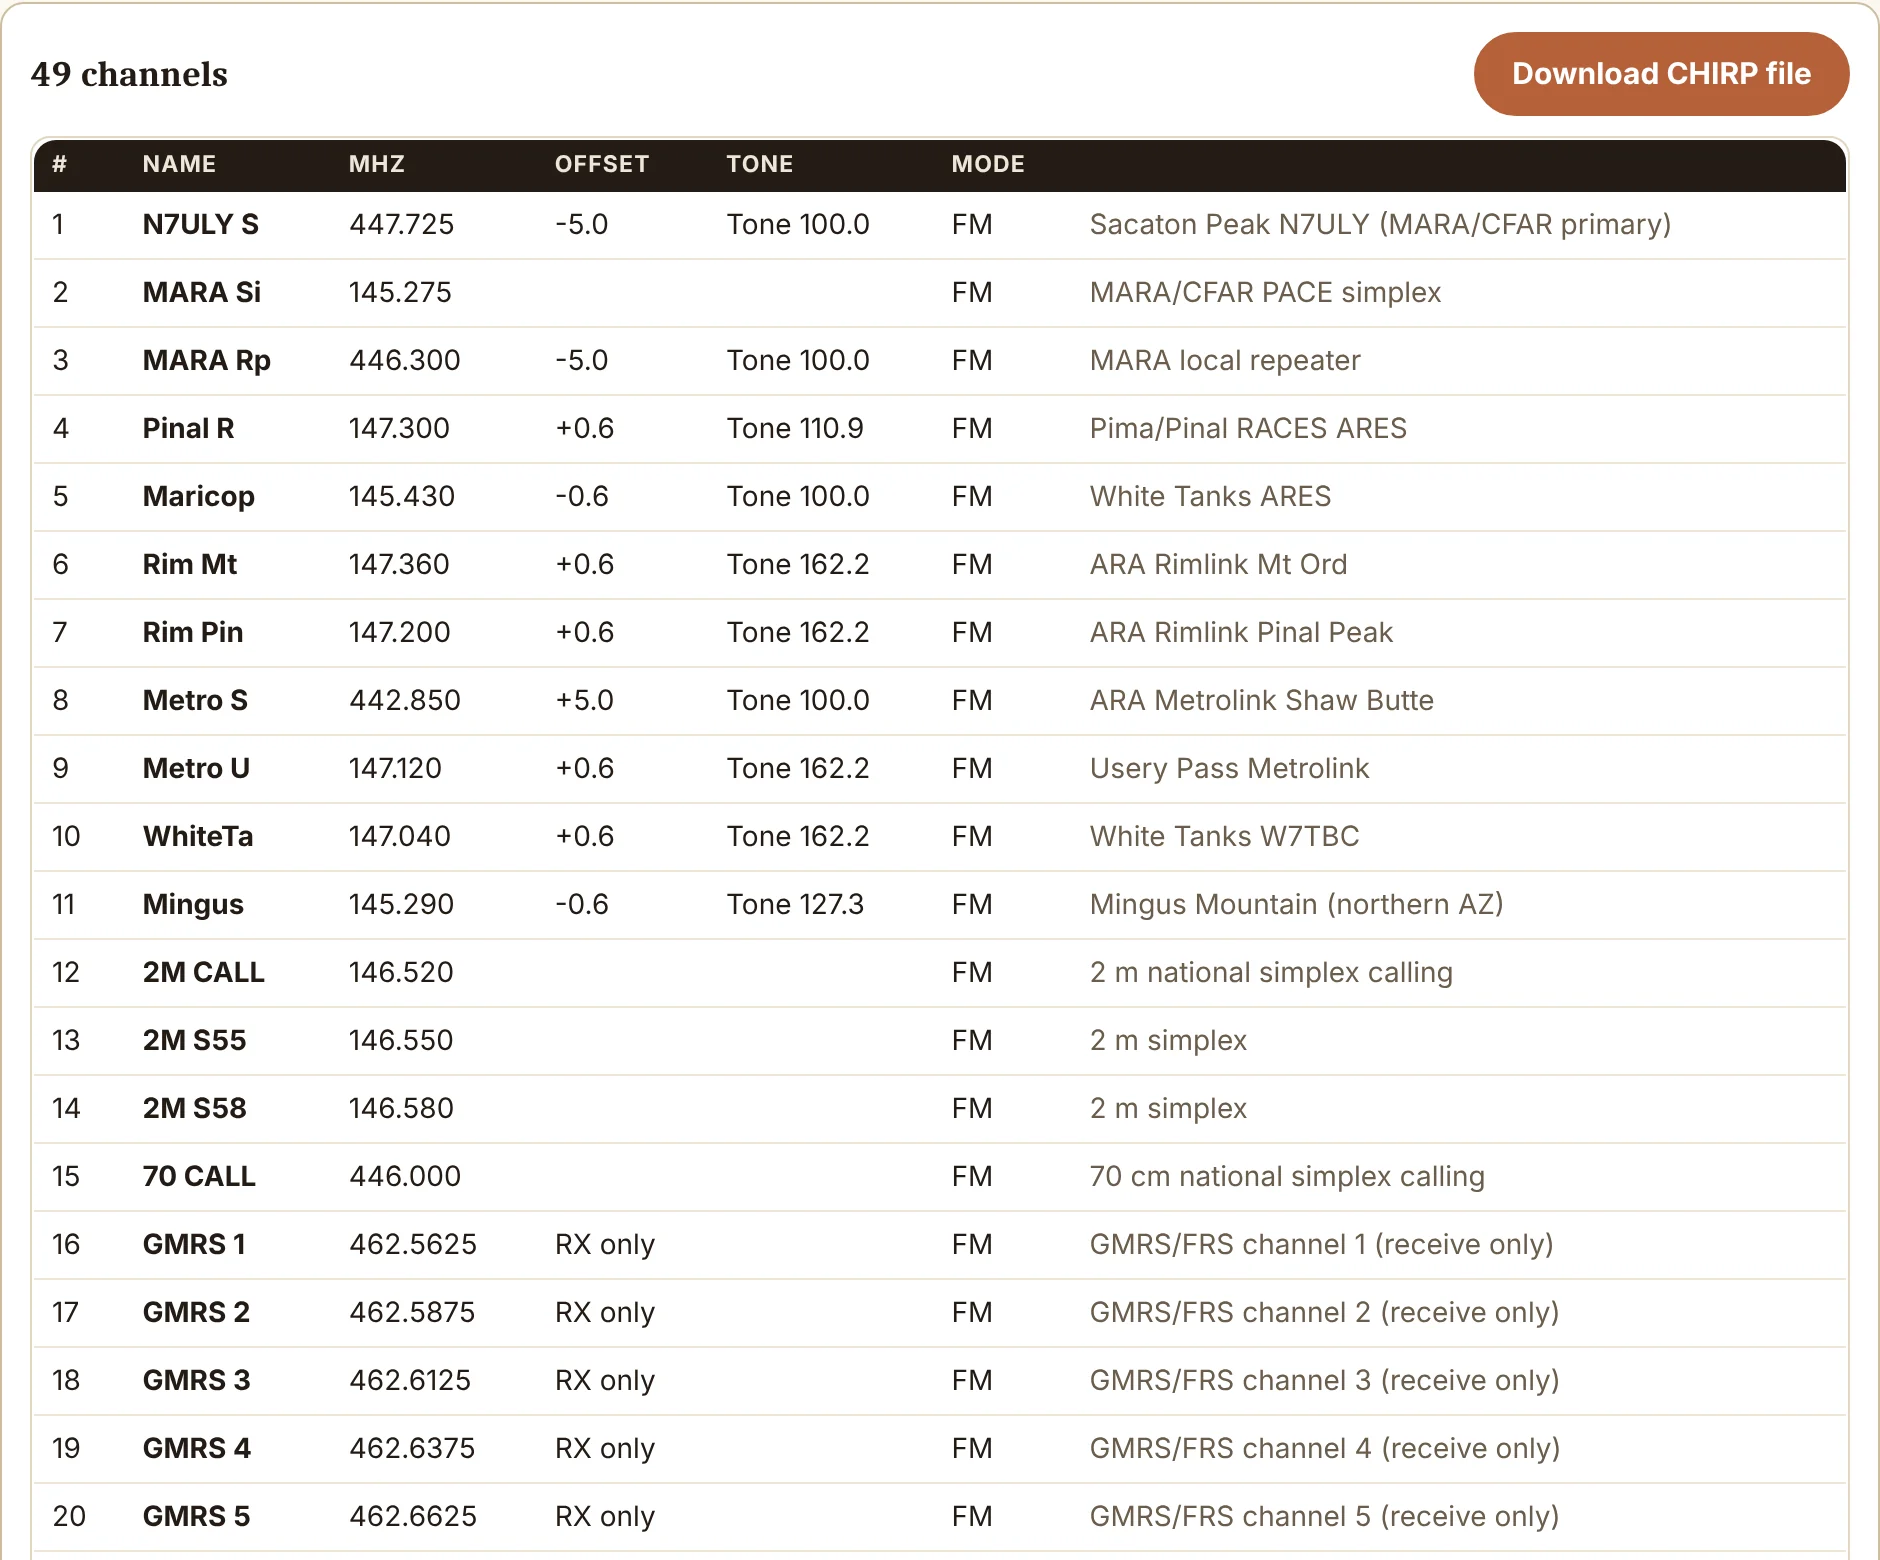
Here are the first lines of the file it writes for this example:
Location,Name,Frequency,Duplex,Offset,Tone,rToneFreq,cToneFreq,DtcsCode,DtcsPolarity,Mode,TStep,Skip,Comment
1,N7ULY S,447.725000,-,5.000000,Tone,100.0,100.0,023,NN,FM,5.00,,Sacaton Peak N7ULY (MARA/CFAR primary)
2,MARA Si,145.275000,,0.000000,,100.0,100.0,023,NN,FM,5.00,,MARA/CFAR PACE simplex
4,Pinal R,147.300000,+,0.600000,Tone,110.9,110.9,023,NN,FM,5.00,,Pima/Pinal RACES ARES
Duplex “-” with a 5.000000 offset means the radio transmits 5 MHz below the repeater output. Tone “Tone” with rToneFreq 100.0 sends a 100.0 Hz CTCSS tone so the repeater opens. A GMRS channel on a UV-5R gets Duplex “off”, which tells CHIRP the channel cannot transmit.
Step 5: import it into CHIRP
- Connect the programming cable and, in CHIRP, choose Radio, Download From Radio. Save that file first. It is your backup of the factory settings.
- Choose File, Import and pick the CSV you downloaded. Click OK to place the channels starting at memory 1.
- Look over the grid, then choose Radio, Upload To Radio.
- Key up on a repeater and check that it opens. If it does not, the tone is the usual suspect.
If the cable is giving you trouble, How to Program a Baofeng UV-5R with CHIRP covers drivers and cable problems step by step. This builder replaces the AI prompt step from How to Use AI to Program Your Ham Radio.
Why GMRS and MURS are written receive only
A UV-5R will happily tune 462.5625 MHz, but tuning is not the same as being allowed to transmit. GMRS radios have to be certified under FCC Part 95E and MURS radios under Part 95J. A ham radio like the UV-5R is not, so transmitting there is not legal even if you hold a GMRS license.
So, unless you tick the certification boxes, the builder writes those channels with Duplex set to off. You can listen to family radios and MURS users, but the radio will not key up there by accident. Tick the GMRS box for a certified GMRS radio and the channels become transmit channels, and the GMRS repeater pairs 15R to 22R appear with the standard +5 MHz offset. The rules are in What GMRS Allows: Encryption, Scanning and Business Band and MURS vs GMRS vs FRS.
Common questions
Does it work with radios other than Baofeng?
Yes. The CSV is CHIRP’s generic import format, so any radio CHIRP supports can take it. Set the channel memory and name length to match your radio.
Will it wipe my existing channels?
Importing places the new channels starting at the memory you choose and replaces whatever is in those slots. That is why the first step is downloading and saving what is already in the radio.
Are my entries saved?
Yes, in your browser. Come back later and your repeaters are still there. Nothing is sent to the server.
DMR Codeplug Generator
The hardest part of getting on DMR is not the radio. It is the codeplug: a radio ID list, talk groups, receive groups, channels and zones that all have to point at each other correctly before you hear a thing. The DMR Codeplug Generator builds a working starter codeplug from a single form and gives you files your programming software can import. Here is how to use it, from DMR ID to first contact on the Parrot.
What the DMR Codeplug Generator does
Fill in six short sections, and it writes the CSV files for your radio, one at a time or all in one zip:
| Radio | What you get |
|---|---|
| AnyTone AT-D878UV / 878UVII Plus, AT-D890UV, BridgeCom Maverick | Channel, Radio ID list, Talk Groups, Receive Group Call List and Zone CSVs, plus a QSOJourney.LST file to import them all at once |
| AnyTone AT-D578UV (mobile) | The same files, with Channel.CSV in the 578 layout |
| Baofeng DM-32UV | Talk groups, channels and zones in the DM-32 CPS format |
| Baofeng DM-1701, DM-1801, DM-860 or RD-5R with OpenGD77 | Contacts, TG lists, channels and zones for the OpenGD77 CPS |
| Baofeng DM-1701 with the stock software | The stock software cannot import channels, so you get the OpenGD77 files as a worksheet to type from |
It starts from the same starter codeplug we built in the DMR Tech Session. Everything you type stays in your browser.
How a codeplug fits together

Think of it as a chain. Your radio ID goes on every digital transmission. Talk groups are the “rooms” you can talk in. The receive group is the list of rooms you want to hear no matter which one you are transmitting to. A channel ties a frequency, color code and timeslot to one talk group. Zones are folders of channels. If any link points at something that does not exist, the import fails or the radio stays silent, which is why building one by hand the first time is so frustrating.
Section 1: your radio and ID
Pick the radio, then enter your DMR ID (7 digits for most hams) and your call sign. No DMR ID yet? Register at RadioID.net first; approval can take a day. RadioID.net and DMR ID Registration walks through it. The examples here use the placeholder ID 1234567 and the call N0CALL.
Section 2: talk groups

The starter list is the one from our Tech Session, on Brandmeister:
| Talk group | Number | Type | Hear? |
|---|---|---|---|
| AZ Statewide | 3104 | Group | Yes |
| USA | 3100 | Group | Yes |
| Worldwide | 91 | Group | Yes |
| Local | 9 | Group | Yes |
| Parrot | 9990 | Private | No |
| Disconnect | 4000 | Group | No |
Parrot is a private call that records you and plays you back, which makes it the perfect first test. Disconnect drops whatever talk group your hotspot or repeater is linked to. Use Browse Brandmeister talk groups or Browse TGIF talk groups to tick more from the full lists. My advice: start with a few. You can always add more, and a radio full of talk groups you never use is harder to drive. Brandmeister vs. TGIF explains the two networks.
Section 3: your hotspot
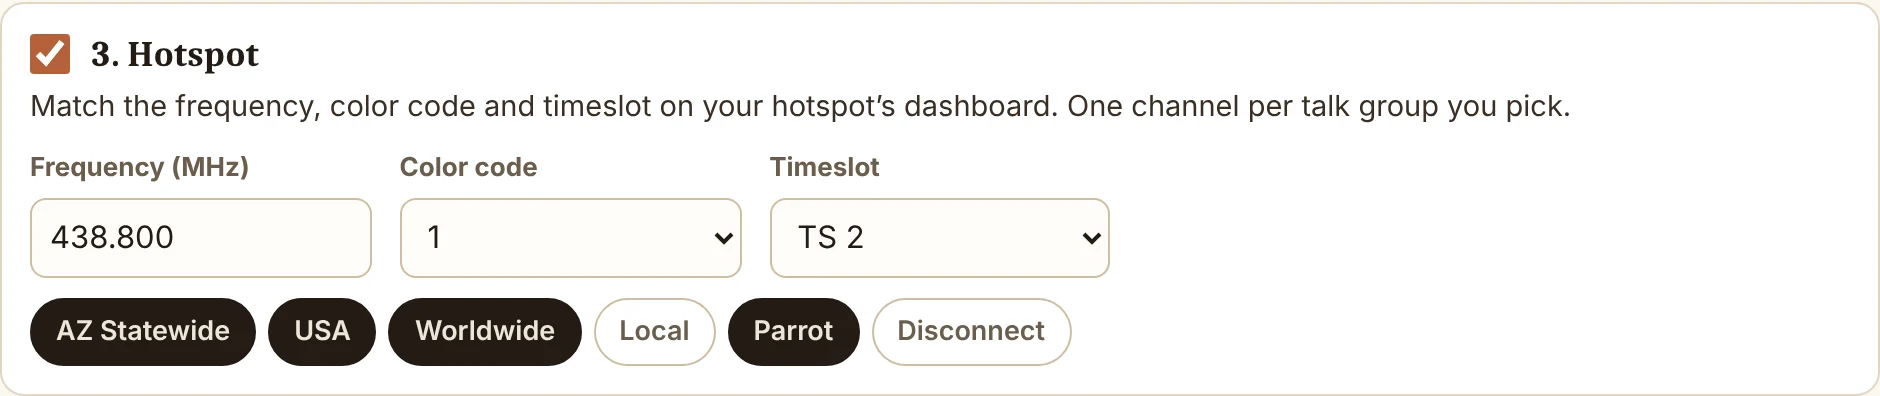
Enter the hotspot frequency, color code and timeslot exactly as they appear on your hotspot’s dashboard (Pi-Star or WPSD). The default is 438.800 MHz, color code 1, timeslot 2. The generator makes one hotspot channel per talk group you tick here, so in this example you get HS AZ Statewide, HS USA, HS Worldwide and HS Parrot, all on the same frequency. Building the hotspot itself is covered in Building a DMR Hotspot with a Raspberry Pi.
Section 4: DMR repeaters
Add each DMR repeater with its output frequency, offset, color code and which talk group sits on which timeslot. Get those from the repeater’s listing on RepeaterBook or from the club that runs it, and do not assume one repeater matches another. Each repeater gets its own zone.
Section 5: analog channels
FM channels ride along in the same codeplug. Keep a few, because when the internet is down, talk groups go with it. The Maricopa and Pinal County starters add Sacaton Peak (N7ULY, 447.725, -5 MHz, tone 100.0), the PACE simplex frequency 145.275 and the national calling channels. A tick adds the seven NOAA weather channels as receive only. More on why in DMR Talkgroups Are Great Fun, But Don’t Mistake Them for a SHTF Plan.
Download and import
With the defaults, the summary reads 15 channels: 4 digital, 11 analog, 3 zones, 6 talk groups, and the preview shows every channel by zone with its RX and TX frequency, color code, timeslot and talk group or tone.
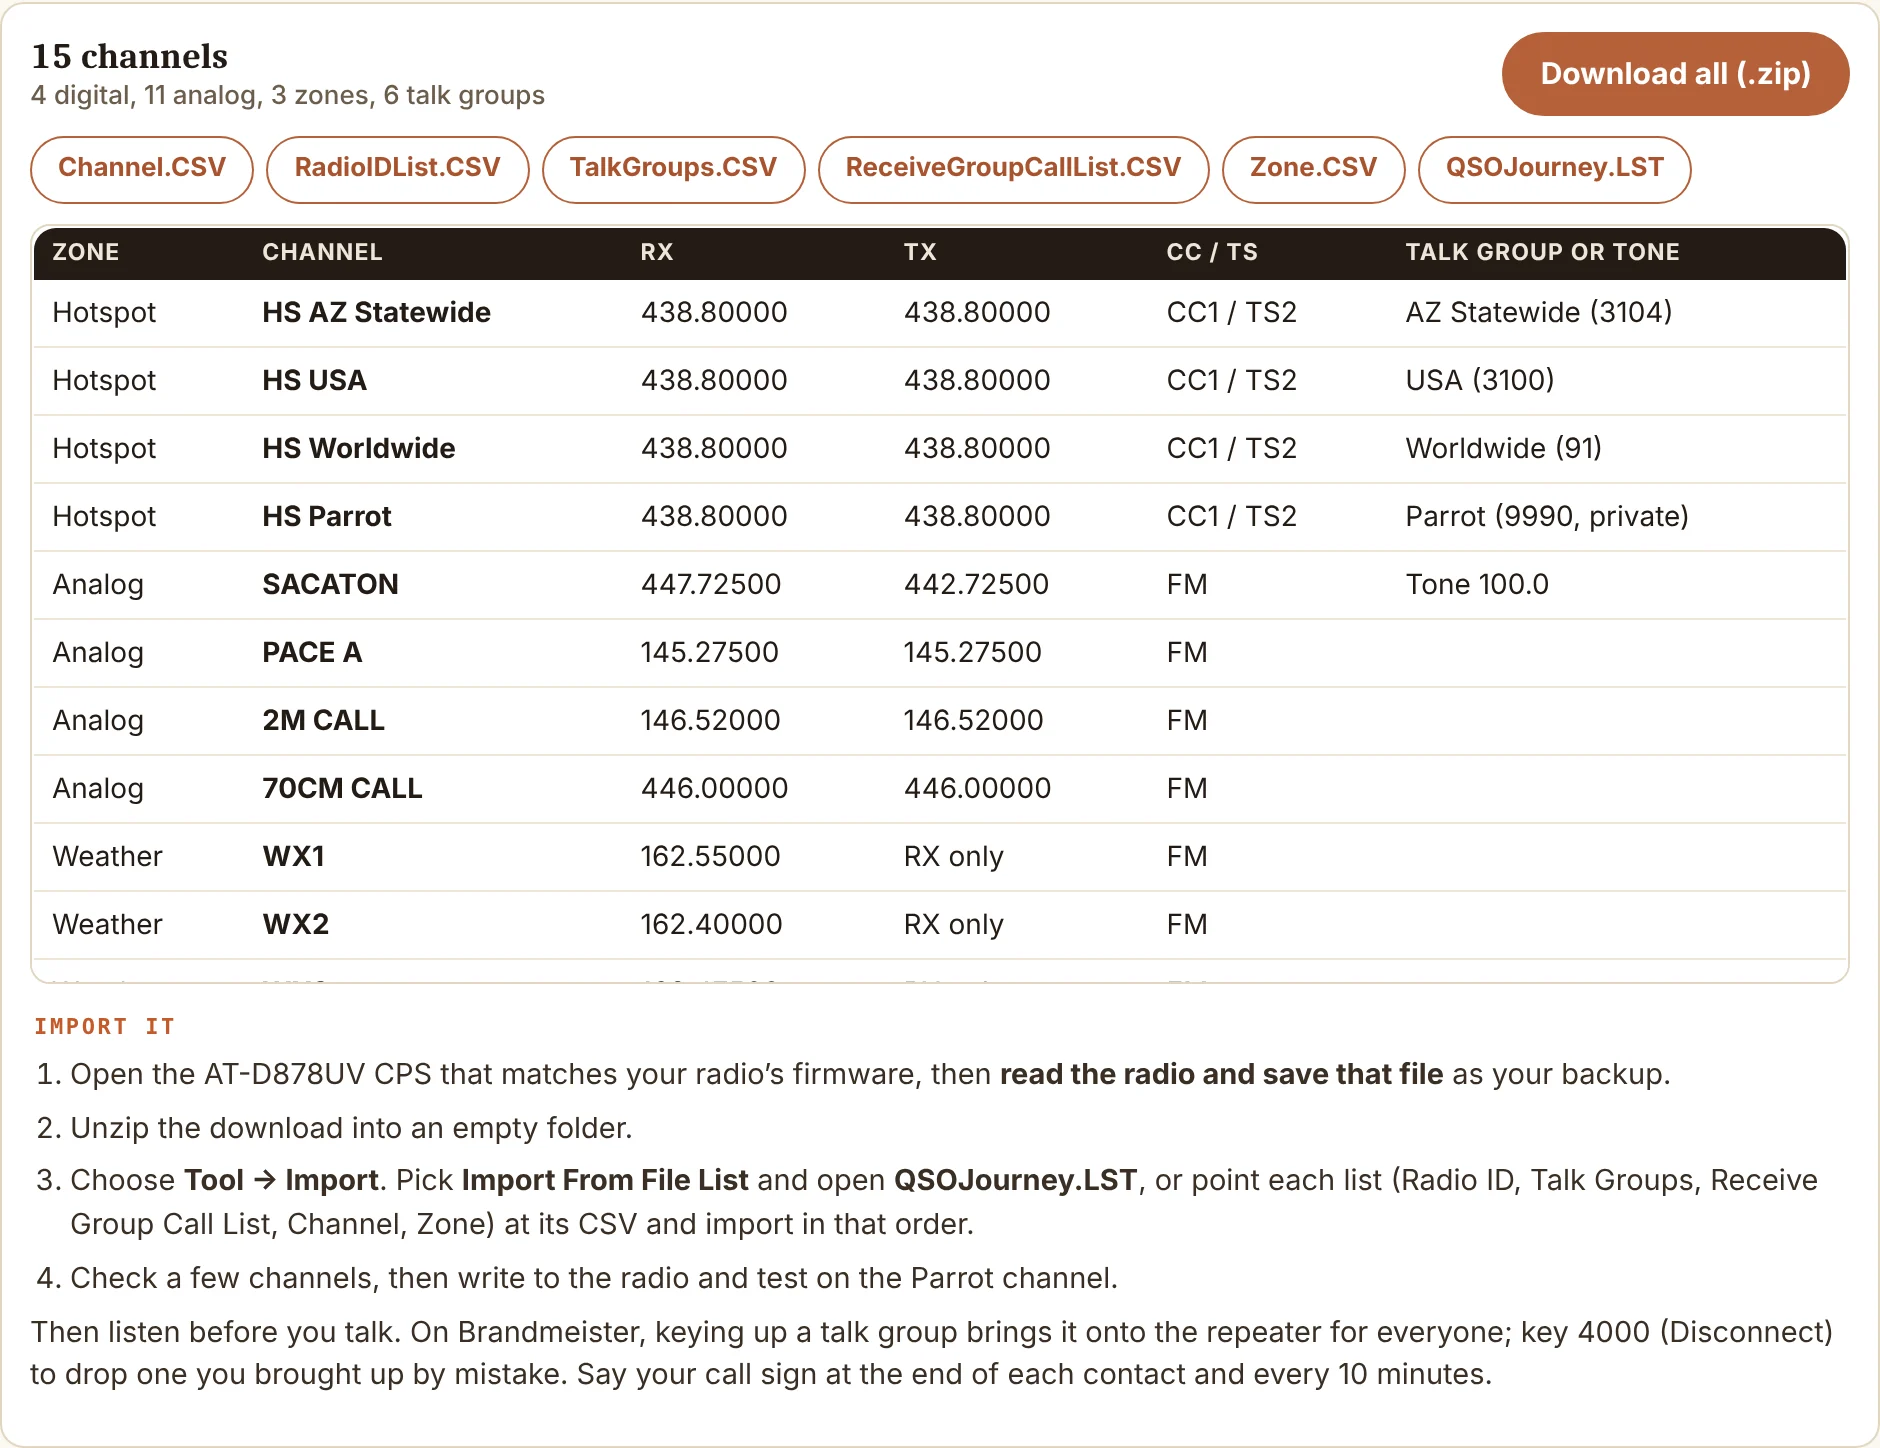
For an AnyTone 878, 890 or Maverick:
- Open the CPS that matches your radio’s firmware, read the radio and save that file as your backup.
- Unzip the download into an empty folder.
- Choose Tool, Import. Pick Import From File List and open QSOJourney.LST, or import each CSV in this order: Radio ID, Talk Groups, Receive Group Call List, Channel, Zone.
- Check a few channels, write to the radio, and key up on HS Parrot. If you hear yourself played back, the whole chain works.
Switch the radio to a Baofeng DM-32UV and the files change to DM32_Talkgroups.csv, DM32_Channels.csv and DM32_Zones.csv (64 channels per zone). Receive groups are set in the DM-32 CPS itself. For a BridgeCom Maverick, the generator renames the contact columns to match BridgeCom’s documented change.
Match my CPS: when the import complains
Programming software adds and renames columns between versions. If your CPS rejects the channel file, export the channel list from your own software (on AnyTone, Tool, Export, Channel.CSV) and load it in section 6. The generator then writes that exact header and fills any column it does not set from the first analog or digital row of your export. That handles CPS versions newer than the generator.
Tips
- Build one by hand first. I still think everyone should build one codeplug manually to understand it. After that, this saves a lot of clicking. Your First DMR Codeplug on the AnyTone is the manual walkthrough.
- Use Parrot as your first test, not a busy statewide talk group.
- Wait between keyups. DMR networks need a moment to route the call. Key up, wait a second, then talk.
- Keep the backup. Always read and save the radio before writing anything new to it.
Antenna Calculators
Almost every antenna question I get at a Tech Session starts the same way: “How long do I cut it?” The Antenna Calculators on QSO Journey answer that for the antennas hams actually build, and they go a step further with heights, trimming, coax loss and a printable cut sheet. This section walks through every calculator with a real worked example, so you know what the numbers mean before you pick up the wire cutters.
What the Antenna Calculators do
There are ten calculators on one page, each on its own tab. Everything runs in your browser, nothing is sent anywhere, and the page remembers whether you like feet and inches or meters.
| Tab | What you get |
|---|---|
| Dipole | Leg and total length for a flat dipole or inverted V, cut length with extra for insulator wraps, NVIS and DX heights, and a trim helper |
| End-fed | EFHW radiator, counterpoise, transformer ratio, and which bands land on a harmonic |
| Vertical | Quarter-wave ground plane or 5/8-wave, with radial lengths |
| J-pole | J-pole or Slim Jim dimensions for VHF and UHF, for copper, aluminium or twin-lead |
| Loop | Full-wave loop, square or delta sides, and the 75-ohm matching section |
| Moxon | Moxon rectangle dimensions A to E from L. B. Cebik’s equations |
| Yagi | Starting element lengths and spacing for 2 to 7 elements |
| Random wire | Lengths to use and lengths to avoid with a 9:1 unun |
| Coax loss | Matched loss, extra loss from SWR, power at the antenna and a cable comparison |
| Wavelength | Full and fractional wavelengths, in free space or at a velocity factor |
Every tab draws the antenna with the lengths labeled, and the Print a cut sheet button gives you a one-page sheet to take out to the yard. All of the lengths are starting points. Cut long, hang it, and trim with an analyzer or SWR meter.
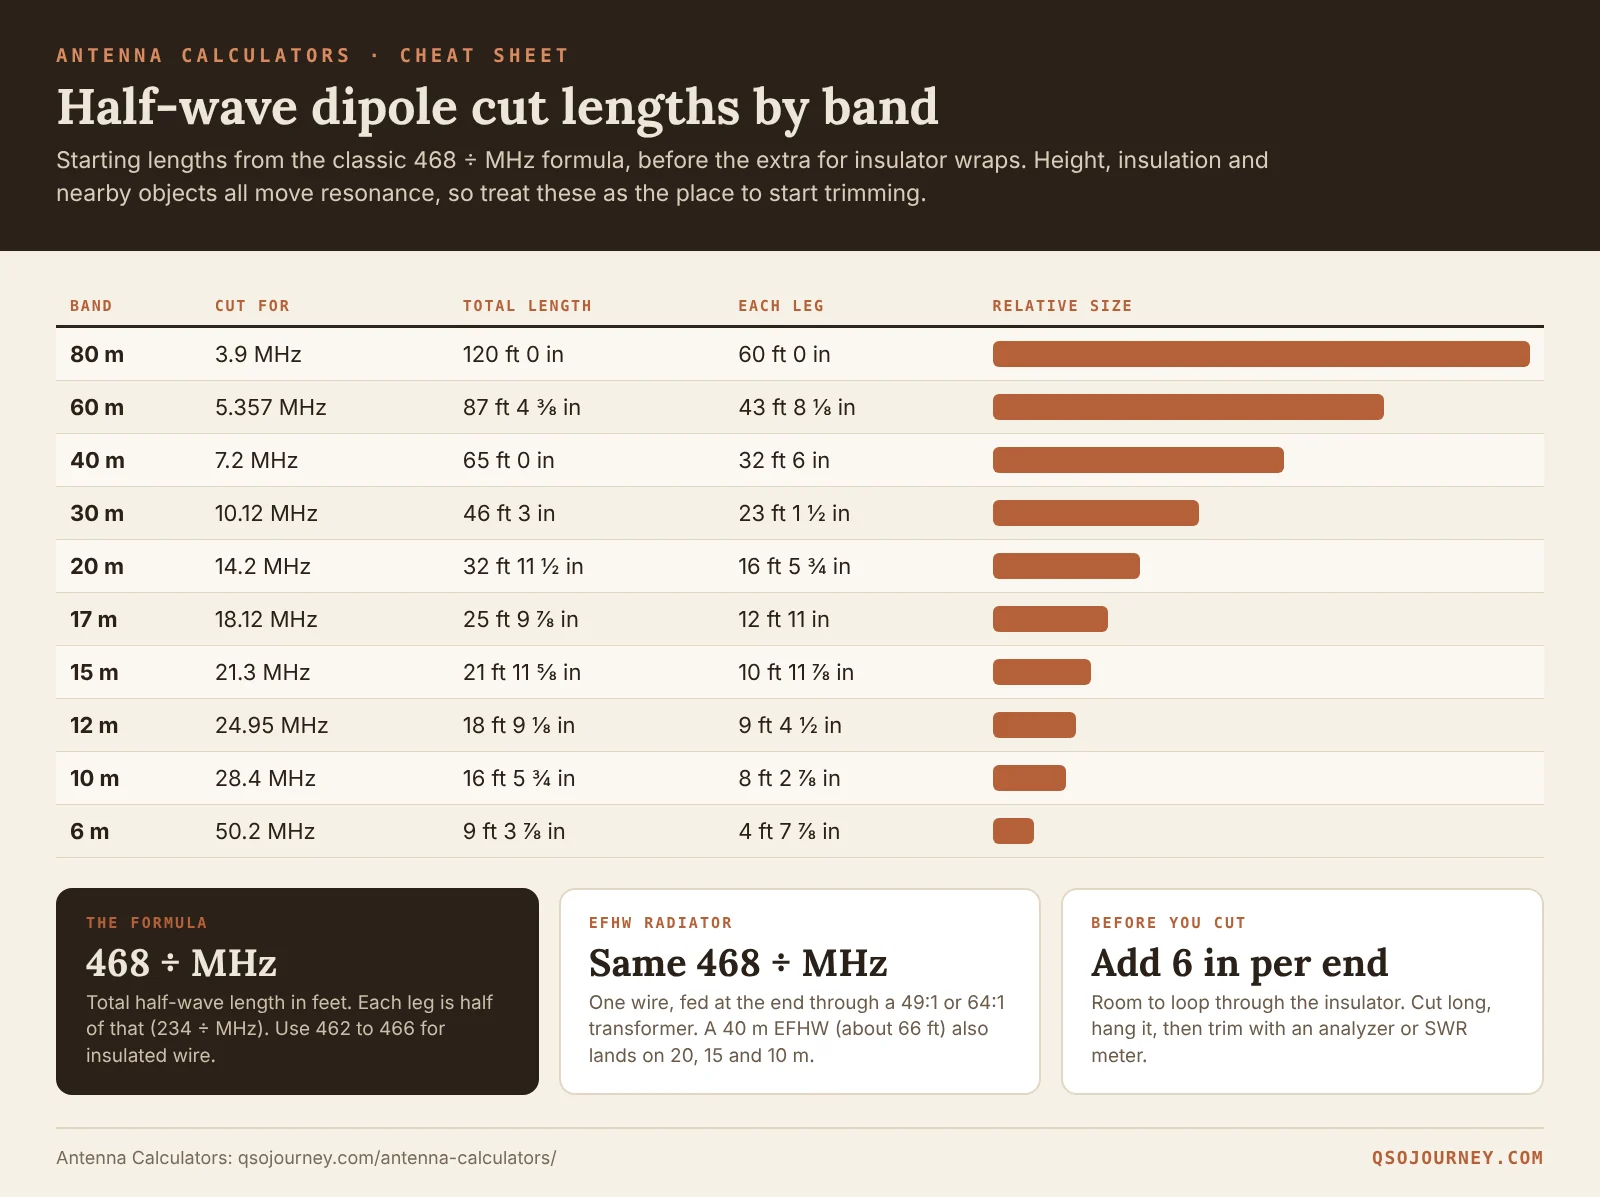
Example 1: an 80 meter inverted V for NVIS
Say you want to check into a regional phone net on 75 meters at 3.9 MHz, and you have one mast in the middle of the yard. On the Dipole tab, pick 80 m, type 3.9 in Frequency, and change Shape to Inverted V.
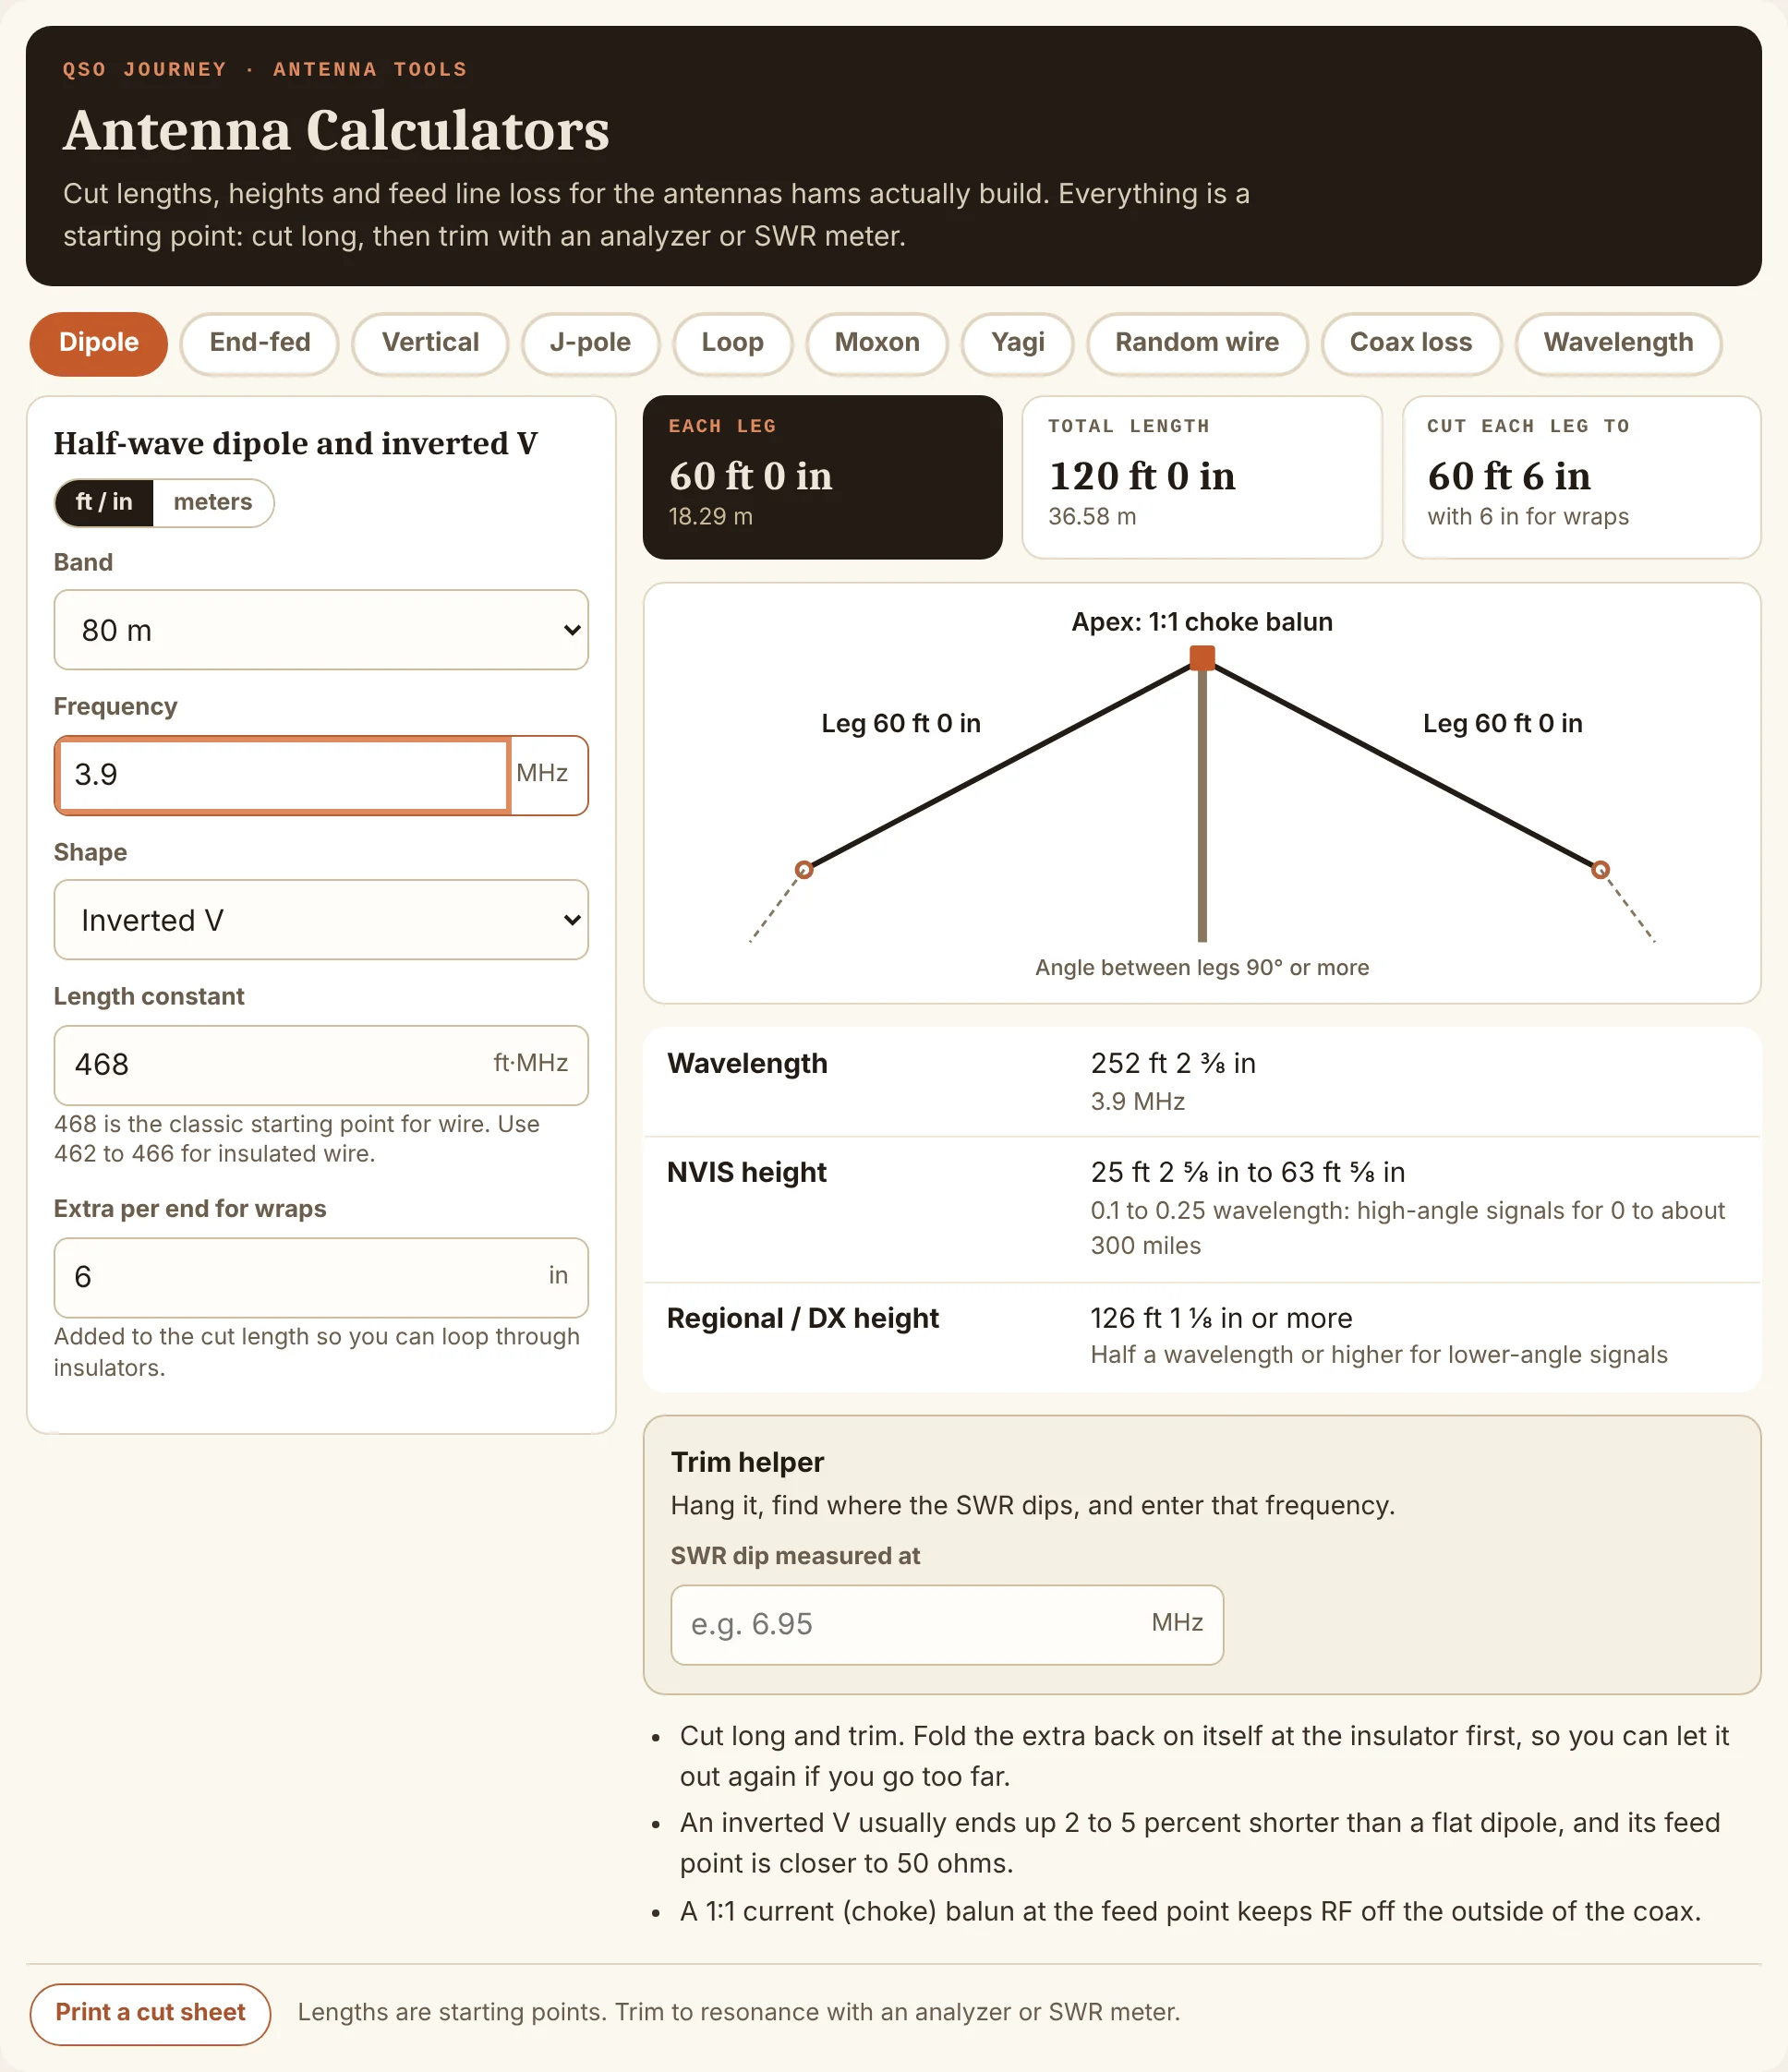
Here is what the calculator tells you:
- Each leg: 60 ft 0 in, total 120 ft. That is 468 ÷ 3.9. Each leg is half of it.
- Cut each leg to 60 ft 6 in. The extra 6 inches per end is for looping the wire through the insulator. Change it if you wrap more or less.
- NVIS height: 25 ft to 63 ft. That is 0.1 to 0.25 wavelength, the range that sends most of the signal nearly straight up for contacts out to about 300 miles. A 30 ft mast is right in it.
- DX height: 126 ft or more. Half a wavelength on 80 m is a tower most of us will never own, which is exactly why 80 m is an NVIS band for most stations.
The notes under the drawing remind you that an inverted V usually ends up 2 to 5 percent shorter than a flat dipole, and that the angle between the legs should be 90 degrees or more. Put a 1:1 choke balun at the apex. If you are new to the idea, NVIS vs. Vertical DX Antennas explains why low and flat wins for regional nets.
Example 2: using the trim helper
Here is a typical first hang. You cut for 7.2 MHz (65 ft total), hang it, sweep it with an analyzer, and the SWR dip lands at 6.95 MHz. Type 6.95 into SWR dip measured at.

The calculator says: “The dip is low, so the antenna is long. Trim 13 ½ in from each leg. New total about 62 ft 8 ⅞ in.” The math is simple ratio: new length = old length × measured frequency ÷ target frequency, so 65 × 6.95 ÷ 7.2 = 62.74 ft. Take half the difference off each leg.
My advice: trim a little less than it says, fold the extra back on itself at the insulator, and measure again. Wire is easy to shorten and annoying to lengthen. If you do not own an analyzer yet, the NanoVNA is the cheapest way to see the dip instead of guessing from an SWR meter band by band.
Example 3: a 40 meter end-fed half-wave
On the End-fed tab, pick 40 m. The default frequency is 7.15 MHz.

- Radiator: 65 ft 5 ½ in. Same 468 ÷ MHz formula as a dipole, just all in one wire.
- Counterpoise: about 6 ft 10 ½ in. Roughly 0.05 wavelength. Many builds use the first few feet of coax shield with a choke instead.
- Transformer: 49:1 (or 64:1). An end-fed half-wave has a very high feed point impedance, and the transformer brings it down near 50 ohms.
- Bands this length covers: 40 m fundamental, then harmonics on 20, 15 and 10 m. 30, 17 and 12 m are marked “Needs a tuner.”
That harmonic list is why the 40 m EFHW is so popular for portable work. One wire, four bands, no tuner. The calculator also warns that harmonics tend to fall a little high in practice, so tune for the band you care about most. For the build itself, see Building a 49:1 Transformer for a 40m EFHW and EFHW vs Random Wire.
Example 4: a 2 meter Slim Jim
A Slim Jim is a great first VHF antenna. Pick 2 m, set the frequency to 146, choose Slim Jim (folded J-pole), and leave it on bare copper or aluminium (velocity factor 0.96).
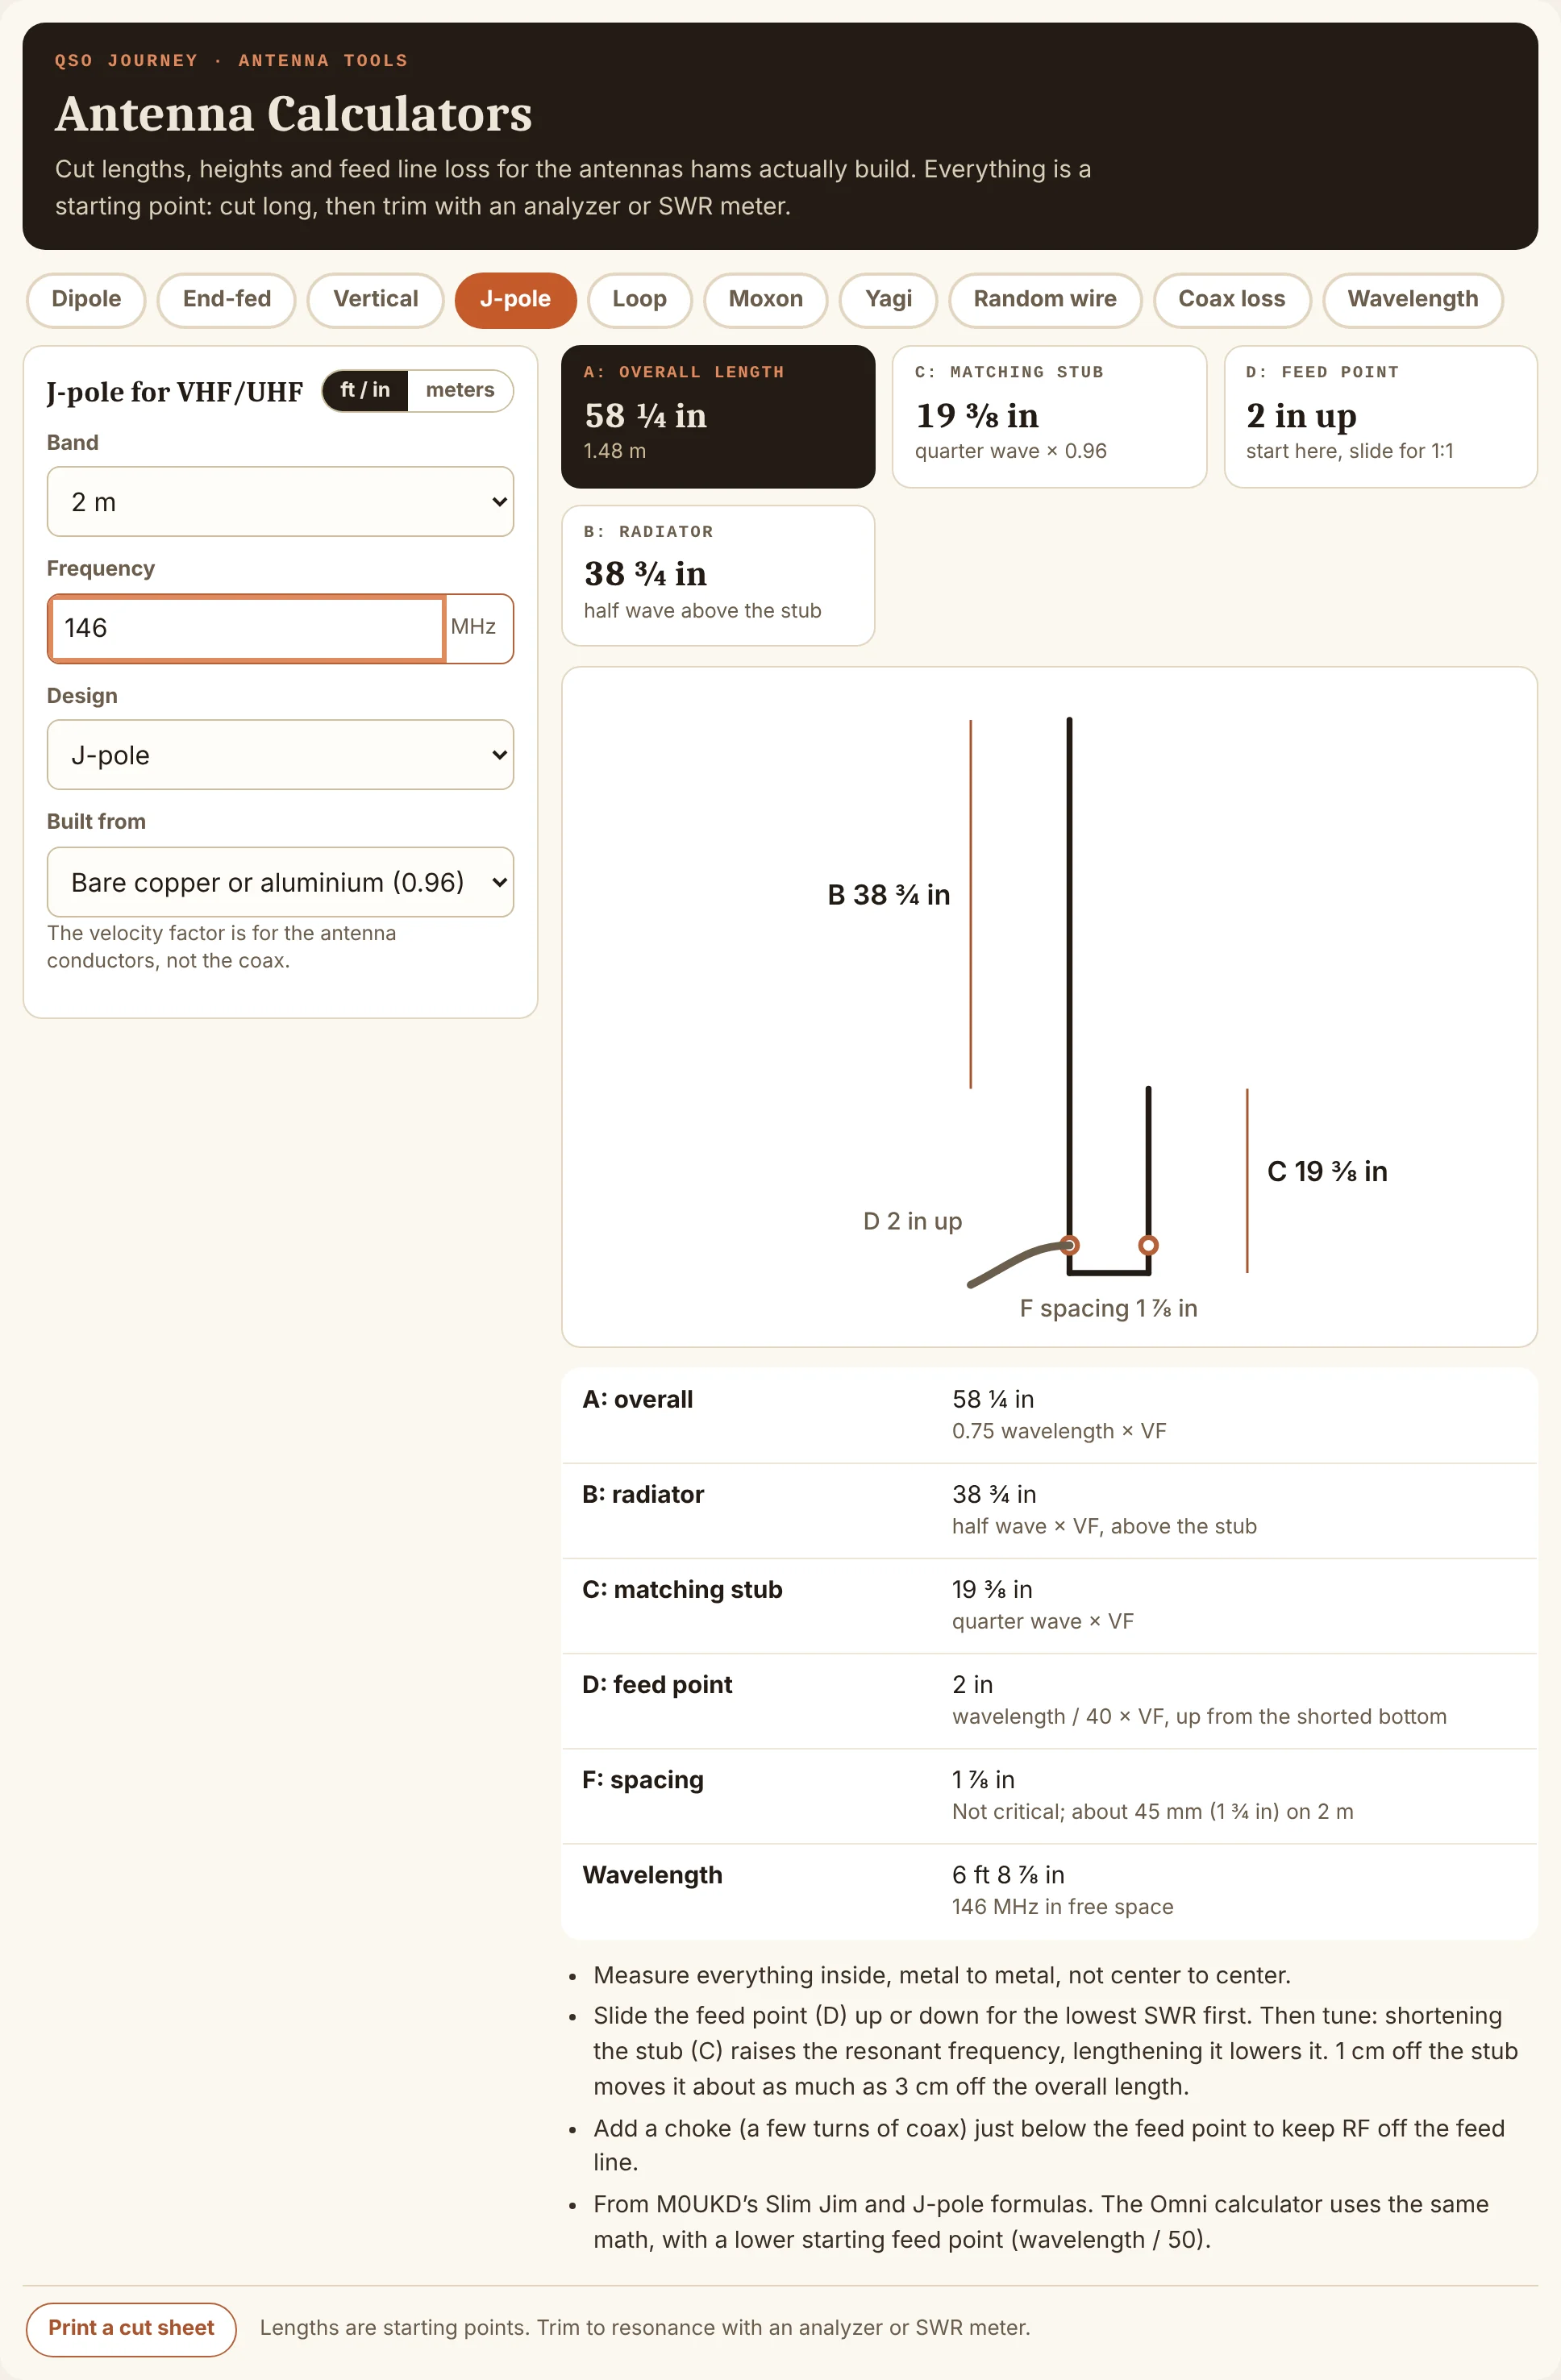
| Part | Length | What it is |
|---|---|---|
| A: overall | 58 ¼ in | 0.75 wavelength × velocity factor |
| B: radiator | 38 ¾ in | Half wave above the stub |
| C: matching stub | 19 ⅜ in | Quarter wave |
| D: feed point | 2 in up | Start here and slide for the lowest SWR |
| F: spacing | 1 ⅞ in | Not critical |
Measure everything inside, metal to metal. Slide the feed point first, then tune: shortening the stub raises the resonant frequency. If you are building it out of 300-ohm twin-lead for a roll-up antenna, change Built from and every dimension shrinks to match that line’s velocity factor. The build is in Building a Roll-Up Slim Jim Antenna for VHF/UHF.
Example 5: a 20 meter Moxon, and Yagis
The Moxon tab uses L. B. Cebik’s published regression equations, the same math as the long-standing calculator on his site. At the default 14.175 MHz in 14 AWG wire, you get:
- A, width: 25 ft 3 ⅝ in (both elements)
- B, driven tail: 3 ft 10 ⅜ in
- C, gap: 7 ½ in, the dimension that matters most
- D, reflector tail: 4 ft 8 ⅜ in
- E, depth: 9 ft 2 ¼ in
- Total wire: 33 ft ½ in for the driven element and 34 ft 8 ⅜ in for the reflector
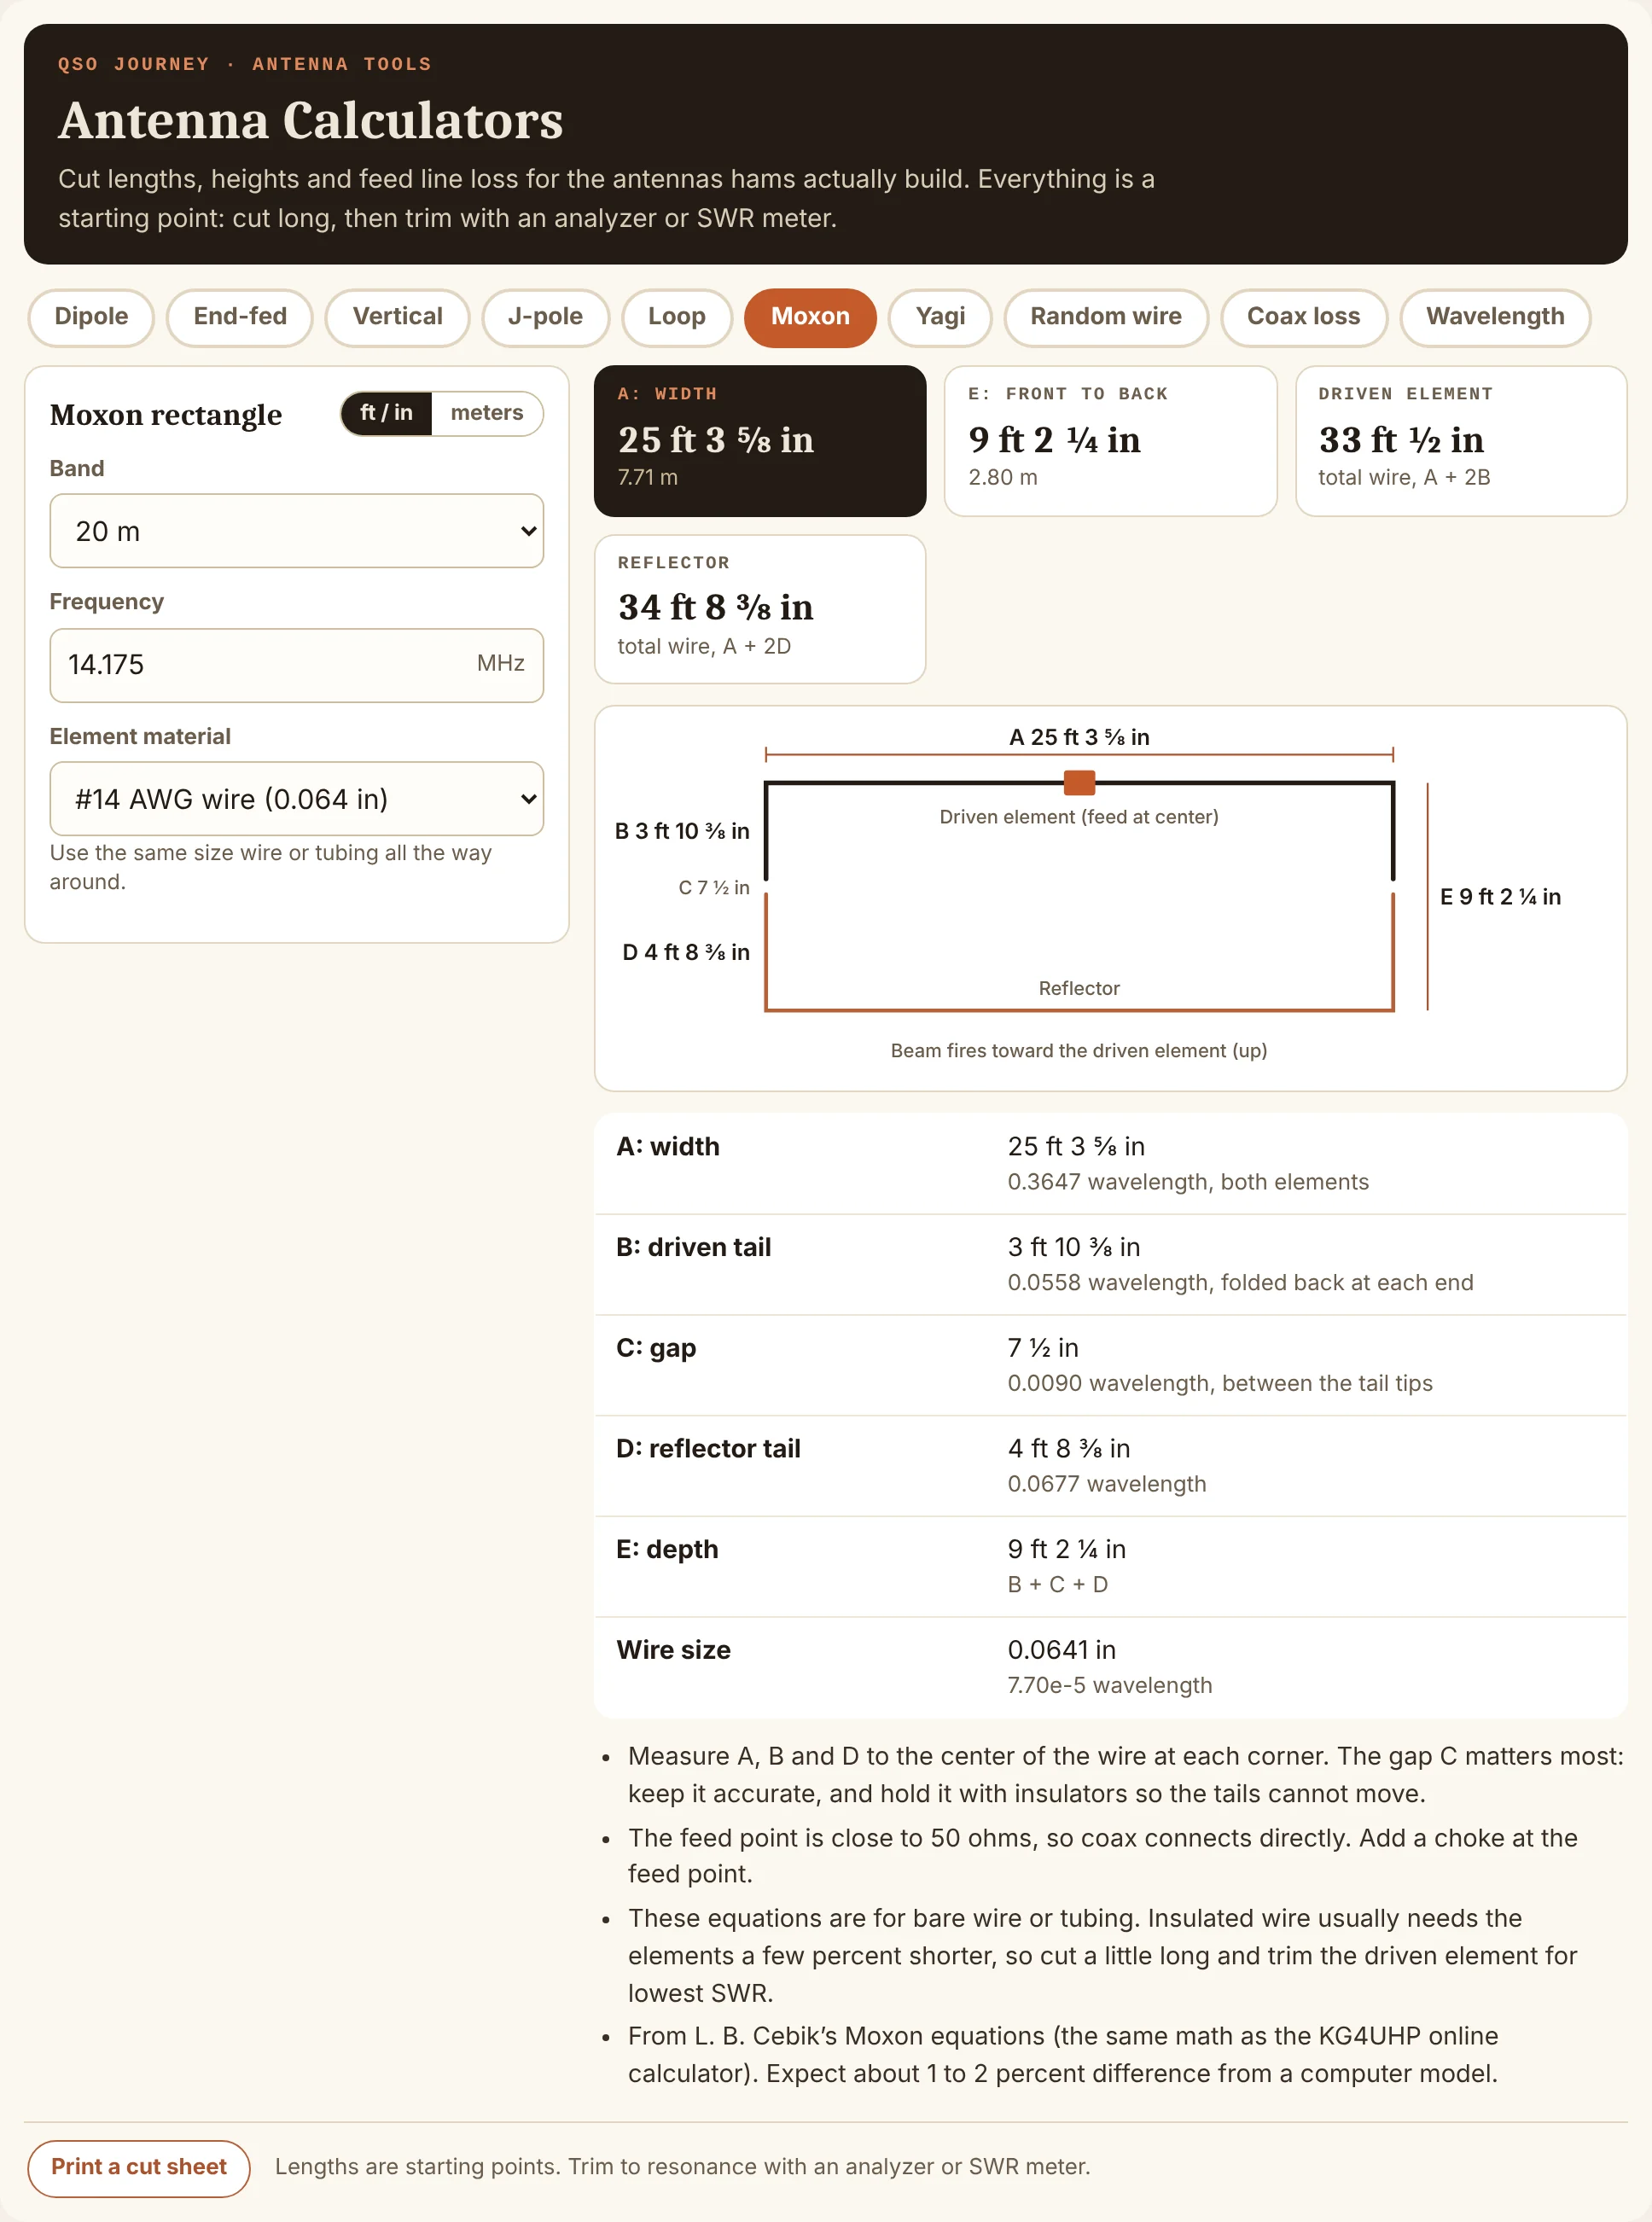
Pick the element material carefully, because the equations depend on the wire diameter in wavelengths. If you are building with insulated wire, cut a little long and trim the driven element. More on why a Moxon is worth building in What Is a Moxon Antenna?.
The Yagi tab gives rule-of-thumb starting lengths for 2 to 7 elements: reflector about 0.51 wavelength, driven element about 0.475, directors a little shorter each, all spaced 0.2 wavelength apart. That is fine for a VHF or UHF beam made of rod. For an HF beam with tapered tubing, the calculator tells you plainly to use a modeling program.
Example 6: random wire lengths that work
A random wire with a 9:1 unun is not really random. Some lengths land near a half wave on one of your bands, where the impedance is too high for most tuners. The Random wire tab checks every length between your shortest and longest wire against every band you tick.

With the defaults (80 through 10 m, 25 to 160 ft, 1 percent margin), the best lengths come out to 28 ft 8 in, 40 ft 7 in, 59 ft 8 in and 70 ft 10 in, each in the middle of a window that clears every band. Uncheck 80 m and the windows open up a lot. Raise the safety margin if your wire runs close to the ground or a roof, since that shifts things. You still need a tuner; a good length just keeps the match inside its range. Background in The Random Wire Antenna: Magic Lengths and Lengths to Avoid.
Example 7: how much power your coax eats
This is the calculator that changes the most minds. On the Coax loss tab, pick 2 m, set 146 MHz, choose RG-58 (solid), 100 ft, 50 W, and leave the SWR at 1.5:1.

- Power at the antenna: 11.8 W out of 50. Total loss 6.26 dB, so 38 watts warm up the cable.
- SWR at the radio: 1.10:1, even though the antenna is at 1.5:1. The loss hides the mismatch, so a lossy feed line makes a bad antenna look good on your meter.
- Same run, other cables: LMR-400 delivers about 71 percent, LMR-600 about 80 percent.
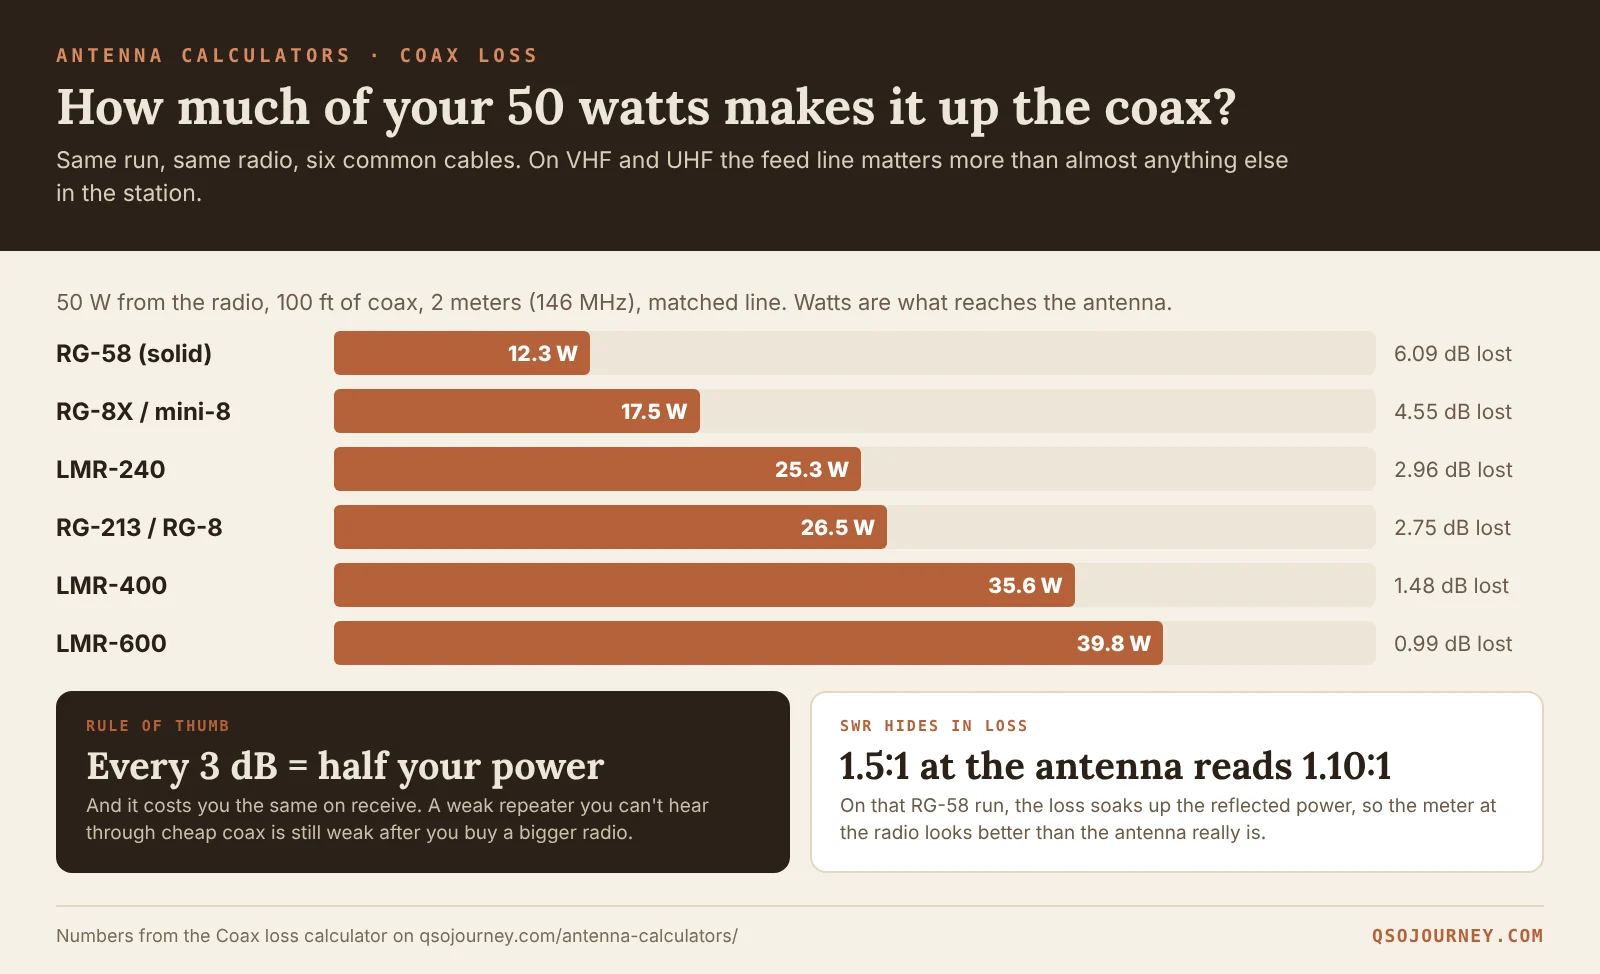
On HF the numbers are much kinder. The default example (50 ft of RG-8X on 20 m at 100 W) delivers 86 W. That is why I tell people to spend on coax for VHF and UHF and not worry as much on HF. Choosing Coax for HF and What Is SWR, and Why Does It Actually Matter? go deeper.
Tips for getting good results
- Use the length constant. 468 is the classic starting point for bare wire. Insulated wire is usually a little shorter, so try 462 to 466.
- Print the cut sheet. It has the drawing, every dimension and the notes on one page. Tape it to the workbench.
- Check the Wavelength tab for stubs. Coax stubs and phasing lines need the velocity factor of the cable, and the Wavelength tab gives 1/8 to 1 wavelength at any velocity factor.
- Trust the analyzer over the math. Height, nearby metal, trees and the ground all move resonance. The calculator gets you close; the analyzer gets you there.
Radio Horizon Calculator
“How far will this radio talk?” On VHF and UHF the honest answer is “about as far as the two antennas can see each other,” and that depends far more on height than on watts. The Radio Horizon Calculator does the line-of-sight math for you: enter two antenna heights, or work backward from the distance you need, and it shows the radio horizon, the earth bulge and the Fresnel zone you need to keep clear. Here is how to use it, with four real examples.
What the Radio Horizon Calculator does
It has three tabs:
- Range from heights. Two antenna heights in, and out comes the radio horizon for the pair, how far each station sees on its own, the optical horizon, the earth bulge at the midpoint and the Fresnel zone for your band.
- Height for a distance. Tell it how far away the other station is and how high its antenna sits, and it tells you how high yours needs to be, with a 50 percent margin figure.
- Height table. A grid of common height pairs, from chest height to a mountaintop.
Presets cover the usual cases (handheld at chest height, car roof, J-pole in a tree, push-up mast, backyard tower, hills and a mountaintop repeater), and it works in feet and miles or meters and kilometers.
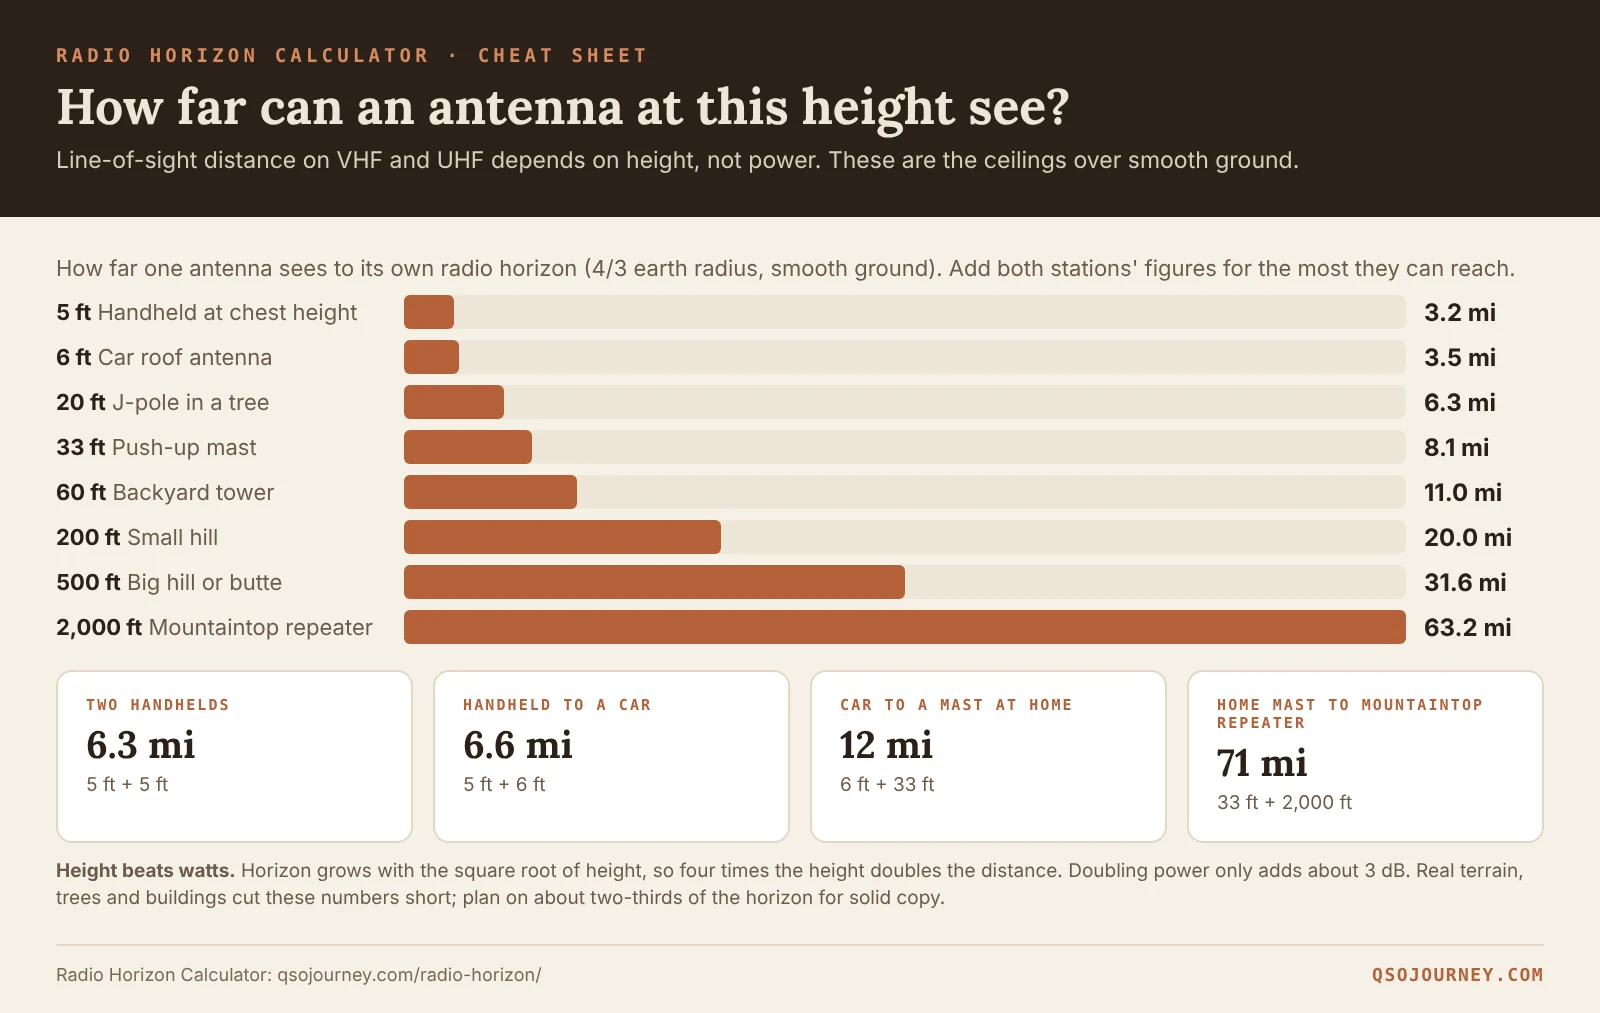
The math, in one line
Each station sees to its own horizon at d = √(2 × k × R × h), where R is the earth’s radius, h is the antenna height and k = 4/3. That 4/3 factor is the standard allowance for the way VHF and UHF bend slightly with the atmosphere, which is why the radio horizon is about 15 percent farther than what your eyes can see. In everyday units it works out to about 1.41 × √(height in feet) miles. The two horizons add together.
Example 1: a handheld talking to a J-pole in a tree
This is the default when you open the page: Station A is a handheld at chest height (5 ft) and Station B is a roll-up J-pole hung 20 ft up a tree, on 2 meters.

- Radio horizon: 9.5 mi. The handheld sees 3.2 mi and the J-pole sees 6.3 mi.
- Earth bulge at the midpoint: 11 ft. On a 9.5 mile path the ground curves up 11 ft between you.
- Fresnel zone at the midpoint: 290 ft radius, with 174 ft (60 percent) to keep clear.
Then comes the warning: at the full horizon distance, the bulge plus the Fresnel zone is taller than both antennas. Signals will be weak near the edge, and solid copy is more like two-thirds of the horizon, around 6 miles, unless you add height. That matches what most people see in the real world. Two handhelds on flat ground top out around 6 miles, and 1 to 2 miles is normal once you add houses and trees.
Example 2: a mast at home to a mountaintop repeater
Change Station A to a 30 ft mast and Station B to a repeater 2,000 ft above the valley floor. Here in Arizona that is a normal repeater site.
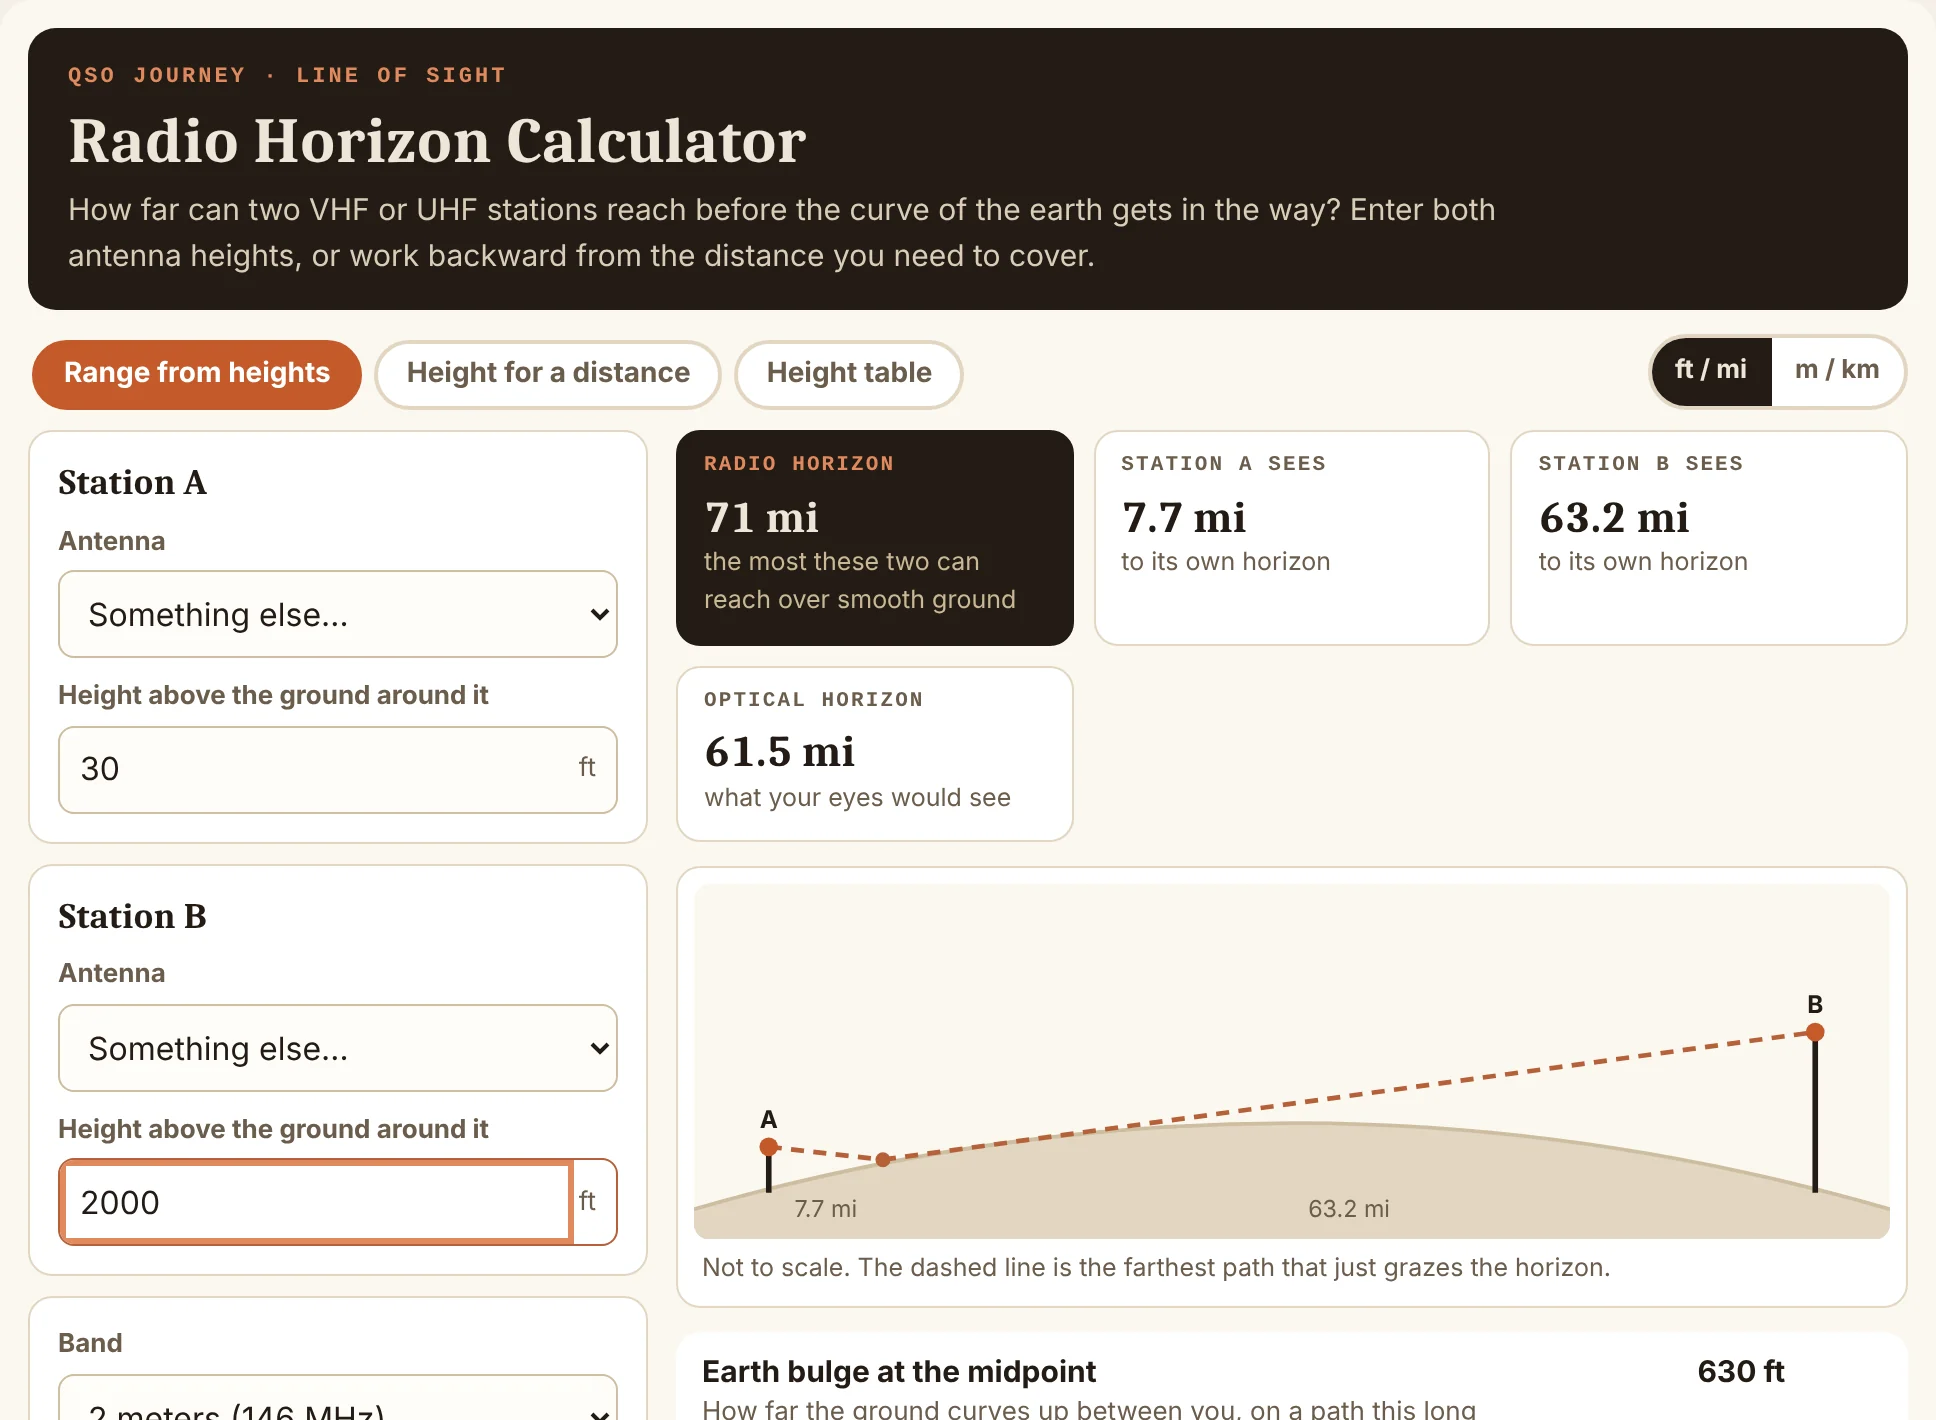
- Radio horizon: 71 mi.
- Your mast sees 7.7 mi on its own. The repeater sees 63.2 mi.
- Earth bulge at the midpoint of a 71 mile path: 630 ft. Fresnel zone: 794 ft radius on 2 m.
This is why one good repeater covers a whole valley, and why your own antenna height matters less once the other end is high. Height is measured above the ground between you, not above sea level, so a repeater 2,000 ft above the valley counts as 2,000 ft plus its tower. Repeater Basics covers how to find and use them.
Example 3: how high does my antenna need to be?
Switch to the Height for a distance tab. Say a friend 15 miles away has a J-pole at 20 ft and you want reliable simplex with them.

- Your antenna needs: 38 ft, the bare minimum for the line of sight to clear smooth ground.
- Their horizon: 6.3 mi from their 20 ft alone, so your antenna has to cover the other 8.7 miles.
- Plan for: 56 ft, adding 50 percent for trees, roofs and the Fresnel zone.
The calculator also points out something people miss: raising the low station helps more than raising the high one, because horizon grows with the square root of height. Four times the height only doubles the distance. If you can only afford one mast, put it at the end that is lowest now.
Example 4: the height table
The Height table tab is a quick-reference grid: read across from your antenna and down from the other station. A few lines from it:
| Your antenna | To a 5 ft handheld | To a 33 ft mast | To a 2,000 ft site |
|---|---|---|---|
| 5 ft | 6.3 mi | 11 mi | 66 mi |
| 20 ft | 9.5 mi | 14 mi | 70 mi |
| 60 ft | 14 mi | 19 mi | 74 mi |
| 500 ft | 35 mi | 40 mi | 95 mi |
Raising a 5 ft antenna to 20 ft doubles its own horizon. Doubling your power adds about 3 dB, which is nice but does not move the horizon at all. Height beats watts.
Earth bulge and the Fresnel zone, in plain English
A radio signal does not travel along a thin line. It fills a football-shaped region between the two antennas called the first Fresnel zone, and it is widest at the middle of the path. If trees, roofs or the curve of the earth poke into more than about 40 percent of it, the signal drops off fast even though you can “see” the other antenna. That is why the calculator shows the 60 percent clearance figure.
- Earth bulge is D² ÷ 8kR: how far the ground rises at the midpoint of a path of length D.
- Fresnel radius at the midpoint is ½ × √(wavelength × D). Higher bands have a smaller zone, so the Band setting only changes this number. The horizon is the same on every VHF and UHF band.
What the calculator cannot tell you
- Terrain. These are smooth-earth numbers. A single ridge between you and the repeater changes everything. Use a terrain profile tool or a coverage map for a real path.
- Whether you will be heard. The horizon is a ceiling, not a promise. It assumes enough power and antenna gain at both ends. A stock handheld antenna often runs out of signal long before it runs out of horizon.
- HF. HF signals go well beyond the horizon by bouncing off the ionosphere. For regional HF, see the NVIS Conditions section below.
For real-world numbers on how far handhelds, mobiles and bases actually talk, How Far Can Your VHF/UHF Radio Actually Talk? A Range Map is the companion read. For GMRS specifically, GMRS for the Family: Real Range, Check-In Nets and Road Trips covers what families should expect.
Power Calculator
A radio is only as good as the battery behind it. The Power Calculator answers the three questions every go-box builder asks: how long will this battery run my radios, how much solar does it take to keep up, and what size wire do I need? This section walks through all three tabs with one real power budget, so you can see how the numbers connect.
What the Power Calculator does
| Tab | Question it answers | What you enter |
|---|---|---|
| Battery runtime | How long will my battery last? | Battery type, capacity, usable percent, and each device with its receive and transmit current, time on transmit and hours on per day |
| Solar charging | How big a panel and controller? | Peak sun hours for your season, system losses, and days without sun to ride through |
| Wire size | What gauge between battery and radio? | Transmit current, one-way length, battery voltage and the voltage drop you will accept |
The tabs share numbers: the Solar tab picks up your daily use from the Battery tab. Everything is saved in your browser, so you can come back to your setup later.

Example 1: how long will a 100 Ah battery run two radios?
The Battery tab opens with a realistic go-box: a 100 Ah LiFePO4 battery running a 100 W HF radio and a 50 W VHF/UHF mobile.
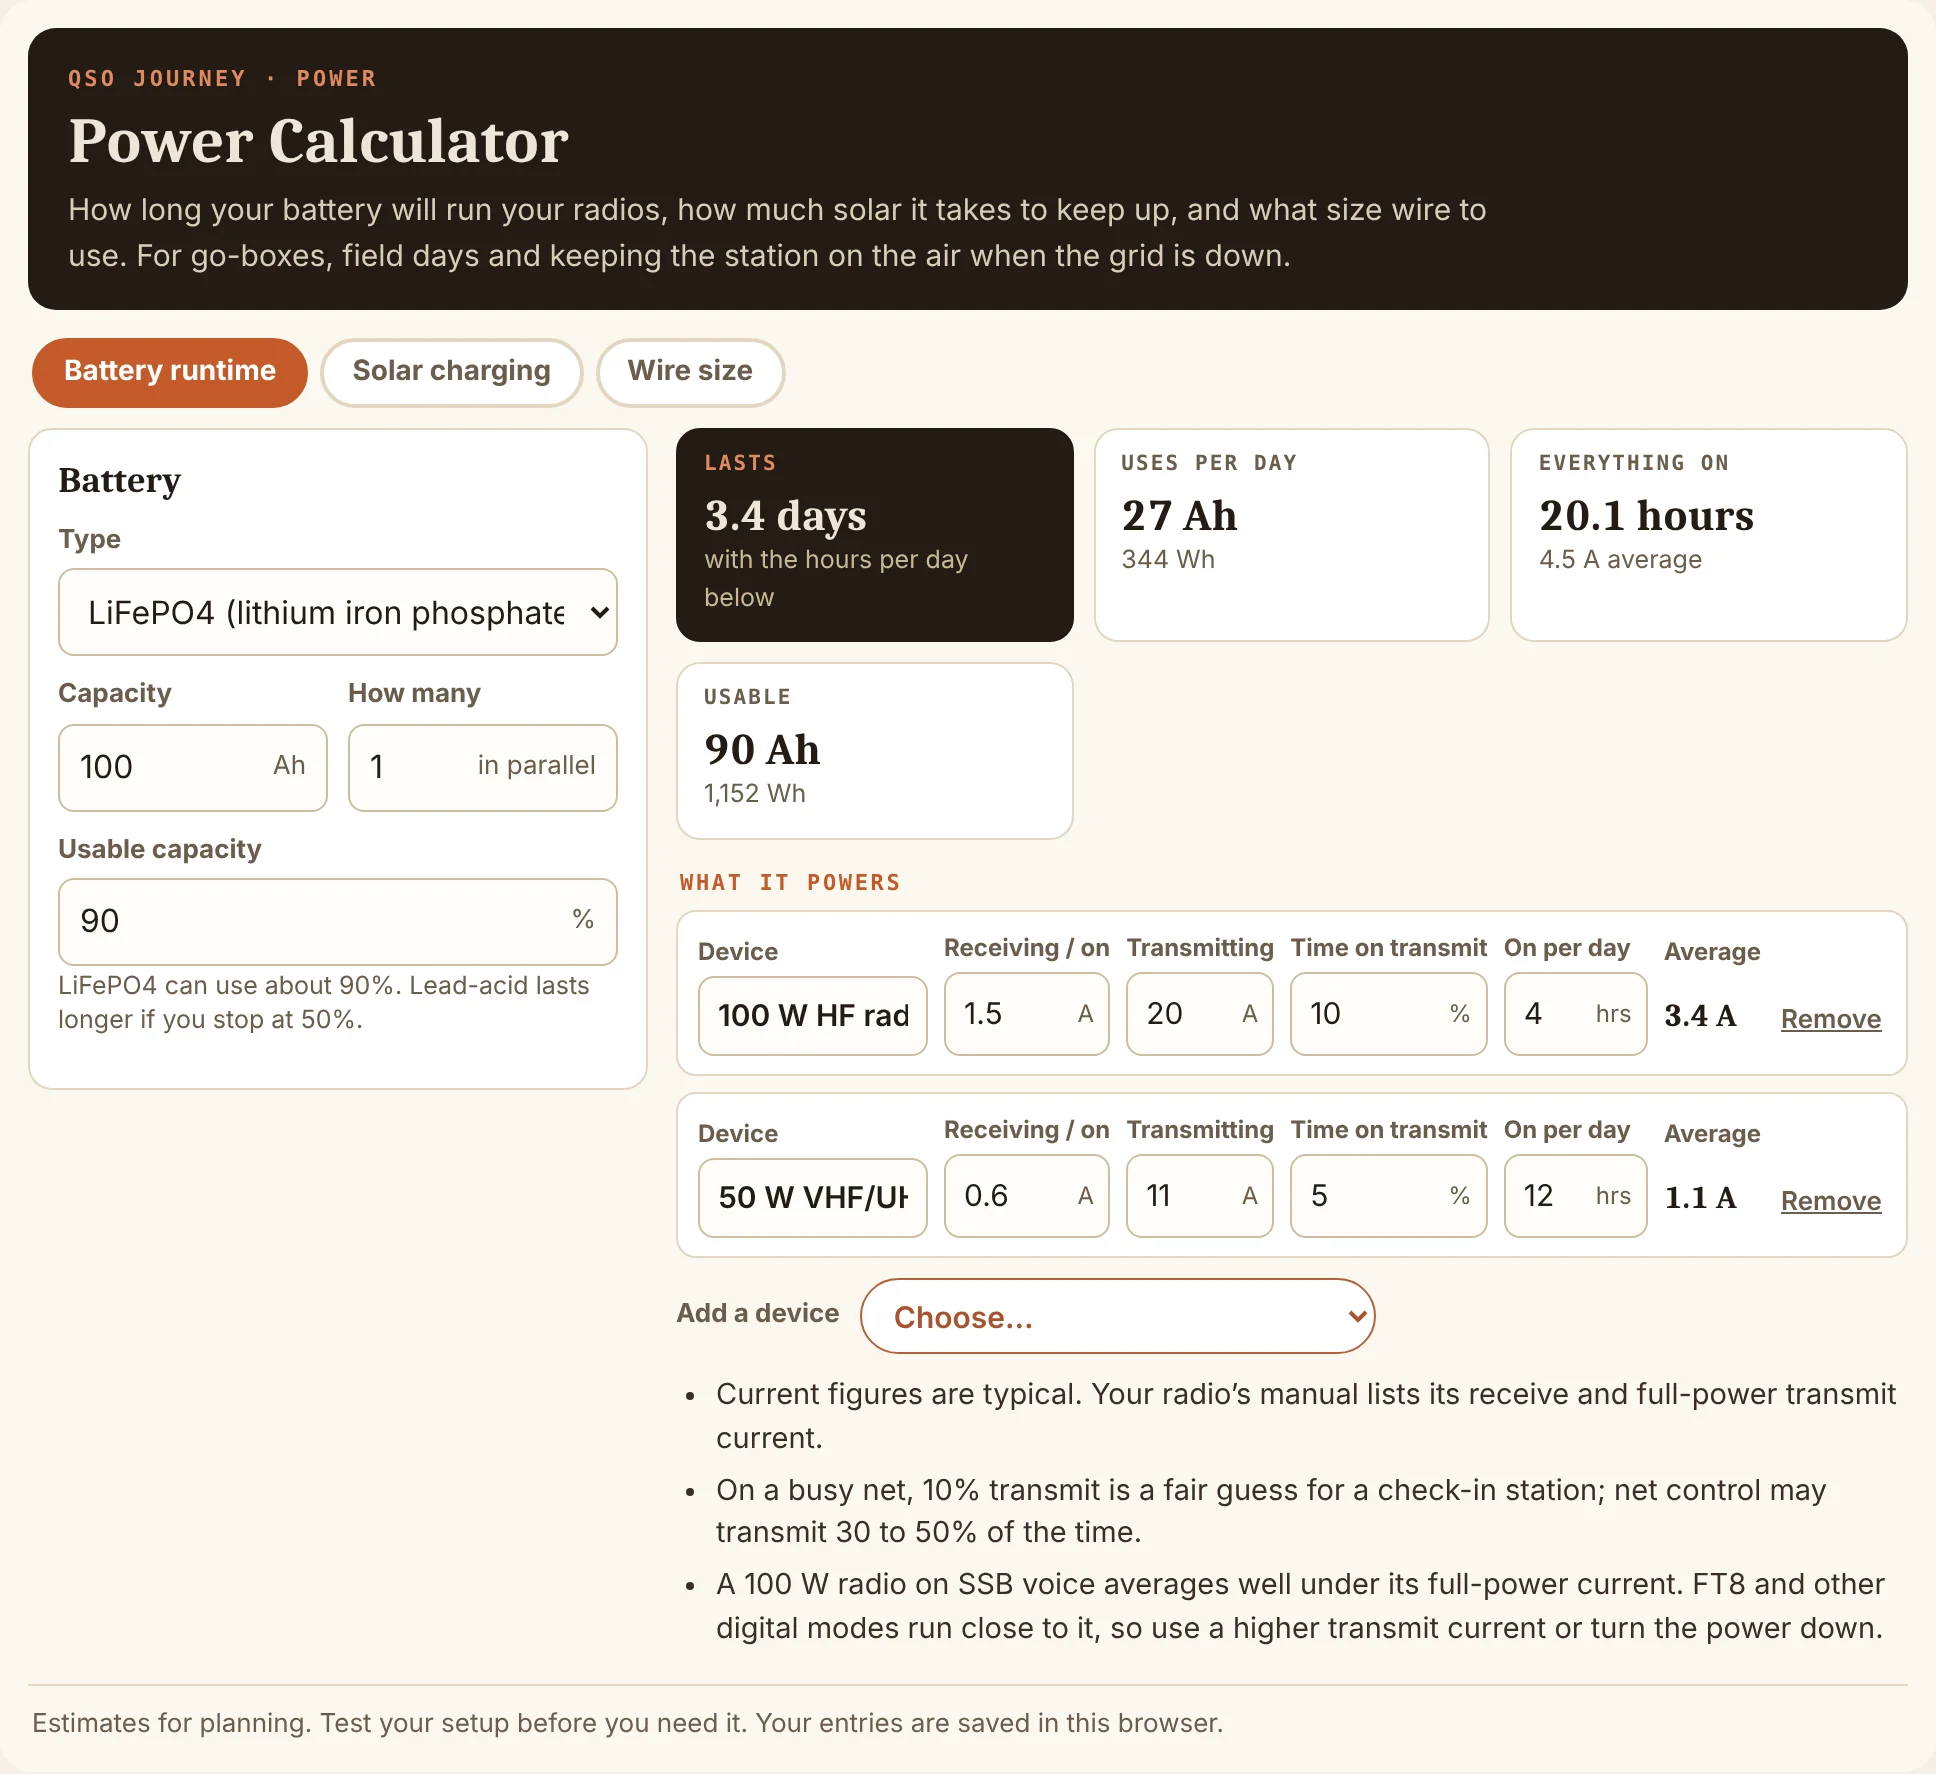
| Device | Receive | Transmit | Time on transmit | Hours a day | Average | Per day |
|---|---|---|---|---|---|---|
| 100 W HF radio | 1.5 A | 20 A | 10% | 4 | 3.4 A | 13.4 Ah |
| 50 W mobile | 0.6 A | 11 A | 5% | 12 | 1.1 A | 13.4 Ah |
The average current is receive current for the time you are listening plus transmit current for the time you are talking: 1.5 × 0.9 + 20 × 0.1 = 3.35 A for the HF radio. Multiply by the hours it is on and you get amp-hours per day. Add them up:
- Uses per day: 27 Ah (344 Wh)
- Usable: 90 Ah (90 percent of 100 Ah for LiFePO4)
- Lasts: 3.4 days at that schedule
- Everything on: 20.1 hours if both radios ran nonstop
The transmit percentage is the number to think hardest about. A check-in station on a busy net might transmit 10 percent of the time; net control can be 30 to 50 percent. And SSB voice averages well under the full-power current, while FT8 and other digital modes run close to it, so for digital either raise the transmit current or turn the power down. The Add a device list has presets for QRP radios, laptops, a Raspberry Pi, a Starlink Mini, phone charging and lights.
Example 2: the same battery in lead-acid
Change the type to AGM, gel or flooded lead-acid and the usable capacity to 50%, which is where lead-acid should stop if you want it to last. Same 100 Ah label, same radios:
| LiFePO4 | Lead-acid | |
|---|---|---|
| Usable capacity | 90 Ah (1,152 Wh) | 50 Ah (600 Wh) |
| Lasts | 3.4 days | 1.9 days |
| Everything on | 20.1 hours | 11.2 hours |
That is why I tell people to compare batteries by usable watt-hours, not the number on the label. A 100 Ah lithium battery does almost twice the work of a 100 Ah lead-acid one, at a fraction of the weight. More in Portable Power for Ham Radio: LiFePO4 vs SLA, Power Budgeting and Solar.
Example 3: sizing solar for an Arizona winter
On the Solar charging tab, pick Desert Southwest, winter (about 5) peak sun hours, leave losses at 25 percent and ask for 2 days without sun.
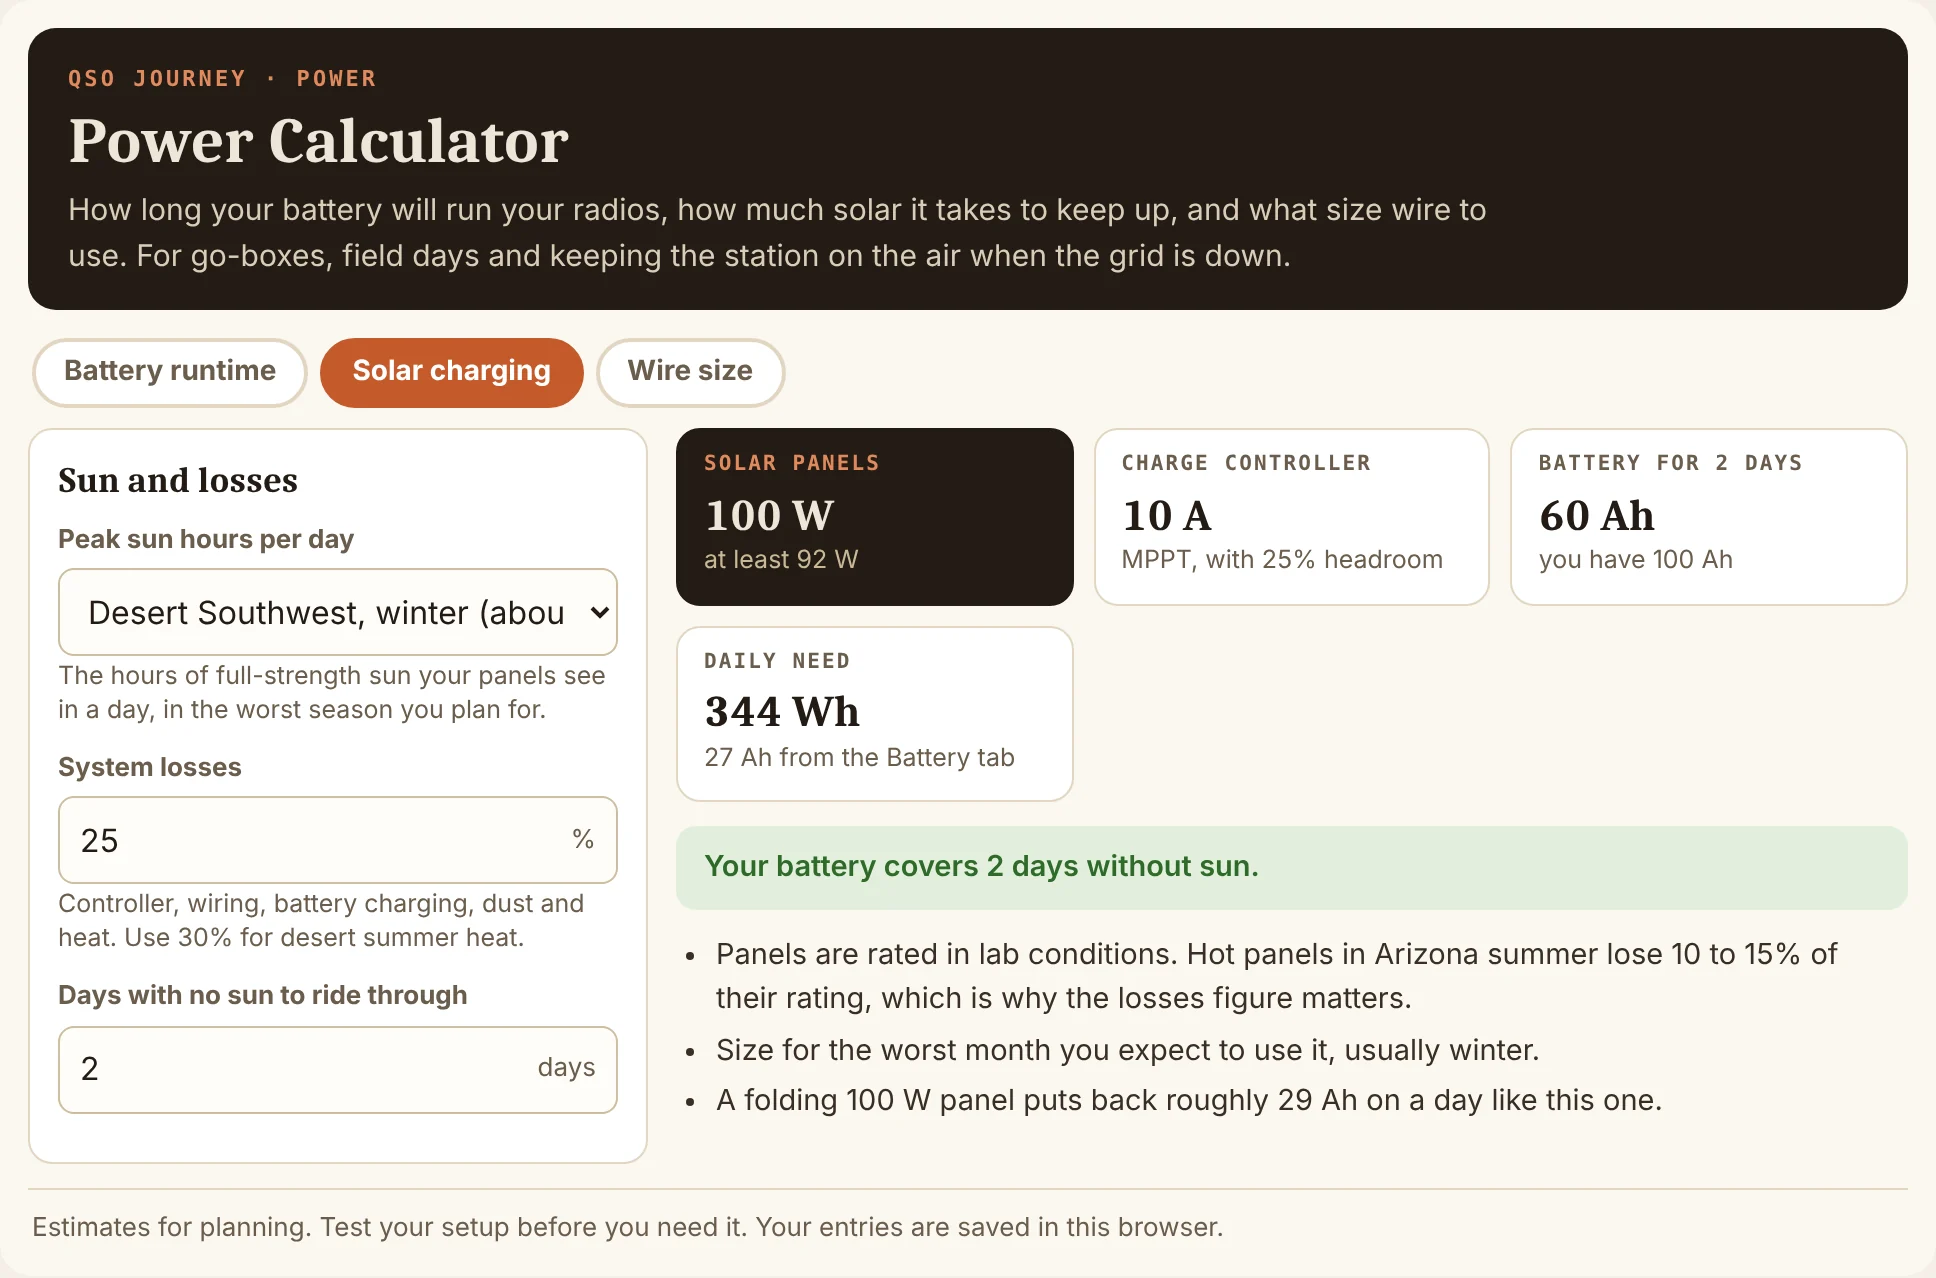
- Solar panels: 100 W (at least 92 W). That is 344 Wh ÷ (5 hours × 0.75).
- Charge controller: 10 A MPPT, with 25 percent headroom.
- Battery for 2 days: 60 Ah. The 100 Ah you already have covers it.
Peak sun hours are not daylight hours; they are the equivalent hours of full-strength sun. Size for the worst month you plan to use the system, which is usually winter. In summer heat, hot panels lose 10 to 15 percent of their rating, so bump losses to 30 percent. The tab also tells you that a folding 100 W panel puts back roughly 29 Ah on a day like this one, which is about what the two radios use.
Example 4: what size wire from the battery to the radio?
A 100 W radio pulls about 20 A on transmit, and radios want close to 13.8 V while they do it. On the Wire size tab, enter 20 A, 10 ft one way, a 13.8 V battery and a 3 percent maximum drop.

| Wire | Drop | At the radio | Verdict |
|---|---|---|---|
| 14 AWG | 1.01 V (7.3%) | 12.79 V | Too small for 20 A |
| 12 AWG | 0.64 V (4.6%) | 13.16 V | Too much drop |
| 10 AWG | 0.40 V (2.9%) | 13.40 V | Smallest that works |
| 8 AWG | 0.25 V (1.8%) | 13.55 V | Works |
The calculator doubles the length for the return lead, which is the step people forget. It also reminds you to fuse both the positive and negative leads close to the battery, that a 100 W radio needs the 30 A or 45 A Powerpole contacts, and that copper-clad aluminum wire drops about 60 percent more voltage than copper. The details are in 12V DC Power for Ham Radio: Powerpoles, Crimping, Fusing and Wire Gauge.
Tips for a power budget you can trust
- Use your radio’s real numbers. The presets are typical. Your manual lists receive current and full-power transmit current.
- Be honest about transmit time. It is the biggest lever. Running net control on FT8 is a very different load than listening to a repeater.
- Plan for the worst month. Solar in December is not solar in June.
- Test it. Run the go-box on battery for an evening and compare what you used with what the calculator said. Then adjust.
If you are building the box itself, Building a Ham Radio 100Ah Battery Box and DIY Battery Box vs. EcoFlow, Jackery, and Predator are good next reads.
NVIS Conditions
Before every regional HF net, net control has the same question: 80, 60 or 40 meters? Pick a band that is closed and half the check-ins cannot hear you. The NVIS Conditions page answers that with real data. It reads the critical frequency from the nearest working ionosonde and tells you which bands are open for local and regional contacts right now. This section explains what it shows and how to use it.
What NVIS Conditions does
- Reads the latest ionosonde data from KC2G (from GIRO and INGV) on the server, refreshed every 10 minutes.
- Picks the nearest ionosonde with a reading under 3 hours old, within 1,500 miles. If none is close and fresh, it falls back to older or farther readings and tells you so instead of guessing.
- Shows the best NVIS band now, the critical frequency (foF2) and when it was measured.
- Gives a Good, Marginal or Closed verdict for 80, 60 and 40 m, for local (0 to 100 miles) and regional (100 to 300 miles) paths.
- Lists the nearest ionosondes with their distance, foF2 and age.
It starts on Maricopa, Arizona. Click Use my location to check from wherever you are.
NVIS in one minute
Near Vertical Incidence Skywave means pointing your signal almost straight up and letting the ionosphere bounce it back down over a circle a few hundred miles across. It fills the gap between VHF line of sight and long-distance HF, which is exactly the range a statewide or regional net needs. The catch: a signal going straight up only comes back if its frequency is below the critical frequency, foF2. Above that, it goes straight through the ionosphere and into space. foF2 changes through the day and with the sunspot cycle, so the band that works at noon is often dead at midnight. More background in What Is an HF NVIS Regional Net?.
Reading the page
| Part of the page | What it tells you |
|---|---|
| Best NVIS band now | The highest band that is open, for contacts out to about 300 miles |
| Critical frequency (foF2) | The measured value and which ionosonde it came from |
| Reading taken | How old the measurement is. Fresh readings are more trustworthy. |
| Band table | Good, Marginal or Closed for 80, 60 and 40 m, local and regional |
| Usable up to | The highest frequency that should work close in and at 300 miles |
| Nearest ionosondes | The stations it could use, nearest first, with their readings |
Worked example: late evening, foF2 3.8 MHz
Here is the page with an example reading: the nearest station, White Sands, 320 miles from Maricopa, reports a foF2 of 3.80 MHz with the layer at 300 km. (This screenshot uses example numbers; the live page uses the current reading.)

- Best band: 80 m. It is marginal close in and good at regional distances.
- 60 and 40 m: closed both local and regional. A 40 m net tonight would only hear the stations that are far away.
- Usable up to about 3.9 MHz close in and 4.9 MHz at 300 miles.
That pattern is typical late at night: foF2 falls through the night, 40 m closes first, and by early morning even 80 m can close for stations close in. That is the “skip zone” people hear about, where a station 30 miles away cannot hear you but one 250 miles away can.
How the verdicts are worked out
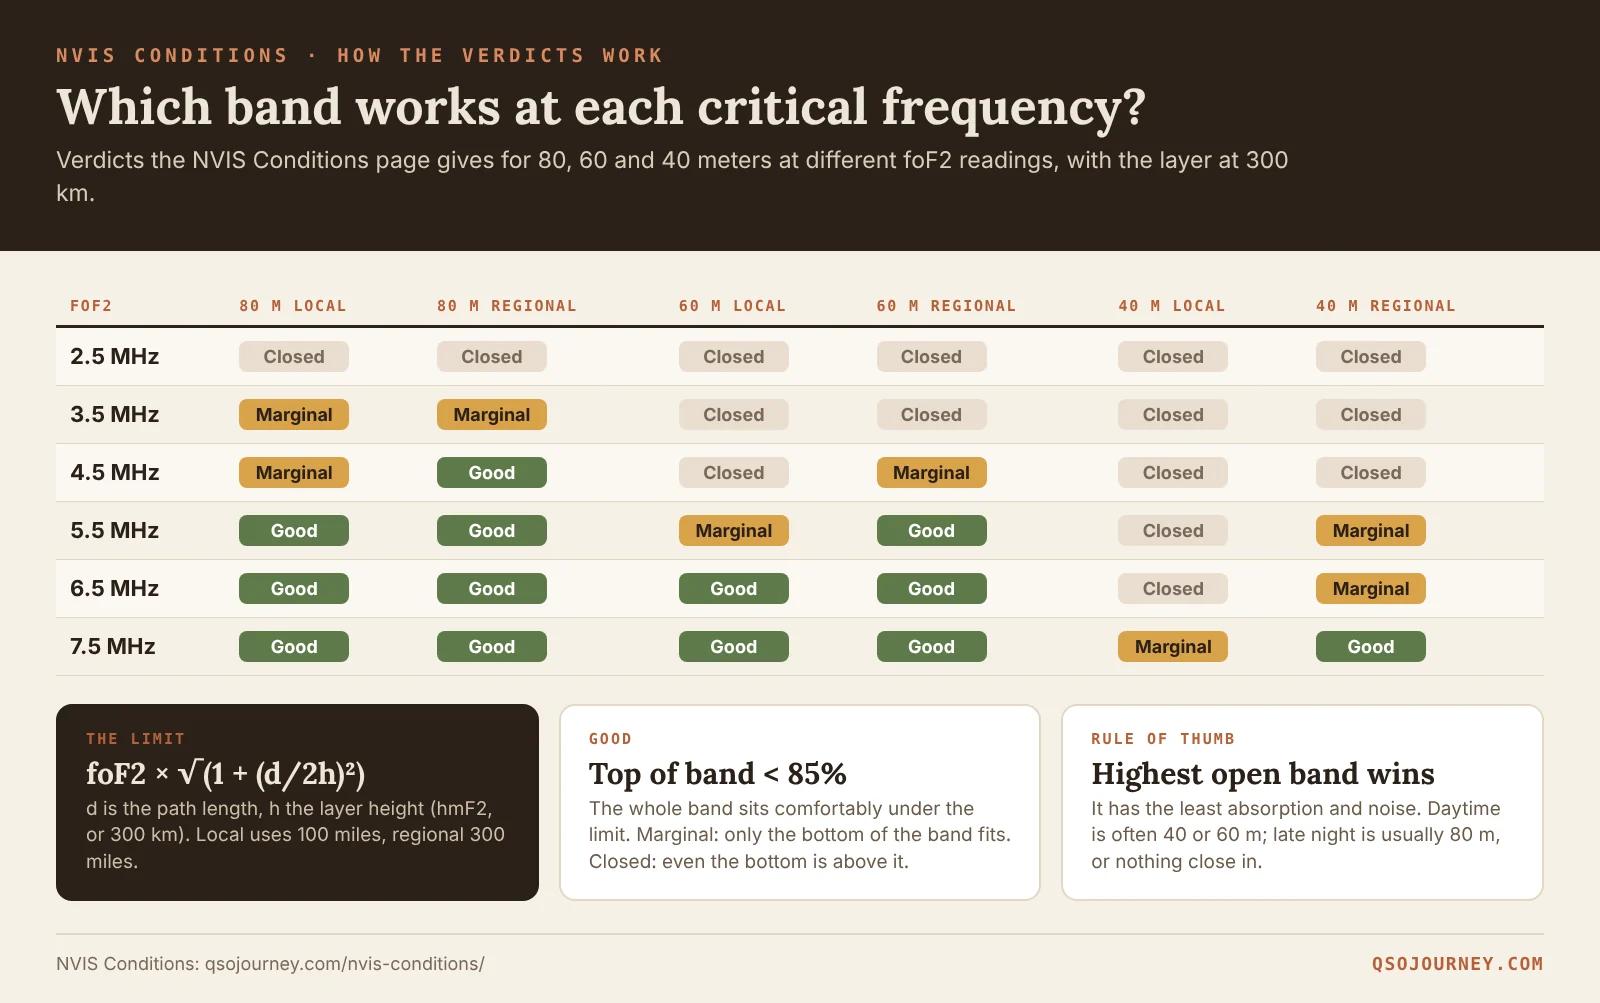
A signal going straight up is limited to foF2. A signal going up at an angle to reach a station farther away can use a somewhat higher frequency, by a factor of √(1 + (d/2h)²), where d is the distance and h is the layer height (hmF2 from the ionosonde, or 300 km if it is missing). The page uses 100 miles for “local” and 300 miles for “regional.” With foF2 at 3.8 MHz and h at 300 km, that is about 3.9 MHz at 100 miles and 4.9 MHz at 300 miles.
Then each band is compared with that limit:
- Good: the top of the band is under 85 percent of the limit, so the whole band fits with room to spare.
- Marginal: only the bottom of the band is under the limit. Expect fading.
- Closed: even the bottom of the band is above the limit.
Readings with a confidence score under 25 are ignored, because automatic scaling of ionograms can be wrong.
Using it for a net
- Check the page 15 minutes before the net and pick the highest band that is open. It has the least absorption and the lowest noise.
- Listen on that band first. The page is an estimate; your ears are the final word.
- Announce a backup: “If you cannot hear net control on 60, we will move to 80 at 15 past.” The page tells you which way things are trending: up during the morning, down through the night.
- Daytime is usually 40 or 60 m. Late night is usually 80 m. 60 m is often the sweet spot in between, which is one reason its 2026 rule change matters. The Band Plan tool lists the 60 m channels.
For the antenna side, a low dipole or inverted V is the classic NVIS antenna; the Antenna Calculators give you the length and the 0.1 to 0.25 wavelength height range.
Limits
- Ionosondes are sparse. Your nearest one may be hundreds of miles away. The ionosphere above you can differ, especially around sunrise and sunset.
- It only knows foF2. Daytime D-layer absorption can make 80 m weak even when it is technically open, and the page reminds you of that during the day.
- It is not a substitute for listening. The live KC2G foF2 map fills the gaps between stations with a model and is a good second opinion.
Data from ionosonde operators around the world, distributed through GIRO and INGV, via KC2G.
Family PACE Plan Builder
When the cell network goes down, most families do not have a plan. They have a vague idea that someone will drive home. The Family PACE Plan Builder turns that into a real plan in nine short steps, written for family members who are not radio people. At the end it prints a one-page plan for the fridge, a fold-over wallet card for each person and a label for every radio. This section walks through it using the example family built into the tool.
What the Family PACE Plan Builder does
PACE stands for Primary, Alternate, Contingency, Emergency: four ways to reach each other, tried in order. Everyone starts at the top and moves down only when a step fails. The builder walks you through who is in the plan, when it starts, the four steps, radios, check-in times, meeting places, code words and contacts, then prints everything. No license is needed to build a plan, and nothing you type is sent anywhere unless you save a file or a share link.
Click Load an example at the top to see a finished plan before you start. That example is the Rivera family in Pinal County, Arizona: Ana and Luis, teenage Sofia, young Mateo, and Aunt Carmen in Albuquerque as their out-of-area contact. Every example below comes from it.
The PACE ladder
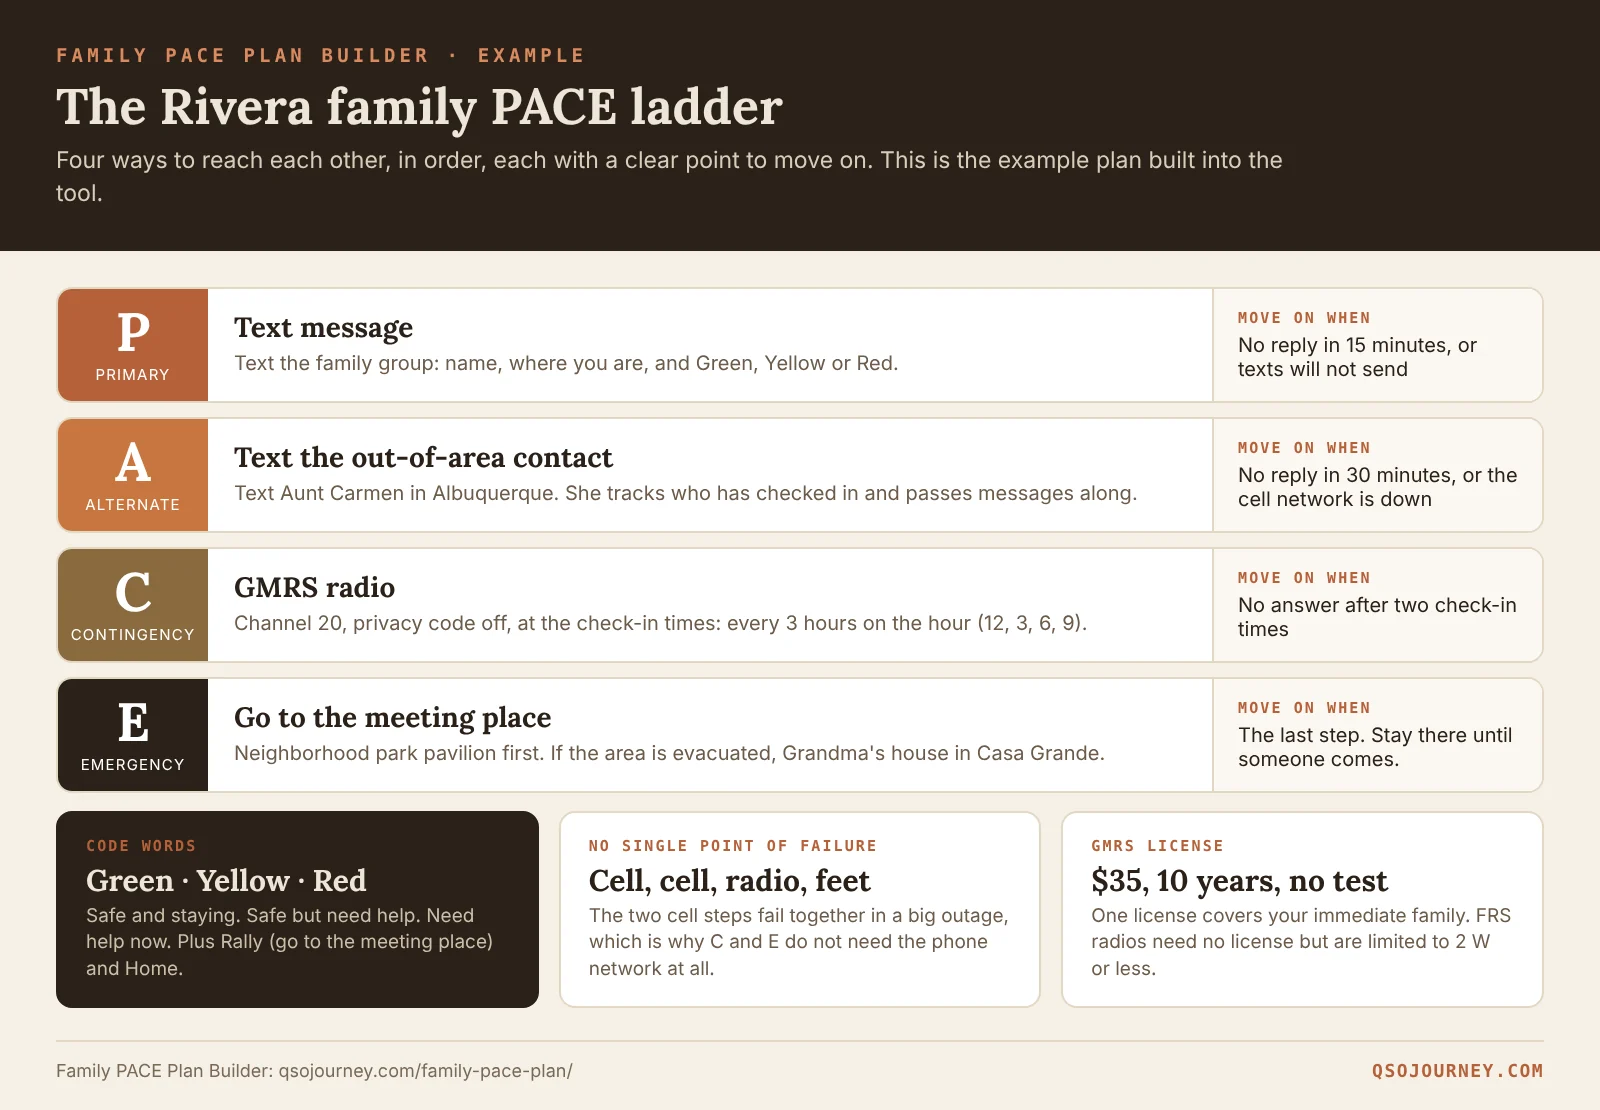
Two details make this ladder work. First, every step has a “move on when” rule, so nobody sits waiting on a text that will never send. Second, the bottom two steps do not depend on the cell network at all. If all four steps relied on the same thing, one outage would take out the whole plan. The builder suggests this exact ladder (text, out-of-area contact, GMRS at check-in times, meeting place) as a starting point.
The nine steps
| Step | What you fill in | In the example |
|---|---|---|
| 1. Family | Plan name, each person (age group, cell, radio, call sign, where they usually are) and the out-of-area contact | Four people; Aunt Carmen in Albuquerque |
| 2. When | The triggers that start the plan and the first thing everyone does | Cell down, power out for hours, evacuation, a big event, or someone unreachable |
| 3. PACE | Four methods, what to do, and when to move on | Text, text Aunt Carmen, GMRS channel 20, meeting place |
| 4. Radios | Service, family and backup channel, privacy code, repeater, NOAA channel, news station | GMRS 20, backup 17, repeater 19R, WX2, KTAR 92.3 FM |
| 5. Check-ins | When the radios come on and for how long | 3-3-3: every 3 hours on the hour, 5 minutes |
| 6. Meet | Meeting places in order | Home, park pavilion, Grandma’s house in Casa Grande |
| 7. Code words | Short words that carry a whole message, plus an optional duress signal | Green, Yellow, Red, Rally, Home |
| 8. Contacts | 911, Poison Control and your own numbers | School, work, doctor, the electric co-op |
| 9. Print | A readiness check, then the plan, wallet cards and radio labels | Plan, four cards and three radio labels |
Choosing radios and channels
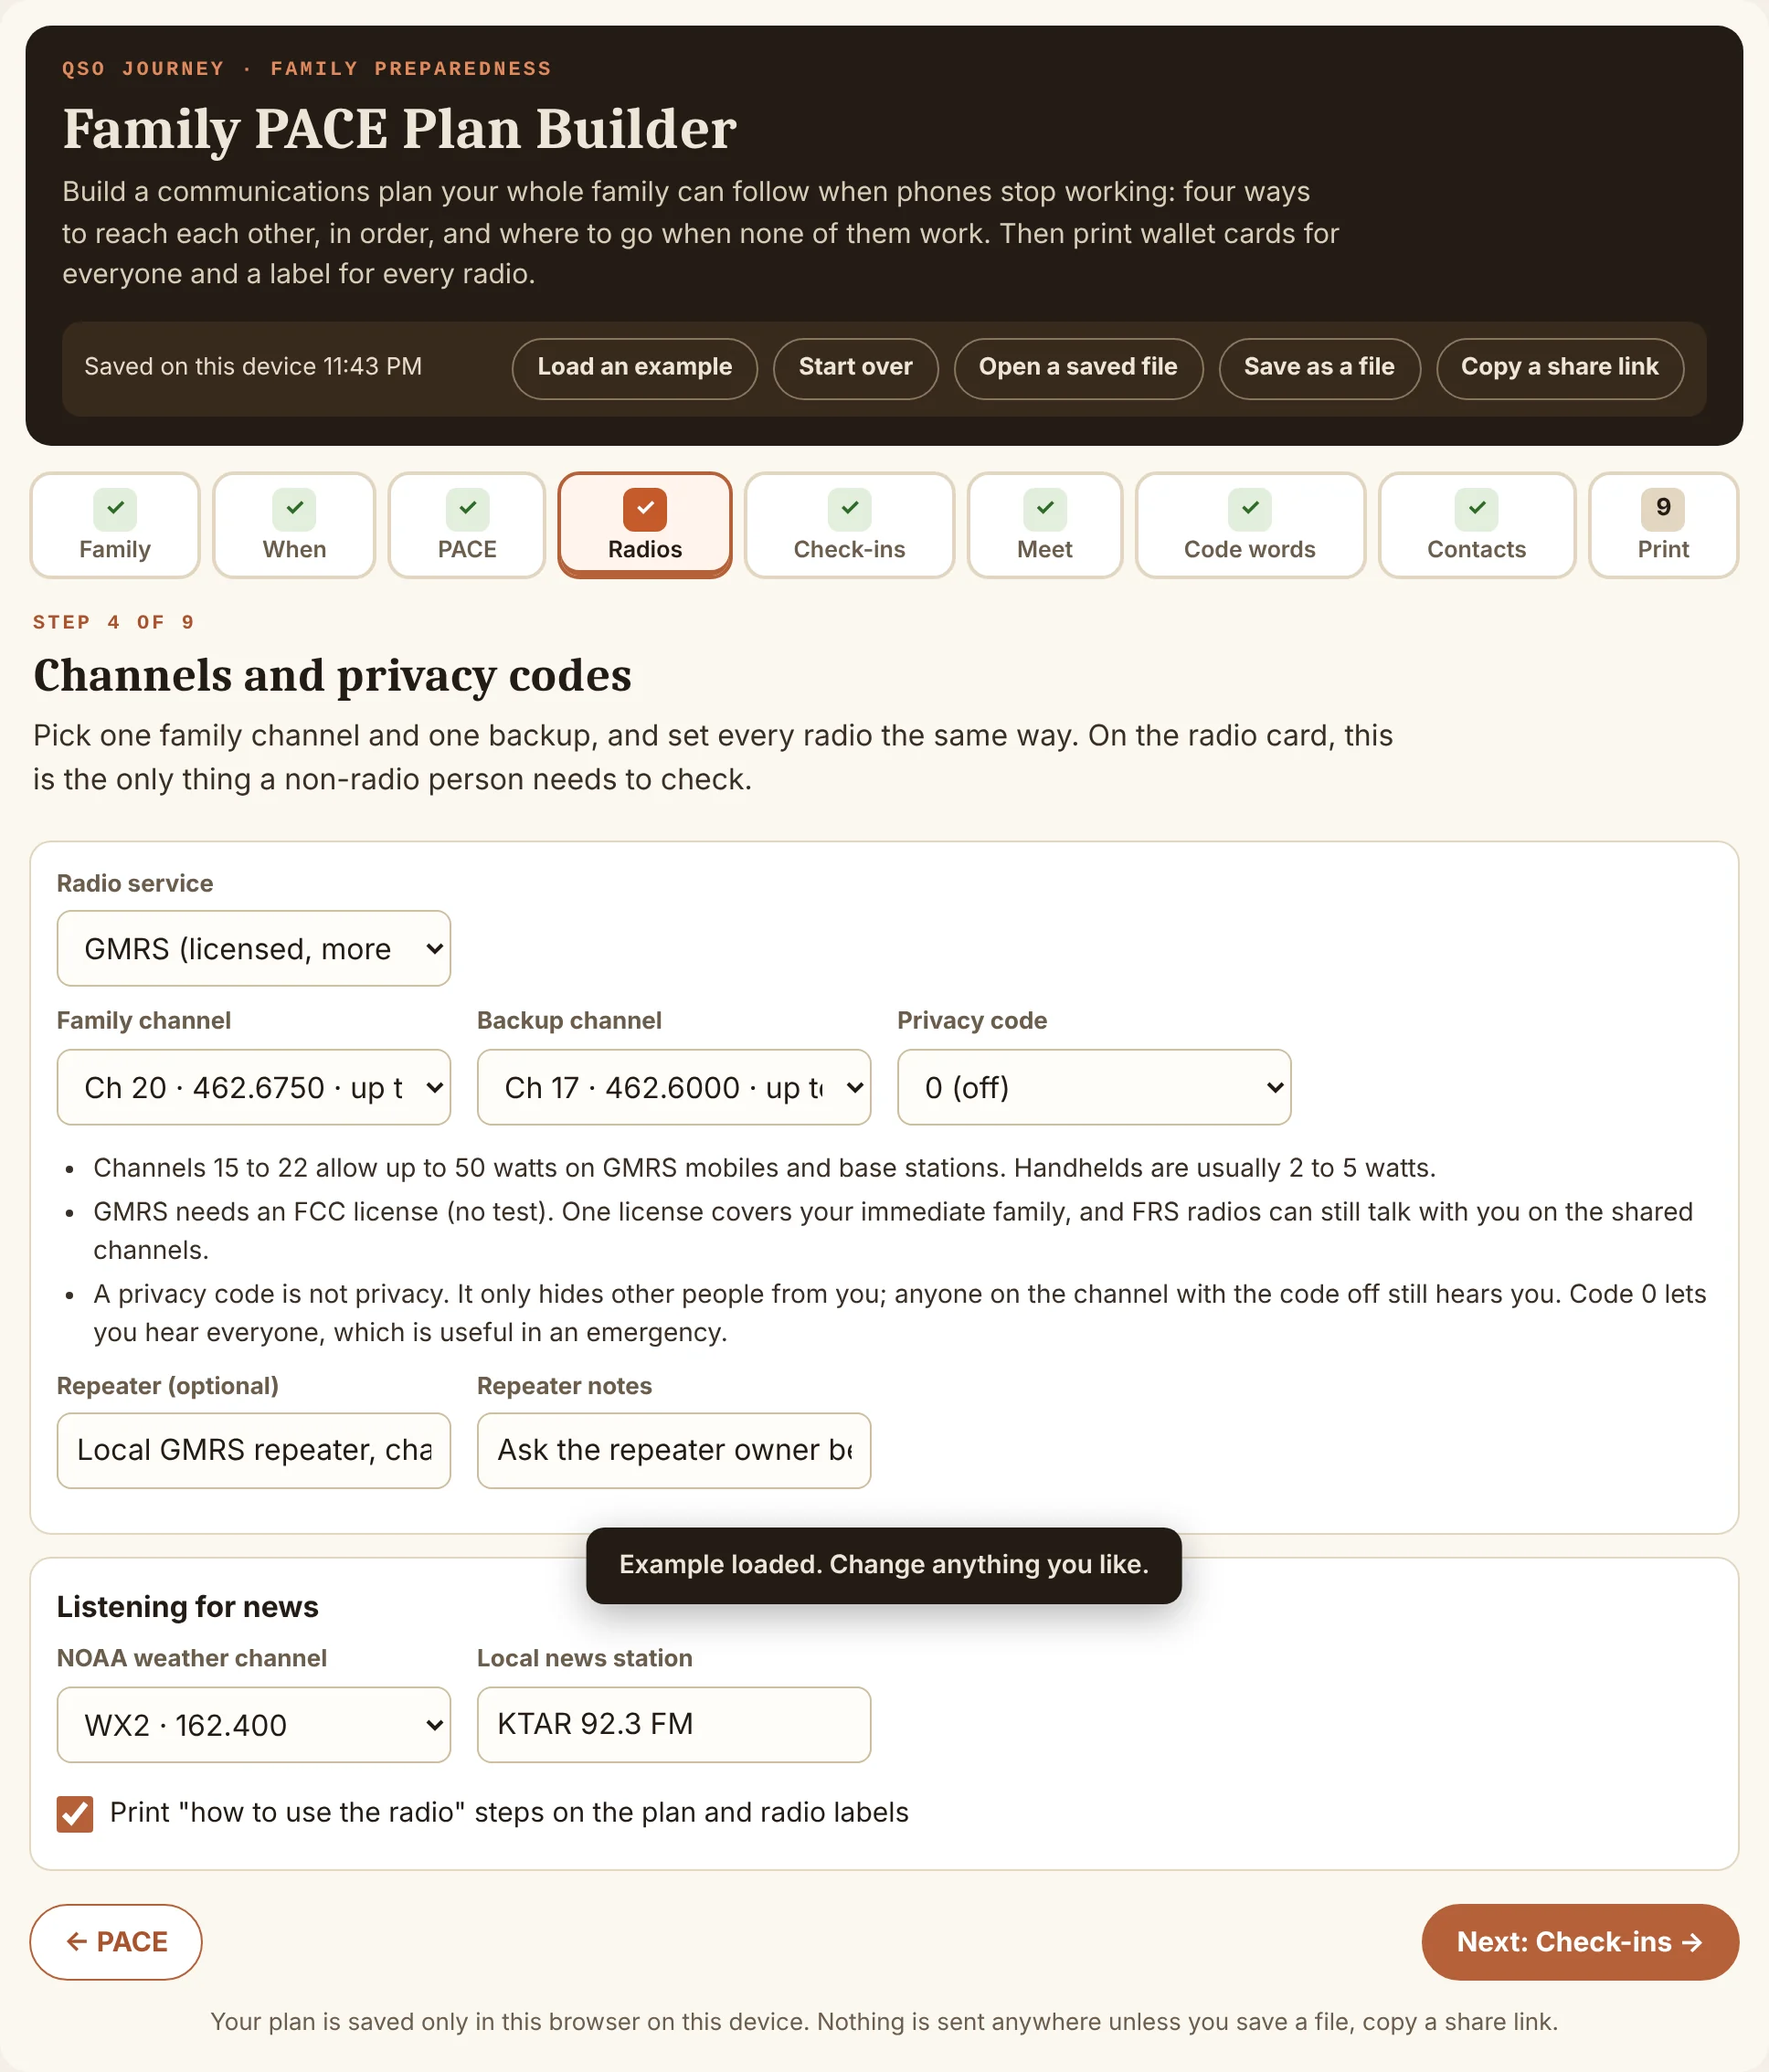
Step 4 shows each channel’s frequency and FCC power limit as you pick it, so you can see the difference between, say, GMRS channel 20 (462.675 MHz, up to 50 W) and an FRS-only channel. The Riveras chose:
- Family channel: GMRS 20. Backup: GMRS 17, for when 20 is busy.
- Privacy code: 0 (off). Privacy codes do not make anything private; they only hide other people from you. Leaving it off means you will hear a family member whose radio is set wrong.
- Repeater: a local GMRS repeater on 19R with tone 141.3, with a note to ask the owner before relying on it.
- NOAA weather: WX2 (162.400). News: KTAR 92.3 FM.
Tick Print “how to use the radio” steps and the plan and labels include plain instructions: turn it on, set channel 20, hold the button, wait one second, speak, let go. GMRS needs one FCC license (no test, $35 for 10 years) that covers your immediate family. FRS radios need no license. GMRS Radio: The Complete Guide has the details.
Check-in times
Radios are useless if nobody has theirs on. Step 5 sets when they come on. The options are 3-3-3 (every 3 hours on the hour), top of every hour, or set times. The Riveras use 3-3-3 for 5 minutes at 12, 3, 6 and 9 o’clock, and leave a radio on between check-ins when batteries allow. Scheduled check-ins save a lot of battery compared with leaving every radio on all day. GMRS for the Family covers running a short family check-in net.
Code words
Short code words carry a whole message in one breath, which matters on a crowded channel and with kids. The defaults:
| Say | It means |
|---|---|
| Green | I am safe and staying where I am. |
| Yellow | I am safe but need help or a ride. Details follow. |
| Red | I need help now. |
| Rally | Go to the meeting place now. |
| Home | Come home now, it is safe. |
You can also set a duress signal, a harmless phrase that means “I am not free to talk.” The Riveras’ is mentioning the dog by name; they have no dog. The duress signal prints on the full plan only, never on the wallet cards.
What it prints
Step 9 starts with a readiness check (for example, a reminder that GMRS needs a license), then prints three things. Print at 100 percent so the cards come out the right size.
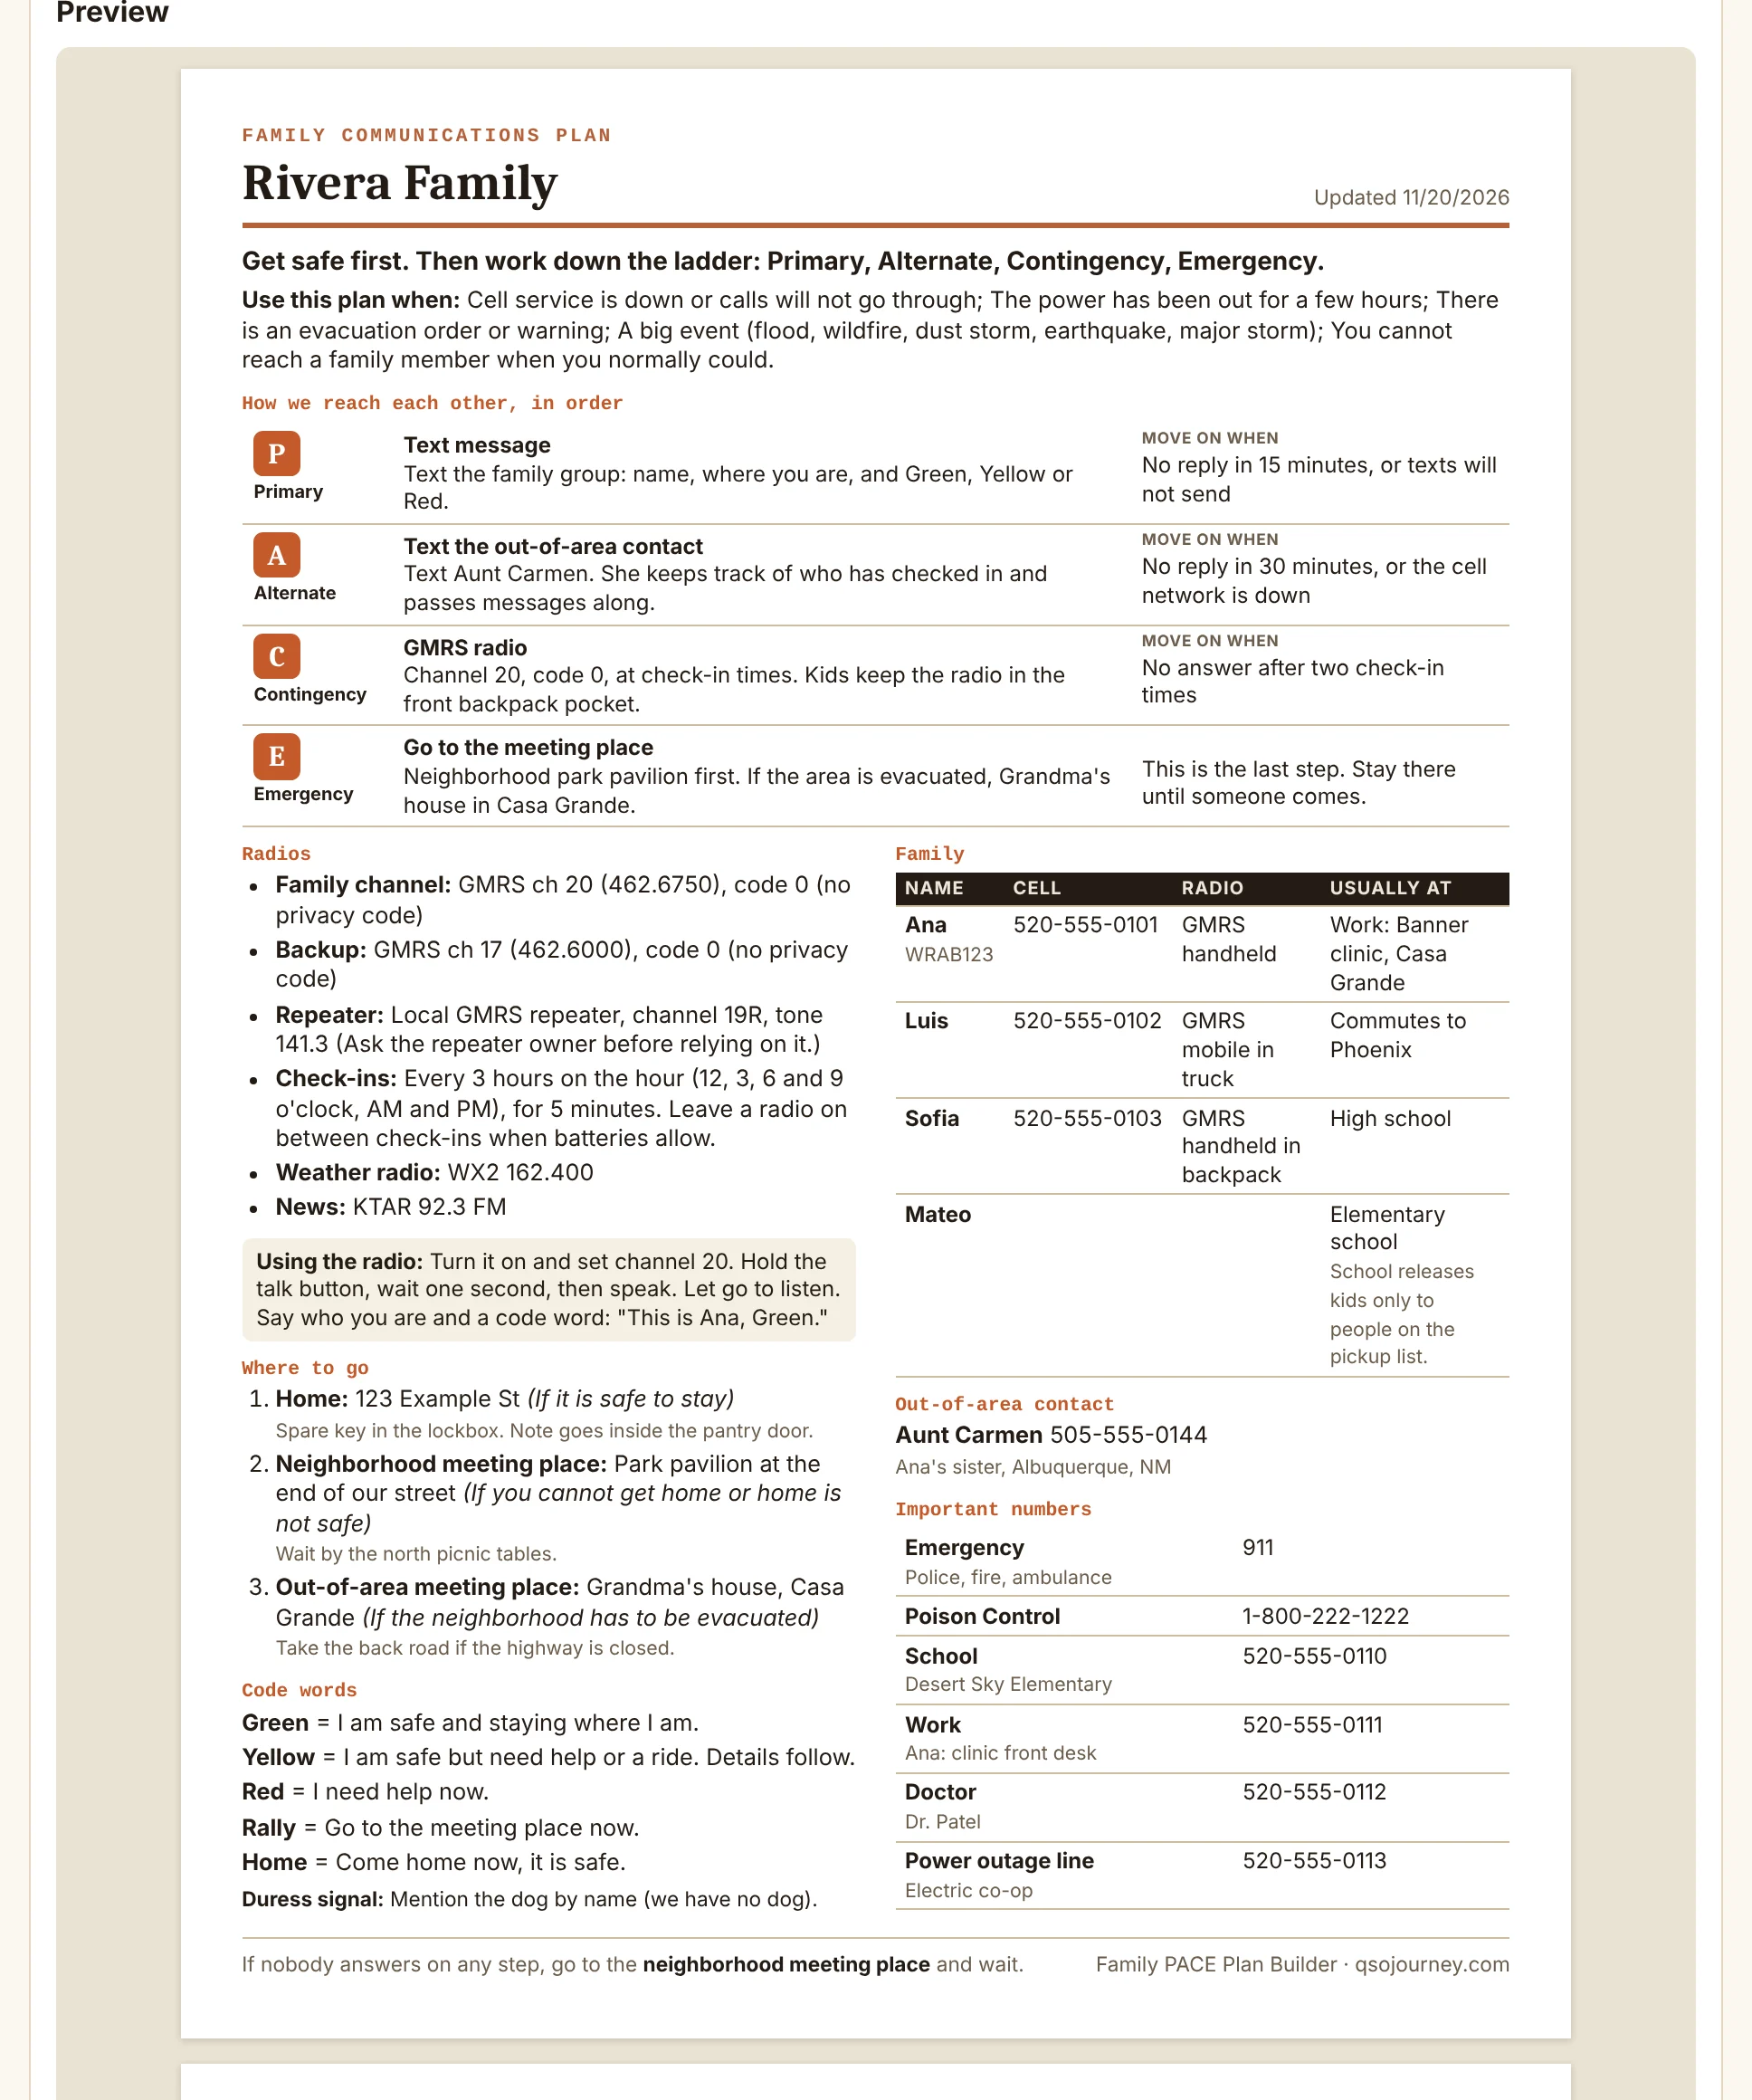
- A one-page plan for the fridge and every go-bag, with the ladder, radios, meeting places, code words, family table and important numbers. It shrinks itself to stay on one page.
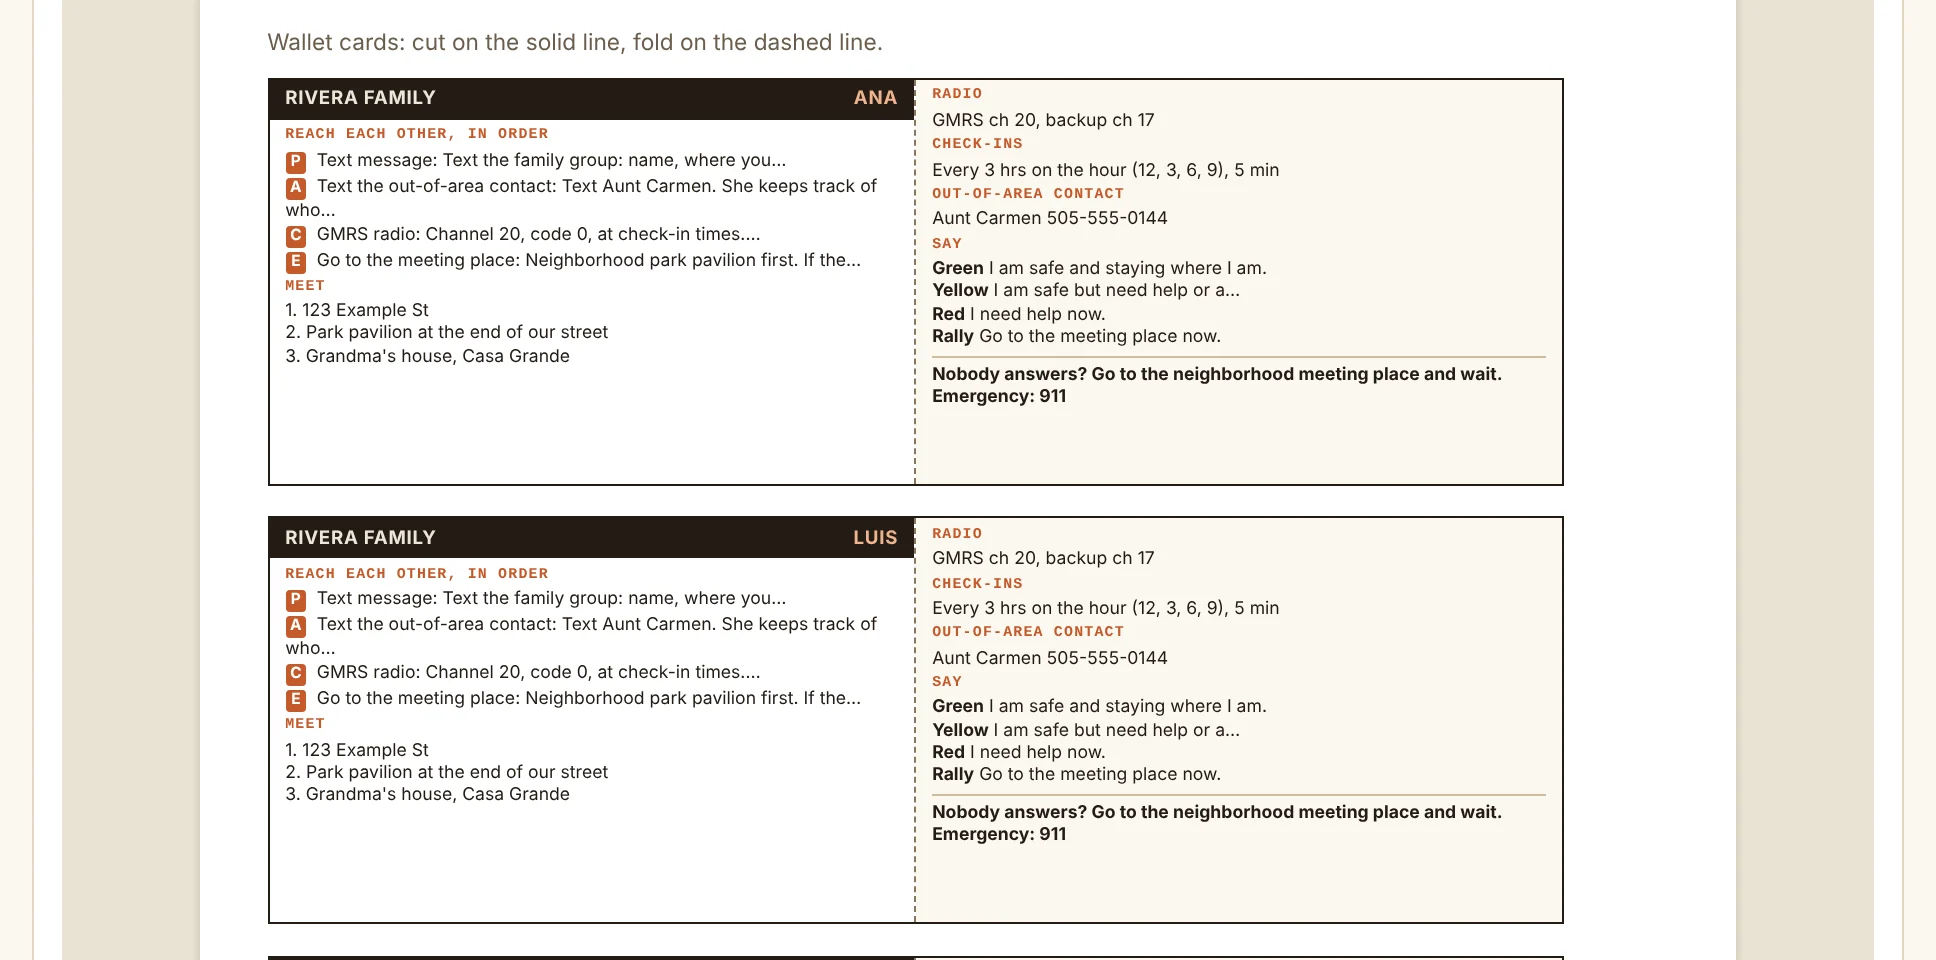
- Fold-over wallet cards for each person (3.375 by 2.125 inch panels), plus blank ones if you want spares.
- Radio labels to tape on the back of each radio: channel, backup, check-in times and how to talk.
Saving and sharing the plan
- Automatic: the plan saves in your browser as you type.
- Save as a file: a small .json file for a USB stick or another computer. Open it later with Open a saved file.
- Copy a share link: the whole plan is packed into the link itself, after the # sign, which never reaches the server. Anyone with the link can read the plan, so send it only to family.
- Save to my account: if you are signed in to QSO Journey, the plan can be stored with your account so you can open it on another device.
Practice it
A plan nobody has tried is only a piece of paper. Step 9 has a place for practice dates and downloads a calendar file for the next practice. Run the plan like a fire drill a few times a year: everyone turns on a radio at check-in time and the kids walk to the meeting place. Practicing Your Family Comms Plan has drill ideas that keep it fun.
If you want the same thing working offline on a Windows computer, with medical cards, food and water planning and printable binders, the Print step links to EmComm Hub.
Also on QSO Journey
Two more tools have their own full write-ups:
- Exam Trainer: free practice tests for Technician, General and Extra on the current pools, with an explanation for every question, a study plan, progress tracking you can share with your Elmer, and Exam Classes for instructors.
- EmComm Hub: my Windows desktop app with more than 40 emergency communications and family preparedness tools that keep working with no internet: family and club PACE plans, net control logging, ICS forms, an offline map and printable binders. Get EmComm Hub.
Tell me what to build next
These tools come from questions I get at Tech Sessions, in the shack and at VE sessions. If one of them gets something wrong for your radio or your area, or there is a tool you wish existed, let me know. 73, Kris KZ7K
Related reading: Getting Licensed: A Beginner’s Path Into Ham Radio · Building Your First Ham Radio Station · Emergency Communications and Preparedness · The Tools page