
Part of our Getting On The Air: Modes, Operations, and Making Contacts guide.
If you operate FT8, FT4, or any of the other digital modes, you have probably run into the same problem every ham eventually hits. You have got four or five programs that all need to talk to each other, and getting them to actually cooperate feels harder than working the DX. This guide walks through installing Ham Radio Deluxe (HRD), WSJT-X, GridTracker, and TQSL, and then wiring them together so a single QSO flows automatically into your log, LoTW, QRZ, and PSK Reporter without you touching a thing after you hit Enter.
The order matters
Install these in this sequence: TQSL first, then WSJT-X, then HRD, then GridTracker. TQSL needs to be set up before anything else because both HRD and GridTracker will ask for your LoTW station location and certificate during their own setup, and it is much less frustrating if that is already done.
1. Installing TQSL
TQSL (Trusted QSL) is the ARRL’s signing tool for Logbook of the World. Nothing gets into LoTW without going through it first, which is worth understanding on its own if you have not read our QSLing and Awards 101 rundown of paper cards, LoTW, eQSL, and DXCC.
- Download TQSL from the ARRL’s LoTW page (arrl.org/lotw) and run the installer.
- On first launch, it will prompt you to either request a new certificate for your callsign or import one you already have.
- If you are new to LoTW, request a certificate. The ARRL will mail or email you a confirmation code, and you will use that to finish activating it in TQSL. This can take a few days if it comes by postal mail, so do this step early.
- Once your certificate is active, add a Station Location in TQSL. This is where you enter your grid square, and it is the record that gets attached to every QSO you upload. Name it something simple like “Home” since you will reference it later in GridTracker and HRD.
- Set TQSL’s preferences to remember your password if you want uploads to happen without a prompt every time (Preferences, then check the box for saving the password). This matters later when GridTracker is pushing QSOs automatically in the background.
2. Installing WSJT-X

WSJT-X is the actual mode engine, decoding and encoding FT8, FT4, JT65, and the rest.
- Download the installer for your OS from the WSJT-X site and run it.
- On first launch, go to File, then Settings, and fill in the General tab with your callsign and grid square.
- Under the Radio tab, you can select HRD / Ham Radio Deluxe since HRD will handle CAT control, or configure it directly if you are not using HRD as the CAT hub.
- Under Audio, select the input and output devices that correspond to your radio’s USB soundcard or external interface.
- Under Reporting, this is the important one: check “Enable PSK Reporter Spotting” only if you do not plan to have GridTracker do that job, since you do not want duplicate spots going out. Also confirm the UDP Server is set to 127.0.0.1 with port 2237 (the default), and check “Accept UDP requests” if you want other apps to be able to send commands back to WSJT-X.
3. Installing Ham Radio Deluxe (HRD)
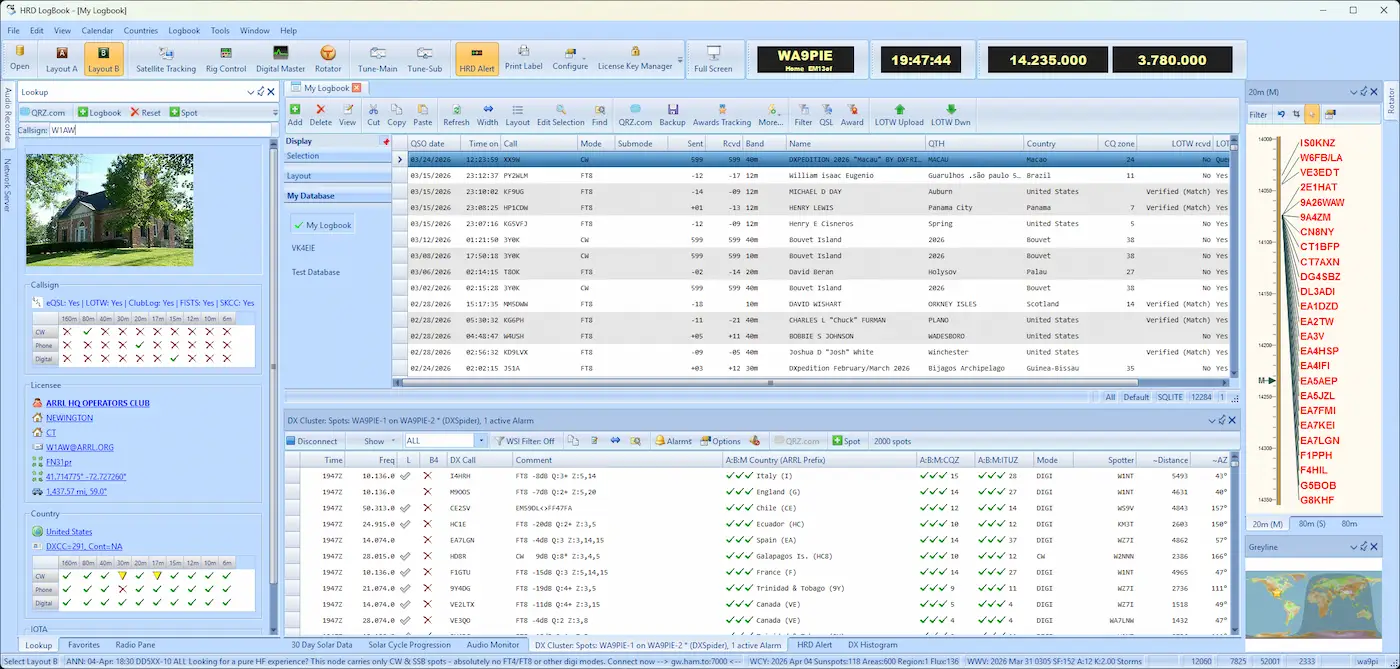
HRD is doing two jobs in this setup: logging (as your primary or backup log, depending on your preference) and CAT control, meaning it talks to the radio directly and lets other programs share that connection instead of everyone fighting over the same serial port.
- Download the full suite installer from hamradiodeluxe.com and install HRD, Logbook, and DM780 together, even if you only plan to actively use HRD and Logbook.
- Launch HRD and connect to your radio: select your rig model, the correct COM port, and baud rate to match your radio’s CAT settings. Confirm you get a live connection (frequency and mode should update in real time).
- Open HRD Logbook and set up a new database, or import an existing ADIF log if you are migrating from another program.
- The key feature to enable here is HRD’s rig control sharing. In HRD’s Radio Control window, there is a setting that lets HRD act as a “server” for other applications, meaning WSJT-X can connect to HRD instead of connecting to the physical COM port directly. This is what lets you run WSJT-X and HRD at the same time without a “port already in use” error.
4. Installing GridTracker
GridTracker is the piece that turns your shack into a real time operation: it maps every station you work and hear, and pushes completed QSOs out to the logging services automatically.
- Download GridTracker from gridtracker.org (it is free, though donations are appreciated) and install it.
- On first launch, GridTracker will ask where WSJT-X is sending its UDP data. Since WSJT-X is set to 127.0.0.1:2237 by default, GridTracker should pick it up automatically as long as the ports match on both ends.
- In GridTracker’s settings, enter your TQSL station location, your LoTW username, your QRZ login or QRZ API key, and enable PSK Reporter if WSJT-X is not already doing it.
- Set your grid square and callsign here too, so the map and awards tracking line up correctly with what WSJT-X is reporting.
5. Using GridTracker for real time uploads
Once GridTracker sees WSJT-X’s UDP stream, it will pick up every logged QSO the moment you log it in WSJT-X. From there, GridTracker handles the rest automatically:
- LoTW: GridTracker calls TQSL in the background to sign and upload each QSO, so you do not have to manually export and import ADIF files.
- QRZ: With your API key entered, each QSO gets pushed straight to your QRZ logbook. See our comparison of QRZ Logbook, Club Log, and HAMRS if you are weighing cloud logging options.
- PSK Reporter: GridTracker reports your received and transmitted signals in real time, which also feeds its live propagation map.
Check GridTracker’s log window periodically at first to confirm uploads are succeeding rather than silently failing. An expired TQSL password cache or a bad QRZ key are the usual culprits.
6. Using HRD as a backup and bridge
Since HRD is also listening to WSJT-X’s UDP broadcasts, it logs every QSO into HRD Logbook independently of GridTracker. This gives you a second, local copy of your log that does not depend on any cloud service being reachable. For more on why this kind of redundancy matters, see Logging Software: Why It Ties Your Whole Station Together.
HRD Logbook can also forward or export to services GridTracker does not directly support, like eQSL or Club Log, either through built in log-forwarding rules or by exporting ADIF batches. Think of HRD as your safety net: if GridTracker’s upload to one service hiccups, HRD’s log is sitting there as a complete, independent record you can always re-export from.
7. Getting everything to sync
Here is the full data flow once all four pieces are configured:
- Your radio connects to HRD over CAT (serial or USB).
- HRD shares that CAT connection out to WSJT-X, so WSJT-X can control frequency and mode without needing its own direct line to the radio.
- WSJT-X decodes traffic and, when you log a QSO, broadcasts that QSO as a UDP packet on your PC (127.0.0.1:2237 by default).
- GridTracker and HRD Logbook both listen on that same UDP port and receive the QSO simultaneously.
- GridTracker takes its copy and pushes it out to LoTW (via TQSL), QRZ, and PSK Reporter automatically.
- HRD Logbook keeps its own local copy as your backup, and can forward it elsewhere if needed.
A quick sync checklist to run through once everything is installed: confirm WSJT-X’s Radio tab points at HRD’s shared connection rather than a COM port that is already in use, confirm the UDP address and port match between WSJT-X and GridTracker, confirm TQSL has your password cached, confirm your QRZ API key is active, and then log a test QSO and check that it shows up in GridTracker’s map, your QRZ logbook, and HRD Logbook all at once.
Once that checklist passes, you are done. Every contact you make gets logged locally, backed up in HRD, and pushed out to the wider ham community in real time, all from one click in WSJT-X.
If keeping this stack of four programs synced sounds like more plumbing than you want to maintain, I reviewed Nexus, a free open-source program that tries to fold WSJT-X, GridTracker, and your logging into one app while still staying UDP-compatible with the setup above.